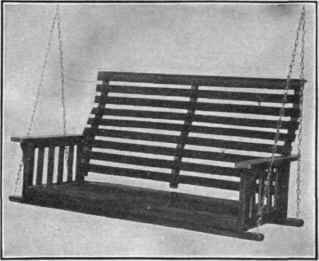
Porch Swing
Description
This section is from the book "Shop Projects Based On Community Problems", by Myron G. Burton. Also available from Amazon: Shop Projects Based on Community Problems.
Porch Swing
Materials
Oak (Chap. III., Par. 29).
14 pcs. 3/8"xl 7/8"x3' 6" Slats.
7 pcs. 3/8"xl 7/8"x3' 8" Slats.
8 pes. 3/8"xl 7/8"x 8" Arm slats.
6 pcs. 7/8"x3"x 24" Arm and curved back pieces.
2 pcs. 7/8x1 1/4"x 17" Upper arm pieces.
2 pcs. 7/8"x2"x 17" Lower arm pieces.
4 pcs. 1-1/16"x2"x 11" Arm supports.
2 pes. 1 1/8"x2 1/4"x4' 3" Sills.
4 pes. 7/8"x2"x 22" Bottom supports.
1 Set chains. 36-6d fin. nails.
4-1 1/2" No. 10 screws, oval head. 15 dozen 1 1/4" No. 16 oval-headed hobnails.
2 dozen 3/4" No. 17 wire brads.
18-1/2" corrugated nails. 4 eye bolts. 2 ceiling hooks. 2 No. 5 screw eyes. 6-1/4"x2 1/2" carriage bolts. 2-1/4"x31/2" carriage bolts.
Introductory Statement
In planning a porch swing one of the most important features is that it shall be comfortable; it should also be attractive and so constructed as to be durable.
The design given in this lesson has been used by one of the largest swing manufacturing concerns in the country for a number of years and it has proven to be correct in every detail. You will observe that the sills are especially heavy and that the swing is so hung as to throw the weight upon these sills.
References:
Outdoor Furniture, Good Housekeeping Magazine, June, 1914. Simple Rustic Work, Louis Suead. Harper's Bazaar, May, 1912. Garden Furniture, The Craftsman Magazine, June, 1913.
Porch Swing
Suggestions For Original Design
Foot Rest
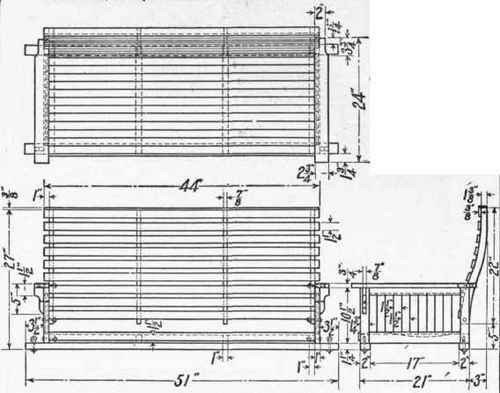
Porch Swing Specifications
The Sills
Plane the sills perfectly square and smooth and cut them the length shown in the drawing.
The Bottom
Cut the four bottom supports the proper length. You will notice, from the dotted lines shown in the end view, that the supports are to be curved on the top side. Lay out this curve freehand and cut it out with the drawing knife. Do not curve these pieces too deeply, or it will weaken them. Nail these bottom supports upon the sills in their proper position. These pieces are to be covered with slats, placed side by side, making a solid bottom.
The Arms
Notice that the bottom and top arm rails are to be plowed to receive the slats. This can be done with the grooving side of your matching plane. If the plane does not cut the opening wide enough, you might lay it out with the marking gauge, and cut it wider with the chisel. Cut the arms the desired length, and assemble them with corrugated nails. Space the slats properly, and fasten with nails at the bottom and top in the cross rails.
The Back
Notice that the back pieces are curved. This is to give them the proper shape to make a comfortable seat. Lay out these curves free-hand, and cut out one of the pieces. Use this one for a pattern; cut the others exactly like it. Assemble by nailing the slats in position. Observe that these slats are not put closely together, as in the bottom, but they are spread as shown in the drawing.
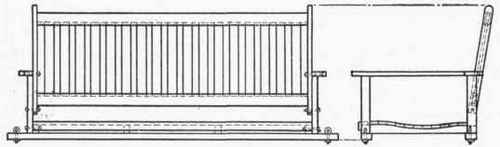
Assembling
The arms are to be fastened to the bottom by means of bolts. The back is fastened in position by means of bolts through the arms. The arms are nailed through into the bottom supports, and are also bolted to the back.
Lay out the brackets free-hand and saw them out with a compass saw. These brackets are to be fastened in position under the arms with screws. Insert the eye bolts in the ends of the sills.
The swing is to be hung with the chain fastened through the screw eyes. The small anchor chain is fastened to the back to prevent tipping over.
Finishing
When the swing is all assembled, go over and examine it carefully to see that there are no rough places or nails extending. Make sure that it is perfectly smooth all over and give it a coating of stain. You must use a good grade of stain, as it is exposed to the weather; it must have a good quality of oil stain which will neither rub off nor fade.
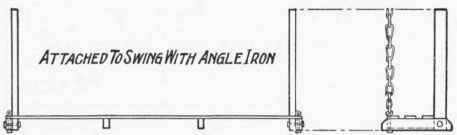
In the Suggestions there are some ideas for a swing of a little easier construction; however, you will note that this swing would not be so comfortable on account of the back being perfectly straight. The suggestion for a foot rest is a very excellent one. This foot rest can be attached to any swing; it is to be fastened to the front sill by means of two heavy angle irons.
Optional and Home Projects Employing Similar Principles.
Porch Chair
1. The plan of construction used in this porch swing can be very readily modified, so as to provide an excellent porch chair. The back and seat need not be changed, except in length. Some plan should be devised to provide suitable legs securely braced.
Porch Rocker
2. The porch chair may be easily converted into a porch rocker with the addition of suitable rockers.
Lawn Seat
3. A lawn seat may be constructed on a plan almost identical with the porch swing. Rustic seats are especially suitable for lawns and parks. The general idea for such a seat may be gathered from the principles and proportions presented in this lesson.
Continue to:
My Books

