Automobile Creeper
Description
This section is from the book "Shop Projects Based On Community Problems", by Myron G. Burton. Also available from Amazon: Shop Projects Based on Community Problems.
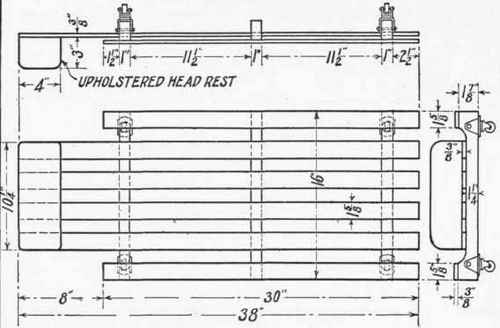
Automobile Creeper

Materials
Oak (Chap. III., Par. 29).
4 pcs. 3/8"xl 7/8"x38" Slats, hard wood.
2 pcs. 3/8"xl 7/8"x30" Slats, hard wood.
3 pes. 7/8"x2"xl6" Cross pieces, hard wood. 1 pc. 7/8"x4"xl0" Head piece, soft wood.
4 dozen 6d box nails. 30" gimp. l 1/2 dozen 8-oz. tacks. 12 uph. nails.
1 set castors. Enameled muslin, 10"xl5".
4-3/16"xl 1/4" stove bolts. 8 screws, 3/4" No. 8.
Introductory Statement
People who have had any experience with automobiles know that it is sometimes necessary to get under the car to do some sort of cleaning, adjusting or repair work. This is always an inconvenient and unpleasant task, not only because it is uncomfortable, but because it soils one's clothes so badly.
This "automobile creeper" furnishes a very handy solution to the problem of providing a way to get under a car easily and quickly with least damage to the clothing.
It is not the intention to make this a piece of cabinet construction, but nevertheless it should be accurately laid out and carefully executed. Because a piece of work is to be used at the barn or garage is no reason why it may be incorrectly or carelessly constructed.
References:
Automobile Handbook, Elliott Brookes. Fredrick Drake Co., Chicago. Automobile Catechism and Repair Manual, Swingle. Fredrick Drake
Co., Chicago. Care and Operation of Automobiles, Hall. Am. Tech. Society, Chicago. The Gasoline Automobile, Longheed and Hall. Am. Tech. Society, Chicago.
Automobile Creeper
Suggestions For Original Design
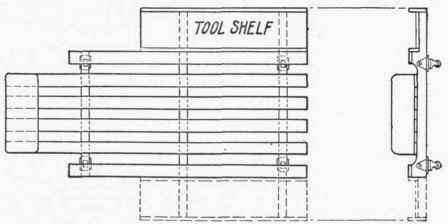
Tool Shelf Either Side Or Both
Automobile Creeper Specifications
Bottom Cross Pieces
Square the stock for the bottom cross pieces (Chapter II., Paragraphs 2, 3 and 4). From the end view you will notice that these pieces are to be curved out on the top edge to receive the slats. Cut them the required length; lay out one and saw it out with a compass saw; smooth with a wood file; use this one for a pattern, lay out and make the others just like it.
The Slats
Square the stock (Chapter II., Paragraphs 2, 3 and 4) and make the slats the dimensions shown in the drawing.
The Head Rest
The head rest is to have a solid wood base upholstered with enameled muslin. Plane out this wood block for the base a little less than the dimensions shown in the drawing. Upholster it neatly, covering it with enameled muslin; it may be padded with excelsior or cotton batting, whichever is most convenient. Trim with gimp and upholstering nails.
Assembling
Space the bottom cross braces properly, nail the slats in position; make sure they are square with the cross braces.
Fasten the upholstered head rest in position with screws or nails from the bottom side of the slat into the wood base of the rest.
Attach the castors to the bottom cross rails, as shown in the drawing. These castors are to be fastened with stove bolts.
Finishing
Finish with a coat of good oil stain (Chapter IV., Paragraph 54). A good coat of shellac or hard varnish will keep the stain from rubbing off.
Optional and Home Projects Employing Similar Principles.
Automobile Creeper With Tool Shelf
1. In the suggestions will be found an idea for adding a shelf for the purpose of holding tools. This shelf may be added on either side of the creeper; if desired two shelves may be used, one on each side.
Continue to:
My Books

