End Half-Lap Joint
Description
This section is from the book "Shop Projects Based On Community Problems", by Myron G. Burton. Also available from Amazon: Shop Projects Based on Community Problems.
End Half-Lap Joint
Paragraph 63. The end half-lap joint is very similar to the crosslap joint. It takes its name from the fact that the material is cut in such a form that one piece laps over the other.
This joint is used in various kinds of frame construction. It is occasionally used in the making of cheap door frames or window screens. This joint is also sometimes used in making the corners of sill construction in small buildings.
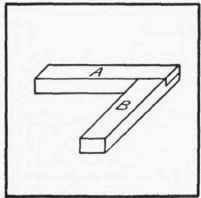
Figure 48.
To Lay Out The End Half-Lap Joint
See that both pieces of material are perfectly square on all sides and on the ends which are to form the joints. Square a line across the face of piece A as far from the end as the width of piece B. Square this line down on each edge of piece A. With the marking gauge set to one-half the thickness of the piece, gauge the depth which the lap is to be cut. Gauge on both sides and across the end. With the back saw, saw down to the gauge line. Place the material in the vise and rip out this corner. When the first piece is finished (it should be carefully smoothed with a sharp chisel) lay it on piece B, and with the sharp point of a knife indicate on the working face where the line is to be squared across. Square this line down on both edges. With the marking gauge set at the same depth as it was when piece A was laid out, lay out the depth which the lap is to be cut in B. Bear in mind that the amount of material left on in B must be sufficient to fill the opening cut in A. For that reason the marking gauge must be used, not from the side from which the gain is to be cut, but from the opposite side. Gauge on both edges and the end. Saw out this lap in the same manner as you did in A. Carefully smooth with a sharp chisel. Assemble with glue or with nails or screws as the nature of the work may demand.
Continue to:
My Books

