


Tables "With Turned Legs
Description
This section is from the book "Things To Make In Your Home Workshop", by Arthur Wakeling. Also available from Amazon: Things to Make in Your Home Workshop.
Tables "With Turned Legs
In no other way can you turn your wood turning to better advantage than in making legs for decorative tables. Rarely has a home too many small tables; there is always room for a graceful occasional table like that illustrated in Fig. 39 or a book-trough end table such as is shown in Fig. 40.
The occasional table with its folding top may be used, as its name implies, for different purposes and in a room with almost any type of furniture. When folded, it takes up the minimum space but still remains an ornament. Because of its adaptability, it is particularly suited to modern requirements.
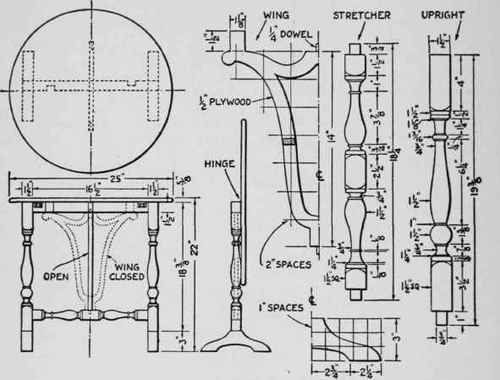
Fig. 38. - Front, top, and end views of the occasional table, and details of the uprights, feet, stretcher and wing.
Three turned parts are required: two uprights exactly alike, which are glued into the feet, and one stretcher connecting them (Fig. 38). The uprights have two square parts and the stretcher three. As to the method of turning, refer to the directions given for the footstool. After those portions which are to be turned are finished and the cuts at the square parts have been made, round the corners slightly with a skew chisel held flat on the T-rest. Lay off the distance of the rounding - about 3/8 in. - by squaring lines on all sides of the square pieces.
Proceed cautiously with the cutting as shown in one of the views of Fig. 42.
A plain square rail, the same length as the stretcher, is used between the legs at the top. The joints may be made with either dowels or mortises and tenons. To this upper rail the top is hinged. Between the rail and the stretcher is pivoted the winglike table top support. Notches are cut on opposite sides of the rail to receive the projections at the upper part of the wing when it is turned parallel to the rail. The wing support is cut from ½- or 3/8-in. plywood and a ¼-in. dowel is glued into each end to enter corresponding holes in the centers of the top rail and the stretcher. If desired, an additional turned rod may be inserted in the wing as suggested in Fig. 39. Obviously, the wing must be put in place before the table is glued together. If, for the sake of simplicity, it is desired to omit the wing, a table catch may be bought and fastened to the underside of the top in such a way as to lock the top to the upper rail when the top is in the horizontal position.
A line of inlay near the edge of the top and an insert in the center will add to the decorative quality of the table if it is to be stained and varnished. Similarly, an art transfer (decalcomania) can be used in the center of the top if the table is finished with brushing lacquer or enamel.

Fig. 39. - When tilted down, the top of this little occasional table is supported by a graceful pivoted wing.
The end table, Figs. 40, 41, and 42, requires the turning of four legs. Care must be taken to have them exactly alike. In making the ornamental book-trough end pieces, it is well to square them and cut the dadoes (grooves) before shaping the edges. Remember to plane and sandpaper the two boards which form the trough before laying out the dadoes into which they are to fit, so as to insure tight, workmanlike joints.
The shaped ends, as well as the upper rails, may be joined to the legs with dowels. Glue up the two ends of the table separately. When the glue is dry, complete the assembly of the framework by joining the two ends, the two long rails, and the two book-trough boards.
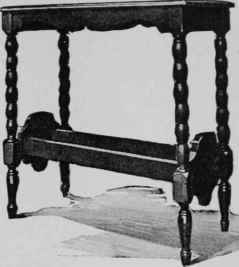
Fig. 40. - Book-trough end table made of maple and stained a rich antique amber color.
The top is fastened by means of cleats about 7/8 in. square, screwed to the inside of the rails flush with their upper edges.
The choice of lumber and of the finish for both these projects is a matter of individual preference. The end table illustrated in Fig. 40 was made of maple and given an amber stain to imitate the color of antique maple. The stain was followed by a thin coat of shellac, which, when dry, was rubbed with No. 00 steel wool. A coat of clear brushing lacquer was next applied, and this was rubbed smooth with powdered pumice stone and crude oil. A coat of liquid wax was finally applied and rubbed to a soft sheen. The result was perfect.
Materials For Tables
No. Pcs. | T. | w. | L. | Part |
For Occasional Table | ||||
2 | 1½ | 1½ | 19 3/8 | Legs |
2 | 1½ | 1½ | 18¼ | Stretchers (plain and turned) |
2 | 1½ | 3 | 10 | Feet |
1 | ½ | 14 | 14 | Support |
1 | 5/8 | 25 | 25 | Top |
1 pair | 2 | Fast joint butt hinges | ||
Tor End Table | ||||
4 | 1½ | 1½ | 26¼ | Legs |
2 | ¾ | 2½ | 10 | Rails |
2 | ¾ | 2½ | 24 | Rails |
1 | ¾ | 13 | 27 | Top |
2 | ¾ | 8½ | 8 | Sidepieces |
1 | ½ | 4 | 24 | Trough |
1 | ½ | 4½ | 24 | Trough |
All dimensions are in inches. | ||||

Fig. 41. - Looking down on the inlaid top of the end table. The wood is bird's-eye maple, beautifully figured.
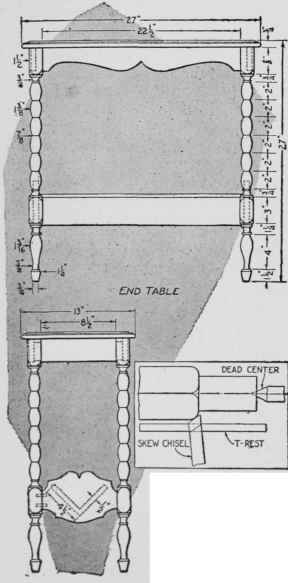
Fig. 42. - Front and end view of the book-trough table, and a diagram showing how the corners of the squared parts of the legs are rounded with a skew chisel.
Continue to:


My Books

