


Birds And Animals
Description
This section is from the book "Things To Make In Your Home Workshop", by Arthur Wakeling. Also available from Amazon: Things to Make in Your Home Workshop.
Birds And Animals
Toy making is not difficult. It may be done quite as well by women and girls as by men and boys. In fact, very few of those who have never attempted the work realize how simple it is to construct attractive toys - toys that will give keen and lasting delight to the children who receive them.
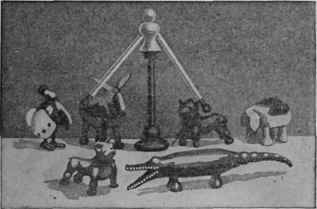
Fig. 21. - Some toys from the collection of F.
Clarke Hughes, who is a specialist in their design and construction.
About the only equipment necessary for making many little toys are a coping (fret or bracket) saw, a jackknife, a hammer, and a rule. While other tools are sometimes needed and are always useful, they are not essential. Do not, therefore, let the lack of tools or a bench prevent you from beginning.
Once you have fallen under the fascination of the work and discovered what fun there is in making toys, you will delight in adding new tools to your kit, and in a short time you will have a home workshop equipped for much more ambitious undertakings.
The subject of tools cannot be dismissed without mentioning a lathe. Indeed, for many of the spindle toys so much in vogue these days, a wood turning lathe is the thing to use. Those who become thoroughly interested in toy making will want to have a lathe sooner or later, but in the beginning it is usually possible to devise a substitute tool process or change the design of the toy so that turning is not required.

Fig. 22. - Well-designed wooden animal toys are more popular to-day than ever, and making them is great fun.
In cutting out practically all of the toys illustrated in Figs. 21 to 26, an ordinary coping saw is sufficient. These saws may be purchased at hardware stores and are among the most inexpensive of tools. A supply of extra coping saw blades should be obtained; they, too, are cheap, so that the breaking of them, which is bound to happen now and then, is a small matter.
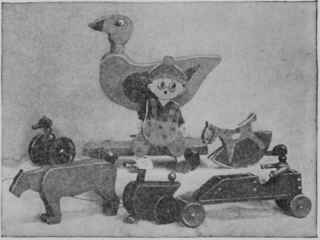
Fig. 23. - "Cute" may justly be used to describe some of these brilliant and charming little toys.
The correct method of using a coping saw is illustrated in Fig. 24. Boards as heavy as 1 in. in thickness, if of white pine, bass wood or any soft wood, may be sawed quite easily in this way.
In Fig. 26 are shown a number of animal forms that were drawn especially for wooden toys. These may be enlarged and used as patterns for toys of many types and sizes.4

Fig. 24. - Left: One- and three-piece toys and several types of bases; how to cut tin-forms with a coping saw. Right: Wheel construction at a glance; various hubs, decorations, and methods of mounting.
Decide first to what size you wish to enlarge the toy. Draw on a piece of stiff paper or thin cardboard the same number of squares as appear over the outline you intend to copy, but make the squares proportionately larger. In each square draw whatever appears on the corresponding but much smaller square in Fig. 26, so that you will obtain an exact enlargement of the original drawing. The elephant, for instance, is 7½ in. long over all and 5½ in. high; the pelican is 7 in. long and 5½ in. high; the puppy dog is 4 1/2 by 5 in., and the others are of corresponding proportions. There is enough variety to keep you busy for weeks.
From the full size drawings you can transfer whatever designs you wish on the wood by means of typewriter carbon paper. Another method, which is quicker if you intend to make a quantity of the toys or have the children help with the work, is to paste the various designs on bristol board or tough, thin cardboard and then cut them out so that they can be used as templates to trace around.
4Full size drawings of a number of bird and animal toys are given in BLUEPRINT No. 56, listed in the Appendix.
Attention is called to the character of most of these forms, with their simple lines and large feet. If these forms had not been changed in this way the smaller parts would split when cut from wood. Tails in most cases should be removed entirely when sawing and leather or twine substituted.
It will be noticed also that all of the illustrations of birds in Fig. 26 show only one leg; and of the animals, only the cow has all four legs. This simplification, if the toys are cut from one piece of wood, makes the work easier and the result more satisfactory from the standpoint of durability.
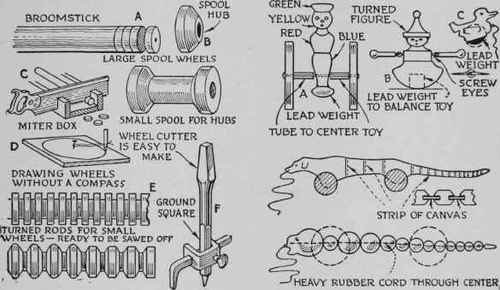
Fig. 25. - Left: Broomsticks and spools as used for wheels; methods of turning wheels; a wheel cutter. Right: Toys weighted so as always to remain upright; "wiggle" toys with jointed bodies.
You are not limited to these designs. Many pictures of animals may be found in books, magazines and newspapers, and these may be made adaptable to wooden toys if simplified in the light of the designs shown.
If a toy is to be cut from plain boards, the grain of the wood must be considered and made to run in the direction best serving to strengthen the weaker parts. The different drawings in Fig. 26 have arrows to indicate the direction in which the grain of the wood should run. If three-ply wood is used, the grain usually can be ignored.
What thickness of wood to select depends upon the size of the toy, the form of construction, and, to a lesser degree, upon the kind of wood. Three-ply parts can be thinner than those of solid wood.
An elephant made the size shown should be ¾ in. thick if a single piece, and 5/16 or 3/8 in. thick if in three parts. The cow, cat and donkey should be ½ in. thick if single and 5/16 in. if in three pieces. The birds and fowl may all be ½ in. thick.
The duck can be made into an especially attractive toy if cut from ¾ in. thick stock with the head separate and loosely doweled in place so that it will turn. The puppy looks best if ¾ in. thick.
After the toy has been cut to shape and smoothed with a bit of sandpaper, the kind and style of base should be carefully considered, because the base has much to do with the general attractiveness of the finished article. Each individual toy seems to call for a special type of base and the form should be studied with this in mind. Some toys look best on a round base, others need a square base.
If wheels are to be used on the base, the size of the wheels should be considered in relation to the width of the base. As a general rule, the width of the base should equal about one half the height of the toy.

Fig. 20. - Outlines of bird and animal toys on Squares to facilitate enlarging them.
In Fig. 24 are shown a number of bases. A and B arc removable. In the case of smaller animals for a Noah's Ark and other collective groups, a small cardboard disk glued to the foot is sufficient.
Wooden animals may be made up in a single piece, or in three sections nailed together, as in Fig. 24. For birds and fowls either a base is used or wheels with a counterbalance (Fig. 25).
Small wheels may be made from a broomstick or curtain rod as suggested in Fig. 25. A stop block placed in the miter box helps to keep the thickness uniform. Two styles of small turned wheels are shown.
In finding the center and drilling the holes in all of the wheels, care must be observed, or they will be one-sided. A jig with a fixed center can be devised to aid in drilling these centers.
If a washer cutter, such as used by steam fitters for cutting gaskets, is to be had, a very good set of wheels may be cut out, provided the wood does not exceed ½ in. in thickness. A satisfactory wheel or washer cutter may indeed be improvised as shown in Fig. 25. The shank is made from an old auger bit.
The larger wheels may be varied in appearance by using different hubs with a plain wheel, as shown in Fig. 24.
Among the newer wooden toys on the market are to be found some that are weighted so they always remain in an upright position. Figure 25 suggests how several of these little novelties are made. Beads sometimes may be used as spacers instead of tubes.
Other toys have one end hinged so that the other can be moved up and down by an eccentric in one of the axles as indicated in Fig. 24.
The jointed toy made in several sections and arranged to wiggle when it is drawn along is always interesting to the children and quite simple in construction, as shown in Fig. 25.
The main points in successful toy making are simple lines, solid construction, and clear, bright colors.
For the smaller toys the gloss paints, carriage or auto enamels and colored lacquers are satisfactory.
Continue to:


My Books

