Turned And Inlaid Trays
Description
This section is from the book "Things To Make In Your Home Workshop", by Arthur Wakeling. Also available from Amazon: Things to Make in Your Home Workshop.
Turned And Inlaid Trays
In turning and inlaying trays, the tool processes involved are only a step in advance of those previously described.
The tray illustrated in Fig. 57 at A is turned from a solid circular disk not less than 1 1/8 in. thick and 6¼ in. in diameter. A circle 6¼ in. in diameter is scribed on the wood with a pair of dividers. The wood is then sawed as nearly round as possible and screwed to a faceplate.
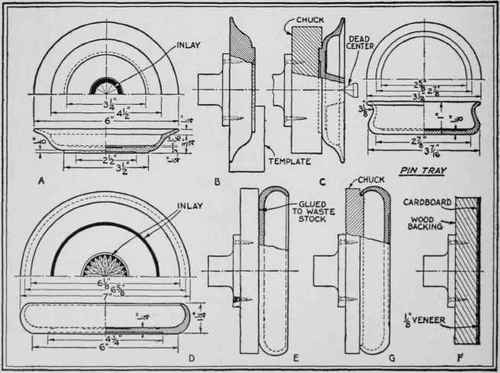
Fig. 57. - A tray with an inlaid ornament (.4) and how it is turned (B and C) ; a tray with an addi tlonal line or band of inlay (D, E, F, and G) ; and a design for a pin tray.
Its outside shape is first turned. For this work it is advisable to use a template of cardboard or thin wood such as shown at B. If it is to be guided properly, the template should bear against a flat surface - in this case the underside of the tray. The recess in this surface is therefore cut after the outside shape of the tray has been completed. Obviously, the purpose of this bottom recess is to make the tray stand well on a flat surface.
The tray is now unscrewed from the faceplate and chucked as at C. It is well to support it during the hollowing-out process by running the dead center up against it. When the tray has been hollowed to the extent shown at C, the tail-stock is moved out of the way and the central part turned down level with the rest of the bottom.
On the half plan at A is shown a circular inset, which is inlaid in the bottom of the tray. Such insets are sold by manufacturers of marquetry and are inexpensive. They are made up of many separate small pieces of wood about 1/26 in. thick, which are glued to a piece of brown paper. A piece of veneer surrounds the inset for protection; it should be carefully cut away with a pocketknife.
A shallow recess of the correct diameter to receive the inset is cut with a skew chisel in the bottom of the tray. The inset is glued into this recess face down, that is, with the papered surface towards the top of the tray. If glue were applied to the papered surface, a good bond would not be made, because the paper might split and parts of the inset come loose.
The gluing may be done by clamping a block of wood over the inset, which should be allowed to dry for at least six hours. Then the bottom of the tray is faced off and sandpapered smooth. The brown paper is removed by this process and the inset now stands out clearly and beautifully.
The tray shown at D is turned by a process known as "gluing to waste stock." This is done as follows:
Turn a circular disk of the proper diameter and face it off very carefully, so that it is absolutely flat and level. Prepare the stock from which the tray is to be turned. Plane one of its surfaces true and level and saw the stock to the required diameter.
Glue the planed surface of the tray to the waste stock, but place a piece of paper between the two glued surfaces. In order to center the stock for the tray accurately, first glue the paper to the waste stock and then mark the diameter of the tray on this papered surface with a pencil. This is easily done while the waste stock is revolving in the lathe. Remove it from the lathe and glue and clamp the stock for the tray securely to it as shown in Fig. 58. When the glue is thoroughly dry, turn the tray as shown in Fig. 57 at E.
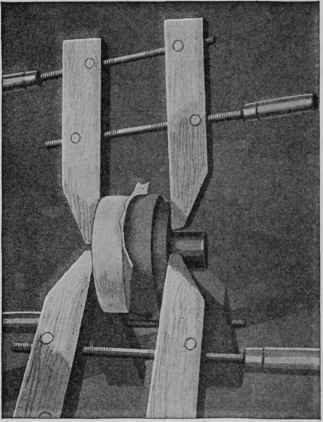
Fig. 58. - How the wood for a tray is glued to a piece of waste stock with a sheet of paper between, to facilitate splitting them apart.
Besides an inset in the center, which is inlaid in the manner described above, this tray also has a line inlay. Ordinary straight lines of inlay cannot be bent to form a circle of such a small diameter. This line is therefore turned from a piece of veneer in the form of a ring. To accomplish this, a piece of 1/8-in. veneer is glued to a circular disk, with a piece of cardboard between the disk and the veneer as at F. When the glue is dry a ring of the desired width and diameter is turned from the veneer. Use two pairs of dividers with very sharp points, one pair to mark the inside diameter of the ring, and the other pair to mark its outside diameter. Mark lightly, then cut on these lines with the toe of a very sharp ¼- in. skew chisel. The ring can now be separated from the cardboard layer.

Fig. 59. - Designs for a powder box and a jewel box, and how the lower part of each box is glued to waste stock to facilitate turning.
Mark the bottom of the tray without resetting the dividers, turn a recess for the ring, and glue it in place. When the glue is dry, face off and sandpaper the inlaid bottom, and then stain and polish the tray.
The tray is removed from the waste stock by driving a sharp chisel into the latter 1/16 in. back of the glue joint. This will cause the paper between the tray and the waste stock to split. The tray may now be chucked as shown at G for the purpose of cutting the recess on its underside. The chuck may be made from the waste stock.
A supplementary design for a pin tray, which is turned by the same method, is given in Fig. 57 for those who wish further practice in wood turning.
Continue to:
My Books

