


Play Screen
Description
This section is from the book "Things To Make In Your Home Workshop", by Arthur Wakeling. Also available from Amazon: Things to Make in Your Home Workshop.
Play Screen
A play screen that resembles a house and can be folded for storage when not in use makes a splendid addition to any child's toys.
As a school project, too, its construction is such that it makes an instructive problem; and it is almost indispensable as part of the kindergarten equipment.
To construct the screen (Figs. 19 and 20), any available lumber may be used, but much labor and time can be saved by purchasing 1 by 2 in. white pine in random lengths from a lumber or planing mill. If wall board is used to cover the framework, this can be ordered at the same time. Two sheets 4 by 10 ft. must be purchased, although only one and a half sheets are needed.
Cut the wall board into four pieces, each 4 by 5 ft. Then cut pieces of wood to length for the outside frame of each section, and glue and nail them to the wall board. All of those pieces arc placed even with the edge of the wall board except the bottom piece of the middle section, which is placed 1/8 in. from the edge. This is done to leave room for the band iron that is screwed in place later. The crosspieces forming the top of the door and the windows, the pieces under the windows, and the vertical pieces at the sides of the doors and windows, are fitted and glued and nailed in place in the order named. The three sections can be lightened considerably by covering the framework either with burlap or unbleached muslin instead of wall board. However, if this is done, it will be necessary to strengthen the frame. The corners will have to be mitered, lapped, or mortised and tenoned, and the other joints also mortised and tenoned. The covering should be lapped over the edge and tacked on the edge or the back.
3 Full size designs for tables, chairs, a couch, a hall clock, a bed and other furnishings are given in Blueprint No. 73, listed in the Appendix.
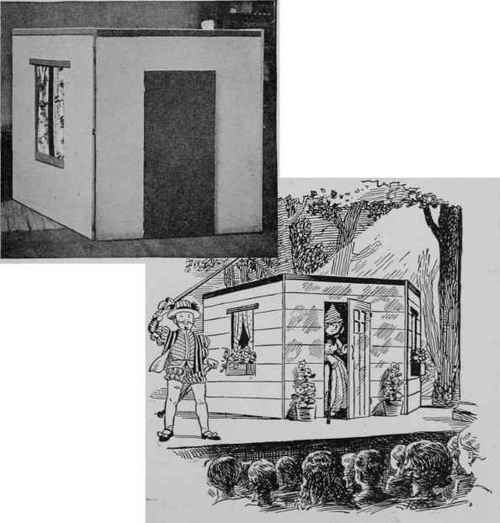
Fig. 19. - The screen may be used as a playhouse, as it appears above, or as scenery for children's plays, as suggested in the illustration at the right.

Fig. 20. - Assembly of the play screen showing front plan of the door and windows and scenerylike construction of the back members.
The frame for the door can be cut, glued, and nailed in place next. In sawing out the door, leave 1/8 in. on all sides for clearance when the door is fitted into position.
The braces shown in the corners are made from the short pieces of 1 by 2 in. stock left after the framework is made. They are cut in a miter box to about 6 in. long and are glued and nailed in place. The sections are allowed to stand overnight to give the glue a chance to set before cutting in the door and windows.
A scries of 1/8-in. holes are drilled in the two corners diagonally opposite each other in the two window openings and a keyhole saw used to start the cut, sawing close to the frame. After the cut is started it is easy to complete the sawing with a crosscut handsaw. The same method applies to the cut across the doorway. In sawing out the door, be sure to saw close to the pieces forming the doorway, leaving any surplus wall board on the door.
The center section has a piece of 1/8 by ¾ in. by 4 ft. band iron screwed to the bottom edge across the doorway to hold the two sides of the section rigid.
The door is to be hung with a pair of ornamental brass-plated hinges, although any available hinges or butts may be used. There are two stops glued and screwed to the inside on one side of the door frame to prevent the door from swinging in too far. A small wood button is screwed to the outside of the frame to keep the door closed when the screen is folded for storage. A small knob is also added to the outside of the door.
The three sections are hinged together with double-acting screen hinges to allow for the proper opening and folding of the screen.
The effects possible through decoration are unlimited. The screen can be painted to harmonize with any desired color scheme. The door frame and the window frames can be painted in a darker color to give a realistic effect. Another possibility is to paint bricks, shingles, or weather boarding on the walls. Small flower boxes for the outside of the windows and cretonne curtains on the inside of the windows give a pleasing effect.
The colors of the paint, cretonne, and other decorations are necessarily left to the individual taste of the builder of the screen. With a little thought and planning a realistic and attractive effect can be obtained.
Continue to:


My Books

