


Colonial Doll's House. Continued
Description
This section is from the book "Things To Make In Your Home Workshop", by Arthur Wakeling. Also available from Amazon: Things to Make in Your Home Workshop.
Colonial Doll's House. Continued
The balustrades are made of match sticks glued between a top and bottom rail. The newel post may be a clothespin or a round penholder.
When all of the small details are in place and the walls tinted, the three sections shown in Fig. 14 may be assembled, using ¾-in. flat-head screws. The front and back should be screwed in place at this time and the two ends and roof hinged. One hinge on the roof will have to have an extension soldered to it to allow it to open out to the line of the chimney.
It is left to the reader as to what kind of roof he will use (see Fig. 17). Small shingles may be nailed or glued in place; they look well but take a great deal of time to construct. The divisions between the shingles may be represented by making grooves with the point of a nail set or a chisel. The same method may be used for lining the siding boards.

Fig. 16. - Left: A simple way to make the sash and doors. The latter vary in size, as can be seen by studying the drawings and photographs. Right: How the outside and inside casings are placed around the window openings.
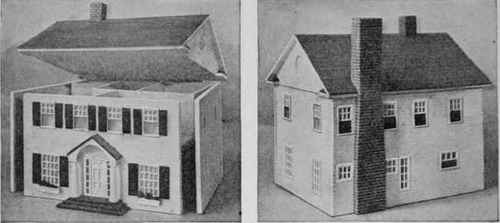
Fig. 17. - Left : Front view of the house showing how the roof section and the side walls are hinged to allow ready access to both upstairs and downstairs rooms. Right : A view of the house as seen from the rear.
The chimneys are made of solid blocks of wood and the bricks carved with a chisel or sharp knife.
The construction of the front entrance is shown in Fig. 12. The arch is shaped with the coping saw; the roof boards are made to match the main roof. The columns may be turned on a lathe or made square, or a small bracket may be used to support the sides of the roof.
The steps in front and at the side are merely three ½-in. sections fastened together and carved like the chimneys. The sunburst design over the door may be carved with a knife or carving chisel.
Making up the window sash is more tedious than difficult. A good sharp knife will be the greatest asset. The method is shown in Fig. 16. Tough and quite heavy cardboard should be used. When the sash are cut, they are glued to a piece of glass or celluloid of the same width and length. Each Bash should be made to fit its particular opening. The construction of the door also is shown in Fig. 16.
Small green shutters serve to brighten the appearance of the house and may be made easily. A piece of very thin wood with a simple design grooved in the outside face is all that is needed for each shutter. These pieces are nailed to the side of the windows.
Small window boxes - blocks with holes for the flowers - may be used under the windows. Pieces of sponges, colored like plants and shrubs and glued on top of the boxes, are quite effective.
Careful painting adds greatly to the attractiveness of the house; it is one of the most important items. The colors suggested (see Fig. 17) are green for roof and shutters, white for the body and doors and window sash, and red for the steps and chimneys. It is well to give the house two or three coats of paint or brushing lacquer.
The inside woodwork (Fig. 18) should be painted white along with the doors.
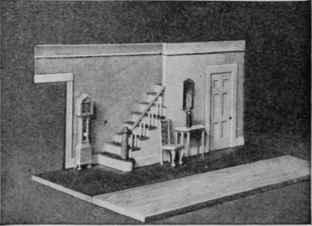
Fig. 18. - How the stairs are built and the hall is furnished with a miniature clock, table, chair, and mirror.
The floors may be stained or finished with clear varnish. Paper or tint the walls.
Furniture, bath and kitchen fixtures may be obtained ready made at the toy shops, where some substantial and well formed models are to be found. These should be of the proper size to match the house. It is more satisfactory, however, to make the pieces in the home shop.3
The porcelain fixtures for the bathroom and kitchen may be shaped or carved from solid wood to resemble as closely as possible the real pieces. These models are covered with a heavy layer of gesso made of glue and whiting and painted with white enamel to give them the resemblance of porcelain.
Continue to:


My Books

