


Projects For The Porch, Terrace, Lawn. Part 4
Description
This section is from the book "Do It Yourself With Aluminum. 125 Projects For The Home Craftsman", by G. W. Birdsall. Also available from Amazon: Do It Yourself With Aluminum.
Projects For The Porch, Terrace, Lawn. Part 4
Terrace Light (Fig. 12-17) is a modern design with simple lines. A 1/16" x 1" x 1" angle 12" long is riveted to a x 1" bar which is formed to hold the cone reflector 15" from the house as shown. A small length of 1/8" x 3/4" bar riveted inside the shade underneath the 1" bar clamps the lamp socket in position. Use armored BX conductor painted with aluminum paint to prevent rust and to match the light, or use heavy-duty flexible rubber conductor.
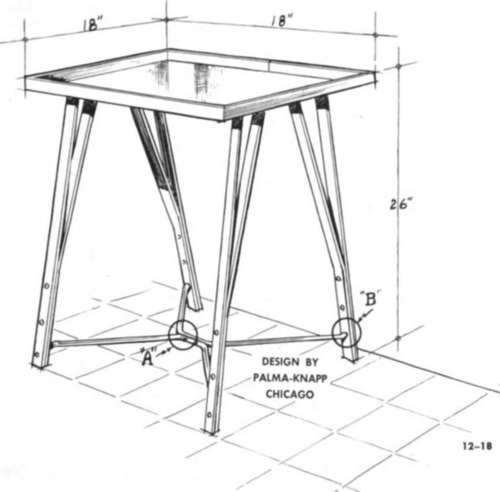
Lamp Stand (Fig. 12-18) uses top frame of 1/16" x 1" x 1" angle 6' long, bent at all four corners as in Fig. 4-37, and with the two ends butted together on the back side. Top panel is 1/2" plywood. Top ends of legs are bent flat and screwed against underside of top panel. Use enough screws for sturdy support. Make legs of 1/4" x 1" bar, and rivet lower 9" together as shown. Braces are 3/8" rod riveted together at "A" per Fig. 4-24. Braces are end-riveted to legs per Fig. 4-20. Cover top panel with glass, or cement sheet of embossed aluminum over it, per instructions at end of Chap. 4.
Desk Lamp (Fig. 12-19) uses 3/8" rod for the frame support. Dimensions and exact bend angles are not critical .... just follow the general idea of the illustration. For outdoor garden parties, make the shade large enough at the bottom to fit over a glass containing a candle. Or electrify the lamp with an electric socket and bulb. Use aluminum clothesline wire for frame of shade and oiled parchment for panels, which may be decorated with oil paints or left plain.
Garden Luminaire (Fig. 12-20) is easy to make, yet presents a highly attractive effect, since light source is below eye level if made 3' high with 18" shade. Others may prefer the larger size indicated. Shade is cone cut from plain or embossed sheet with lock seam at "A." See Fig. 4-5 for details. Electric lamp socket mounts on a 3/8" rod center support. Side supports are 3/4" tube, one of which carries the electric conductor up to the lamp. Attach shade to upper section of tube with sheet-metal self-tapping screws.


Use an aluminum nail about 21/4" long for the pin at "B." Bottom support is combination of vertical center rod and pointed ends of x 1" bar bolted to bottom of tube as shown.
Novelty Tables (Fig. 12-21) have many possibilities on porch or terrace, including the suggested grouping shown. These are individual triangular units, ideal for supporting potted plants or flowers, for use as seats, or as individual tables for serving tea, cocktails, or snacks. Cut three legs of 1/16" x 1" x 1" angle 18" long for each table. Sharpen the 90° included angle between faces to 60° by squeezing these legs judiciously in a vise as in Fig. 3-21
Next cut three 18" lengths of the same 1" angle for braces. Trim the horizontal face of each piece to a 30° angle at the end so it will fit inside the leg. Assemble to legs, putting two rivets into each end of each brace, with braces down 4" from top of legs.
Fig. 12-21.

Cut table top from 3/4" plywood, making equilateral triangles, 18" on a side. Attach legs to corners of table top with long wood screws or finishing nails. Finish table top before assembling to frame.
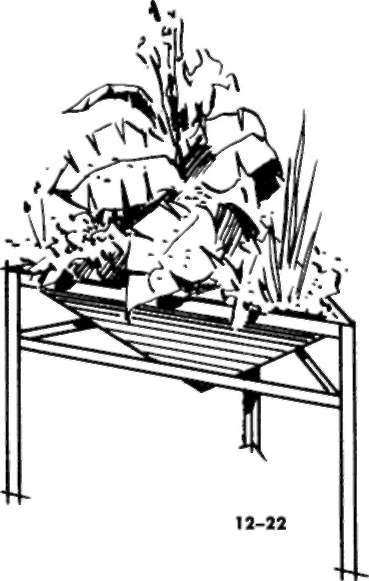
Novelty Planter (Fig. 12-22) is made exactly as the table (Fig. 12-21) except that the table top is replaced by another set of braces, riveted to the legs. Also legs should be 16" long, instead of 18".
The triangular pan (Fig. 12-23) is made from one piece of plain aluminum sheet. It measures 16" on a side around the top, and 16" from each corner to bottom of pan. On a square piece of sheet 18" x 18", mark diagonals from opposite corners. Notch corners and bend up a 1" flange all around. Now bend up along each diagonal to form the pan. One panel will be extra because only three of the four panels are needed for the pan. So cut off the fourth, leaving about 1" for a flange to overlap at "C." Thus "A" and "B" will be bends, "C" will be an overlapped joint which must now be riveted . . . . Make waterproof with mastic compound. Paint inside of planter with aluminum paint before riveting it inside the top frame.

Fig. 12-23.
Utility Table (Fig. 12-24) is ideal way to use a discarded solid door .... or any thick piece of wood large enough to make a table top. If nothing else is available, make table top from two or three thicknesses of 3/4" plywood, nailed or screwed together from the underside. Sand edge of table top smooth and apply a paste filler with a stain to produce a dark oak or mahogany; then varnish or finish in a flat black. Make size to suit your needs .... 18" x 36" or 42" for cocktail tables, 18" x 18" for general use.
Feature of this design is the 3/8" rod used for legs. Cut four 36" lengths. Make 2" radius bend 16" from one end in each tapping screws secure 18" lengths of brace on top of the plastic sheet to the cross braces underneath. See free instruction sheets in Do-It-Yourself Aluminum racks for details on constructing plastic storm sash.

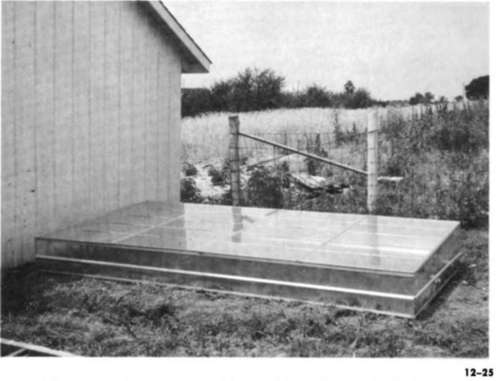
A 12' long panel of 5-V Crimp aluminum roofing is cut to provide the enclosing structure. Its 48" width is divided 12" for front, 18" for back with the remaining 18" cut in two lengthwise to provide the ends which are then cut down to 12" width at front, as shown in Fig. 12-25. Corners are joined by riveting to 12" and 18" lengths of 1/16" x 1" x 1" angle, which is also used to frame top edge of entire enclosure.
Hose Reel (Fig. 12-26) uses a 6' length of 1/4" x 1" bar for main frame and upper handle, bent into a "U" measuring 18" wide at top, 27" down each side. The brace holding the unit upright is another piece of 1" bar bent to a "U" measuring 18" wide, 12" down each leg. This brace is riveted to the first piece at slightly less place, leaving rods ends about 8" apart at tips. Drill vertical holes 2" in from each side and each end of table top to within 1/4" of upper surface of table. At a 45° angle and 6" in from these first four holes, drill another set of four . . . . drilling vertically in both cases.
Note outside member of each leg is vertical, inside portion at an angle. Drive the short member of each leg into the outside hole; the long member into the inside hole. Be sure to bend this member 3" from end so it will parallel short member and thus go into the vertically drilled hole. Now place the table top upside down on thin rug or a pad and force the rods into the holes, using a rubber mallet or a wood block and a hammer.
Cold Frame (Fig. 12-25) is extremely light .... one man can easily lift and move entire unit. Top is four separate panels, each measuring 3' x 5' made from Do-It-Yourself Aluminum screen section fitted with plastic sheet and cross braces spaced at 1' intervals. Sheet-metal selfthan a 90° angle so the reel will not tip over easily.
Continue to:


My Books

