


Projects For The Porch, Terrace, Lawn. Part 3
Description
This section is from the book "Do It Yourself With Aluminum. 125 Projects For The Home Craftsman", by G. W. Birdsall. Also available from Amazon: Do It Yourself With Aluminum.
Projects For The Porch, Terrace, Lawn. Part 3
Cocktail Table (Fig. 12-12) features two large shelves for magazines and a two-level design that adds an air of distinction. This large table should be used only in a good-sized room. End panels are 20" square, edged with 1/16" x 1" x 1" angle that is bent down 4" at a 60° angle both along front and back edges to the center 18"-long panel. A 6' angle will frame one end panel and extend down to the center panel. So three lengths will be required. All panels are 94" plywood finished in black lacquer or Nov-A-Ply with clear lacquer. Be sure to use splice plates to reinforce corners at "A," made per Fig. 4-37, and at "D."
Cut the four legs from 1" tube 16" long, and set top ends into 94" plywood blocks and into underside of end panels. See Fig. 4-57 and instructions for inserting legs. Slant legs out 10°. Brace legs with 3/8" rod extending full length of table and end-riveted at "C" per Fig. 4-21 and screwed against underside of center panel. Crossbars set 2" apart to form magazine rack under each end are also 3/8" rod end-riveted to long rods at "B" per Fig. 4-20.

Book Magazine Rack (Fig. 12-13) is an ideal unit for a porch or any outdoor area, as it is all-aluminum. Panel is 161/2" wide, 24" long, plus 4" turnup at front. Bend side frames from 94" tube as shown, and pin tube edgewise into 1/4" x 1" bar which frames the embossed sheet panel, using an aluminum nail at "B" and other contact points. Two reinforcing crossbars of 3/8" rod, 181/4" long, form a book-rest at back by end-riveting into tube frames at "A" per Fig. 4-21. Top bar is 4" above lower, which is 11/2" above panel. See Fig. 3-27 and accompanying instructions for tube bending.


Portable Barbecue (Fig. 12-14) makes an excellent unit for outdoor cooking. Make top frame of 1/16" x 1" x 1" angle with corners notched, bent, and reinforced with splice plates, per Fig. 4-37. Cut two 1/2" plywood end panels 10" x 18", and mount in frame. Cut embossed aluminum panel 18" x 36", and bend two 10" panels at each end. A third 10" panel in the center is depressed 3" below the other two panels as shown in the diagram. These are simple 90° bends, easy to make per Fig. 3-6. Place bent sheet on top of wood end panels, and cement in place per instructions at end of Chap. 4.
The grill is 3/8" rod spaced 2" apart and end-riveted to the sheet per Fig. 4-19. Do not place charcoal directly on aluminum sheet but on a piece of expanded steel mesh placed over the aluminum.
Lower frame and panel are also 18" x 30". Seal the wood panels before installing. Cement embossed sheet to upper panel surfaces. Use 3/4" tube for the end-framing with through bolts for connections to angle frames at "B." See Fig. 4-84 for wheel-axle details. See Fig. 3-27 and accompanying instructions for bending tube.
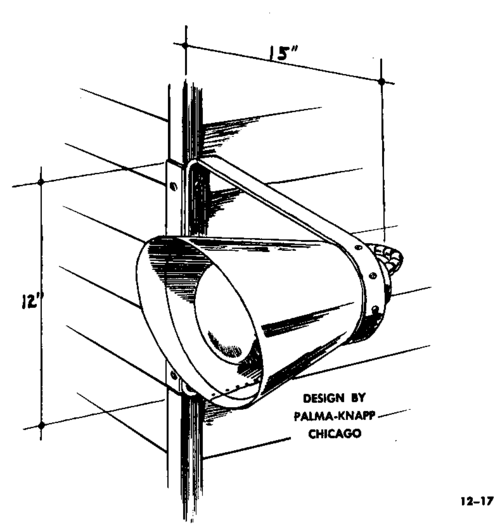
Outdoor Wall Lamp (Fig. 12-15) attached to the house adjoining the terrace makes an attractive lighting scheme possible .... especially with colored lamp bulbs. Bracket is 1/4" x 1" bar cut 14" long with 1" turned up at each end and drilled for 3/4" tube extending up to lamp socket. This is a 4" diameter wood block with a cone top as shown and hollowed out to take the lamp socket. Make lamp shade of plain aluminum sheet formed to a cone 10" diameter at bottom and 6" at top, 7" deep. Form cone 10" deep first, then slot upper 3" and fold tips in to make flange, in turn screwed to bottom face of the wood block.
Drill or punch a series of small holes around edge of shade to let out light side-wise. To make the supporting arm, see Fig. 3—27 and accompanying instructions on tube bending.
Flower Stand (Fig. 12-16), although presenting a highly novel and modern appearance, is simple to construct. Top frame is 1/8" x 3/4" bar 62" long, bent at all four corners with the ends overlapped in back per Fig. 4-26. Lower frame is 1/16" x 1" x 1" angle cut and formed to the same dimensions as upper frame. Bottom, sides, and ends are cut and formed from one piece of embossed sheet 36" x 20" with a piece 8" square cut out of each corner. Sides and ends are then bent up 6" high and riveted to the upper frame. Then install plywood panel in lower frame before bolting the formed sheet box into place. Apply two coats of aluminum paint to wood before assembling.
Fig. 12-16.


Make each pair of legs from a 54" length of 1/4" x 1" bar bent to a U with 24" for each leg, 6" across the top. Attach with bolts through bottom of box. Braces are 3/8" rod end-riveted to legs at "A" per Fig. 4-20.
Continue to:


My Books

