


Chapter 12. Projects For The Porch, Terrace, Lawn
Description
This section is from the book "Do It Yourself With Aluminum. 125 Projects For The Home Craftsman", by G. W. Birdsall. Also available from Amazon: Do It Yourself With Aluminum.
Chapter 12. Projects For The Porch, Terrace, Lawn
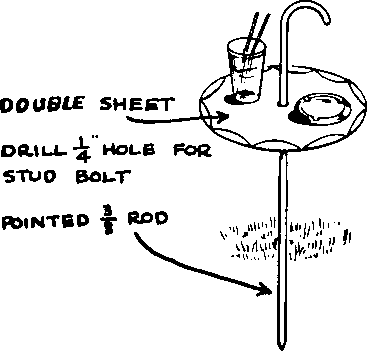
Lawn Cane Tray (Fig. 12-1) is handy outside anywhere as it is held in position by pushing the sharpened point into the ground. The 3/8" rod is in two sections joined end to end at the tray with a stud bolt as detailed in Fig. 4-14. A washer on each side of the tray spreads the stresses and strengthens the sheet-to-rod joint. Cut the washers out of a piece of 1" x 1" x 1/16" angle, and drill to fit the stud.
The bottom section of the rod is 36" long; the top piece is 18" with the handle curved on a 4" radius. The tray is 12" in diameter, made of two thicknesses of aluminum sheet joined by two or three rivets in each scallop for maximum strength and stiffness.
Fig. 12-1.
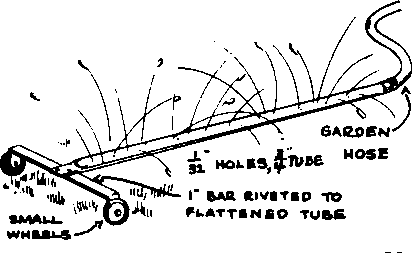
Lawn Sprinkler (Fig. 12-2) employs a 6' or 8' length of 3/4" tube fitted with a hose coupler at one end as shown in Fig. 4-81. The other end is flattened and riveted to a 14" length of 1/4" x 1" bar, which is turned down at each end to carry small wheels of plywood. Drill two rows of 1/32" holes down the length of the tube, spaced about 2" apart or closer if desired.
All-aluminum Card Table (Fig. 12-3) uses a frame 36" x 36" of 1/16" x 1" x 1" angle with corners carefully mitered and 12-3 joined by bolting the special Stanley hinge bracket (Fig. 12—4) (available in most hardware stores! inside at each corner. Center-punch and drill 1/4" holes for the 1/4" x 1" bolts. Trim a full sheet of embossed aluminum 36" x 36" to fit under the Stanley brackets, and rivet to the underside of angle frame, spacing rivets 2" apart around the entire frame and 1/2" in from the edge. Put 3/4" x 2" redwood strips crosswise underneath the metal sheet to stiffen and prevent sagging. Where strips cross each other, make a saw cut and chisel out half of each member to make a lap joint, like Fig. 4—29. Put wood screws through edge of frame angles into ends of braces to secure in place.
Fig. 12-2.

Cut four legs 27" long from 1" tube. Turn table frame upside down. Lay the four legs along inside of frame. Clamp legs under the Stanley brackets, allowing
1/4" clearance between end of leg and frame. Use a 3/8" wood spacer block between leg and inside of angle frame to position legs correctly under the Stanley bracket. Drill four holes, and screw four #8 x 3/4" self-tapping screws through bracket arm into each tube leg.
Fig. 12-4.
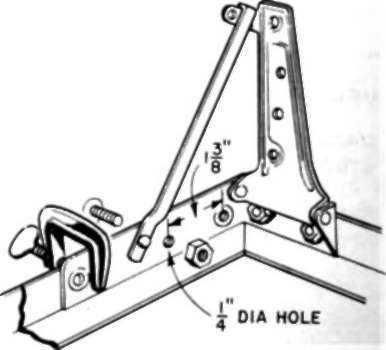
Note that there is a pin alongside the bracket to guide the folding arm or latch. Pull leg up, and mark location for pin. Drill hole through the arm hole into the leg. Drive the pin furnished with the Stanley bracket into the hole in the leg up to the shoulder. Leg will now latch in fully open position, yet can be folded down flat into table frame.
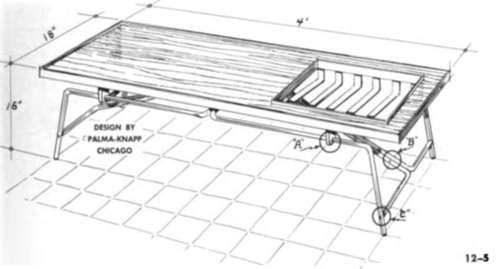
Planter Coffee Table (Fig. 12-5) combines a coffee or cocktail table with a recessed section for a planter .... or an aquarium for fish. Filled with brightly colored fish, marine plants, etc., this makes a highly novel combination. Table top is 3/4" plywood, edged all around with Me" x 1" x 1" angle bent around corners (per Fig. 4-37) and screwed to underside of table.
Make the four legs from 3/4" tube and bend as shown. See Fig. 3-27 for tube bending. The support at "A" is an angle formed from 1/4" x 1" bar with top section screwed to underside of table and vertical portion drilled to take the 3/4" tube as shown. Lock tube in position by drilling a small hole in back edge of bar, and insert pin into tube.
Braces are 3/8" rod, riveted together at "B" and end-riveted to tube legs at "C per Fig. 4-21. Aquarium supports are 1/4" bar screwed to underside of table.
Aquarium
Make full frame from 1/8" x 3/4" x 3/4" angle to size desired per Fig. 4-42, but put vertical corner posts outside the top and bottom frames, not inside as shown in detail in Fig. 4-43. Miter frame corners, and rivet all connections securely. Bottom, sides, and ends are panels of 1/4" plate glass. Cut bottom 1/8" smaller than inside measurements of bottom frame. Place a good fillet of Alumastic (aluminum mastic compound) inside corners of bottom frame. Then set glass into this mastic. Cut side panels 1/8" smaller than remaining space inside frame, put mastic into corners of frame members, and set glass into mastic. Now cut end panels also 1/8" smaller than space remaining, place mastic, and insert panels. Place mastic inside ends and sides all around bottom. Fill aquarium with water. Allow to set several days. If water seeps through joints, add a small amount of mastic inside the glass at joints after thoroughly drying the entire aquarium.
Indirect Table Lamp (Fig. 12-6) has a 5" diameter round wood base 11/4" thick which contains the lamp socket. Three 3/8" rods 3" long are equispaced around the outside by drilling 3/8" holes 1" deep into base as shown. The three legs of 3/8" rod are end-riveted to these rods at "A" per Fig. 4-20, at a point 4" above the table top. Three other stud rods are end-riveted to the legs 8" above "A" in the same manner. Opposite ends of these studs are end-riveted per Fig. 4-19 to the 7" diameter, 10" high tube of plain sheet. Scratch a rectangular pattern of 1" squares on outer face of this tube section as shown.
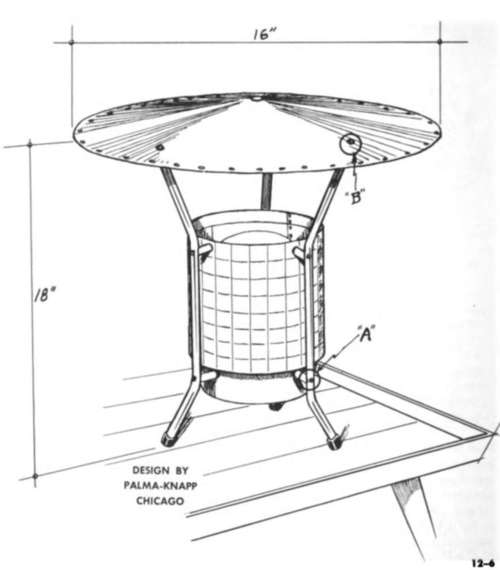
The lamp shade is a 16" diameter, 2" deep cone of plain sheet, end-riveted to the ends of the three legs at "B" per Fig. 4-19. Put rubber tips on legs, and run lamp cord out through bottom or side, as desired.
Large Table Lamp (Fig. 12-7) will cast a dull glow over a large floor area without shining in your face. First make the wood base section by cutting out two 4" diameter circles in 94" plywood. Screw together. Drill three equispaced 3/4" diameter holes around edge to take the legs of 94" tube. Cut legs 13" long. Make a bend 8" from the bottom on as short a radius as you can handle. See Fig. 3-27 and accompanying instructions for tube bending.
Insert tube in base block, and lock with screws or nails driven up from bottorn of block into tube. File bottom of tube off flat with table top, and insert spring closure caps or a rounded wood dowel.
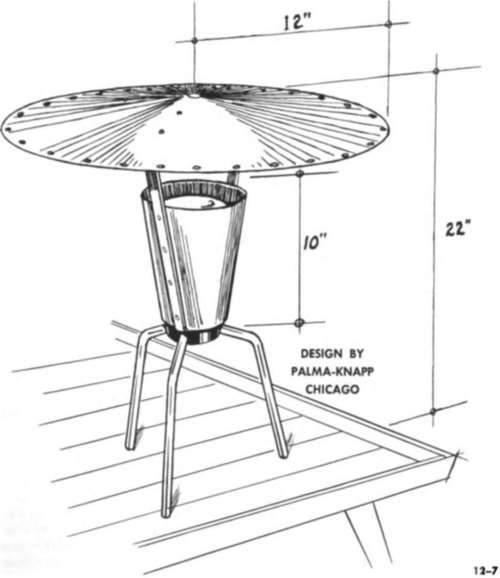
Screw lamp socket to top of wood base. Make cone for lamp 10" high, 6" diameter at bottom, 8" diameter at top, and rivet the two top shade supports to cone. These supports are 1/8" x 3/4" bar 18" long. Bend bottom 2" to go under cone, and screw to top of wood base. Bend top 2" of support inward to fit under top shade.
Top shade is a 24" diameter circle of plain sheet with a 1" hole in the center and with a 1" pie section cut out. The remaining edges are overlapped and riveted to form a cone 2" deep. Drill a row of 1/4" diameter holes 1/2" from edge, 2" apart. Rivet to shade supports.
Continue to:


My Books

