Wise Planning. Continued
Description
This section is from the book "Boy's Fun Book Of Things To Make And Do", by Grosset & Dunlap Publishers. Also see: The Pocket Dangerous Book for Boys: Things to Do.
Wise Planning. Continued
Do not eat roots that have an "edible look"-some of them may be poisonous. And beware of toadstools! The really efficient camper should familiarize himself with various types of roots, herbs, and so on before he makes his trip.
Hiking just for the fun of it is good fun and healthy exercise, but for the best enjoyment of a hike, no matter how long you intend to walk, have an objective in mind, plot out your course beforehand, then "go to it," a modern trail blazer-prepared for the worst-and the best.
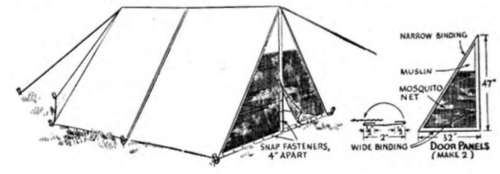
You Can Easily Make A Pup Tent
THE cheapest practical tent is the popular "pup" type used by outdoor and military organizations all over the world. A pup tent is not as roomy as many of the others, but you can make it cheaply and easily, and it will protect a pair of campers from insects and the weather. If more than two persons will camp together, build extra tents.
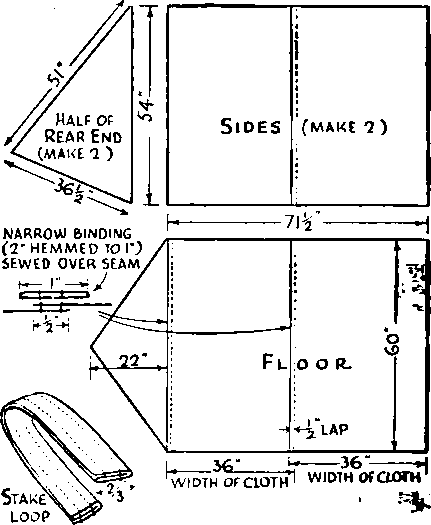
The materials in a pup tent 5 feet wide, 8 feet long, and 33/4 feet high cost about $3 or a little more. Buy 15 yards of heavy unbleached muslin 36 inches wide, a piece of mosquito netting 3 by 5 feet, and 14 feet of clothesline for rope. Cut the cloth as shown in drawings and sew them together to make the different tent parts; a floor, two sides, the two halves of the back end, and two triangular door panels. The dimensions include all allowances for seams and hems.
Sew rear-end pieces to sides along the 54-inch dimension, using a sewing machine if possible; then sew these two sections together along the top and down the slanting rear ridge, and finally join the floor to the bottom edges of the assembled sides and ends. In joining all parts, lap edges over each other 1/2 inch, sew twice, then cover the seam with a 2-inch strip of muslin, inch of each edge being folded under and hemmed to give the strip a net width of 1 inch. Place these reinforcing strips on the outside of the tent everywhere but on the floor, where they go on top, inside. Leave the front edges of the tent sides unhemmed but bind them with more of these strips. This use of tent-cloth scraps to bind seams and edges is cheaper than buying regular herringbone tape and makes just as sturdy a finished job. Muslin tents must be reinforced at these places to prevent damage from the pull of ropes and wind, and from the wear of handling.
For stake fastenings, cut more strips of cloth 2 inches wide and 9 inches long. Fold these three times to make a strip 2/3 inch wide by 9 inches, double into loops, and sew the 41/2-inch loops to each bottom corner of the tent and midway along the foot of each side. When you pitch your tent, twist these loops small enough to slip snugly over the top of your tent stakes. The double cloth is just as serviceable as rope.
You will need 10 stakes and a pair of 45-inch poles to erect this tent. Poles are set inside, at each end of the horizontal ridge, and may have to be trimmed shorter to fit the exact height of your tent. You can always wedge up a short pole with chips or small stones under its bottom to pull the tent taut and smooth. Sew on small squares of doubled muslin inside of the tent ridge where the poles bear, so they won't cut through it in time. Poles can usually be cut at your camping site, or you can carry two made from the butt ends of bamboo fishing poles. A 7-foot rope sewed to each end of the tent's ridge is staked out front and back to keep poles upright.
And now for the doors. Note that the upper third of each triangular door panel is made of muslin for better protection against wind and rain, while the lower two thirds is of mosquito netting to give ventilation. (Campers who use a pup tent must be careful to pitch it so the tight back end will face in the probable direction of storms.) Make the door panels the size shown, which permits them to lap 2 inches over each other at the center and 2 inches below the edge of the tent floor at the bottom. Bind these loose edges with a 3-inch strip of cloth hemmed 1/2 inch at each edge to make it 2 inches wide, then bind the edges of the doors which join the tent side with 2-inch strips hemmed to 1-inch width, sew them to the sides, and bind the joint with more of the same strips. Then install snap fasteners every 4 inches along the loose edges so they can be fastened tightly together, and to the floor edges to make the tent insect and snake proof. The bottom edges of door panels lap underneath the front edge of floor when so fastened, not atop it.
To waterproof your pup tent, shave 3/4 pounds of beeswax or paraffin and dissolve it in 3 quarts of turpentine which has been heated by setting its container in a tub of hot water. Do this mixing outdoors; never heat these materials on a stove. When wax is dissolved, apply the warm mixture to the pitched tent with a brush. Give sides one coat, the floor and all seams two coats. Let the tent stand outside until the turpentine odor has left, and it is ready for use.
Continue to:
My Books

