


A Corner Cabinet
Description
This section is from the book "Handy Man's Workshop And Laboratory", by A. Russell Bond. Also available from Amazon: Handy Man's Workshop And Laboratory.
A Corner Cabinet
The large heavy tool chests which were at one time so much in use are very awkward to get at, injurious to the tools, and in other ways inconvenient and out of date. A cabinet secured to the wall, within easy reach, is more convenient, and each tool can be seen at a glance, having its appointed place, hung either vertically or horizontally on a peg or shelf or in a drawer within the cabinet. A tool cabinet is cheaper, and is made more easily than a chest. By referring to any tool catalogue, it will be seen that it is simply a flat oblong box with a recessed lid. The latter can be made from a box procured at a hardware store or box factory at little expense. But to have something different is generally the desire of most "handy men."
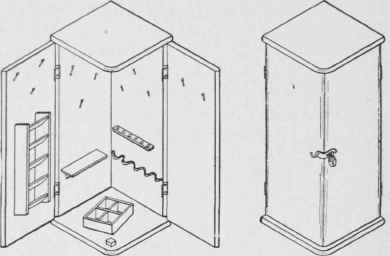
Fig. 18 - The corner cabinet open and closed.
The corner cabinet, or cupboard, shown in Fig. 18. and detailed in Fig. 19, is not only original, but more easily made than any of the foregoing tool chests or cabinets.
The top and bottom consist of two boards, 13 inches square by 1 inch thick. The projecting corner is rounded off to a radius of 1 1/2 inches, and the adjacent sides have their edges slightly rounded, as shown at A in Fig. 19. Four sides, B, are cut from 1-inch boards, 2 feet 9 inches in length and 12 inches wide. The edges are chamfered at an angle of 45 degrees, and the corners rounded off to a radius of 1/2 inch, as detailed at B1. Two of the sides, B, are secured together with nails and glue, and the top and bottom nailed in position, flush with the outside edges, which are square, allowing the cabinet to fit close against the corner of. the shop. The other two edges, which are rounded off to give a neat finish, project 1 inch, as clearly seen in Fig. 18.
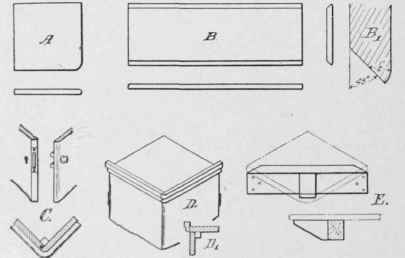
Pig. 19 - Constructional details of the cabinet.
Either a padlock, with strap, can be used to lock the cabinet, or a flush lock, as shown at C in Fig. 19. Two blocks of wood, for the doors to bear against when closed, are secured to the bottom and underside of the top, 2 inches from the edges. These are shown in Fig. 18, and at C and D1 in Fig. 19. If desired, the top and bottom can be made 12 inches square, and finished off with a cornice, as shown at D and D1.
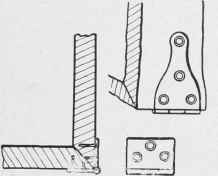
Fig. 20 - How the hinges are applied.
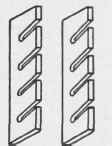
Fig. 21 - Rack for chisels.
The cabinet can be supported on a bracket, made from a piece of 3 x 4-inch timber, as* detailed at E. Spikes driven into the wall, through the sides of the cabinet, will further secure it.
Two hinges should be used on each door, either made flush, as shown in the general view. Fig. 18, or on the outside, as shown in the detail view, Fig. 20.
The furnishing of the cabinet is a matter of choice and depends to a certain extent on how many tools are placed in it. The saws and lighter tools should be hung upon the doors, the heavier tools inside. Shelves and racks of wood or leather, for the bits and handle tools, can be easily made. A rack constructed as shown, hung" upon the door, will be found very useful for small tools. Chisels, etc., can be supported on vertical strips of board, notched as shown in Fig. 21. Either a plain oil finish or the natural wood is all the cabinet requires to complete it.
Continue to:


My Books

