Stationery Case (Fig. 6)
Description
This section is from the book "Handcraft In Wood And Metal", by John Hooper, Alfred J. Shirley. Also available from Amazon: Handcraft In Wood And Metal.
Stationery Case (Fig. 6)
Note
An advanced model introducing secret mitred and lapped dovetailing in carcase, with decoration based upon veneer inlaid and incised, with vee tool cuts filled with wax composition.
The Process
Cut out and plane up to thickness the following material:-
English. | Metric. | |||||||||||||||
Top | 1 ft. | 5 3/4 | in. | X | 7 | X | i | in. | oak | 46 | X | 18 | X | 1.3 | cm. | |
Bottom | 1 ft. | 5 3/4 | in. | X | 6 1/2 | X | 1/2 | in. | 46 | X | 17 | X | 1.3 | cm. | ||
2 | Ends | 1 ft. | o 3/4 | in. | X | 7 | X | 1/2 | in. | 31.5 | X | 18 | X | 1.3 | cm. | |
Back | 1 ft. | 5i | in. | X | 12 1/2 | X | 7/16 | in. | 44.5 | X | 31 | X | 1 | cm. | ||
Front | 10 | in. | X | 11 1/2 | X | 9/16 | in. | 28 | X | 3° | X | 1.5 | cm. | |||
Clamps | 1 ft. | o | in. | X | 3i | X | 9/16 | in. | 3° | X | 9 | X | 1.5 | cm. | ||
4 | Feet | 4i | in. | X | 1 3/4 | X | i | in. 4 | rosewood | 11 | X | 5 | X | '75 | cm. | |
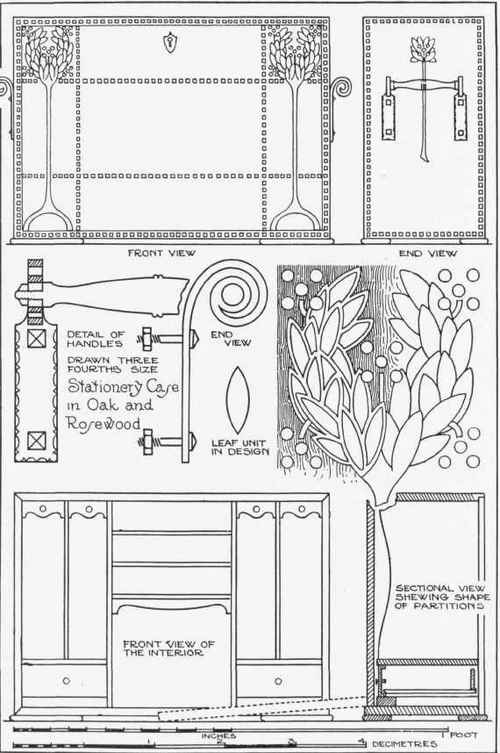
Fig. 6.
Interior.- | ||||||||||||
2 Vertical Divisions 1 ft. | 0 1/2 | in. | X | 6 | X | 1/4 in. | holly 31. 5 | X | 15 | X | •75 | cm. |
2 Central „ | 9i | in. | X | 6 | X | 1/4 in. | " 23.5 | X | 15 | X | •75 | cm. |
3 „ Horizontal Divisions | 7 | in. | X | 6 | X | 1/4 in. | „ 18 | X | 15 | X | '75 | cm. |
2 Side „ ,, | 51/4 | in. | X | 6 | X | 1/4 in | „ 1 3.5 | X | 15 | X | .75 | cm. |
4 Arches | 2 1/2 | in. | X | 1 | X | 1/4 in. | " 7 | X | 2.5 | X | 75 | cm. |
1 Central Arch | 7 | in. | X | 1 | X | 1/4 in. | „ 18 | X | 2.5 | X | '75 | cm. |
1. Plane up top, bottom, and ends to length and width.
2. Set out mitred dovetail joints at corners per exercise following on A and B.
An Exercise in Mitred Dovetailing.
(a) Mark mitre lines as shown in Fig. 7.
(b) Gauge lines across inside of both pieces.
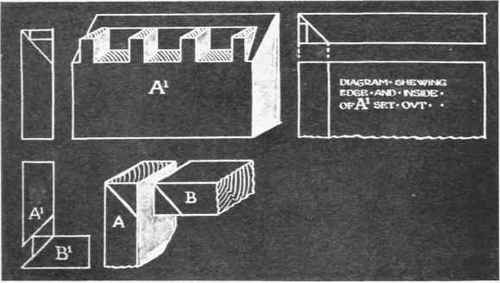
Fig. 7.-Diagrams showing method of setting out, etc.
(c) Gauge and rebate lap.
(d) Mark out pins on A', cut same and remove waste.
(e) Place A' on B' in position shown, and with a marking awl mark position of sockets. (f) Cut sockets and chisel out same, cut mitres and fit together.
3. Fit carcase together, take apart and rebate same to receive back.
4. Mark and cut the grooves in carcase to receive the interior divisions.
5. Clean up inside surfaces and glue together, fit and screw back in position.
6. Clamp together the front (tongue worked on centre part, fitting into grooves on clamps).
7. Glue together, level off when dry, and fit in opening.
8. Fit up the interior, all pieces are housed 1/8 in. deep into top divisions.
Fig. 8.
The Decoration
Method of inlaying the mosaic stringing is described on p. 146. Veneers are used for the ornamental device; these should be cut to outline and inlaid level with the surface of the wood. When dry the leaves are indicated or outlined with vee tool cuts, and filled with composition (see also p. 148); the spots are executed with a drill and filled in with composition. The whole is then allowed to stand by and is then scraped and sandpapered. The inside of the fall should be lipped with veneer 3/4 in. wide, the groundwork covered with morocco leather or skiver.
Continue to:
My Books

