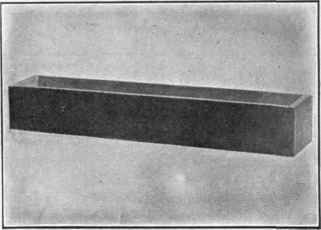
Window Box
Description
This section is from the book "Shop Projects Based On Community Problems", by Myron G. Burton. Also available from Amazon: Shop Projects Based on Community Problems.
Window Box
Materials
Poplar (Chap. III., Par. 42) or any soft wood.
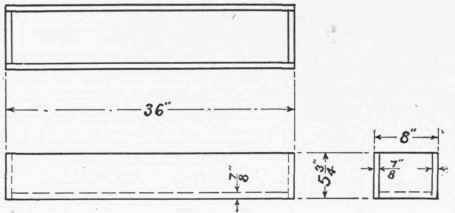
l pc. 7/8"x6 3/4/"x35" S2S 2 pcs. 7/8"x6"x37" S 2 S
2 pcs. 7/8"x6"x 6 1/2" S 2 S 2 1/2 dozen 6d finishing nails.
Introductory Statement
In cities where there is but little opportunity to come in touch with the beautiful green fields and bright flowers of the country, much has been done to give a cheerful and beautiful effect by encouraging the growth of plants and flowers in window boxes. Regardless of the surroundings, a pretty window box filled with growing plants adds considerably to the beauty of the home.
This box can be made of almost any kind of lumber. Even waste material from a dry goods box can be used if first-class material cannot be had. It should be carefully and neatly made then given at least two coats of good paint as a protection to the wood. Various ways have been devised for fastening window boxes in position; sometimes a small brace bracket is used under the box. An easy and simple way is to use small screen door hooks, thus fastening each end of the box to the window casing, allowing the weight of the box to rest on the window sill.
References:
A Garden City in a Country Village, Bessie M. Weed.
U. S. Bulletin No. 408, School Exercises in Plant Production.
U. S. Bulletin No. 218, The School Garden.
The Flower Garden, Bulletin No. 2, Ithaca, N. Y.
Lessons With Plants, Bailey. Macmillan Pub. Co.
U. S. Bulletin No. 157, The Propagation of Plants.
U. S. Bulletin No. 94, The Vegetable Garden.
Window Flower Box
Suggestions For Original Design
No.1

No.2

No.3

No. 4

No.5

No.6
Rustic Box

Window Flower Box Specifications
As this material is furnished S 2 S, it will not be necessary to resurface it.
The Side Pieces
Select the best surface of one of the side pieces and mark it the working face (Chapter II., Paragraph 2). Plane one edge perfectly straight and square for a working edge (Chapter II., Paragraph 4). With the marking gauge (Chapter II., Paragraph 6), or with the lead pencil and ruler (Chapter II., Paragraph 7), gauge the width, as shown in the drawing; gauge on both surfaces. Carefully plane to the gauge line. Square one end (Chapter II., Paragraph 5). Measure the length, and in like manner square the other end. Prepare the other side exactly like this one.
Continue to:
My Books

