How To Enlarge Holiday Snapshots
Description
This section is from "Every Woman's Encyclopaedia". Also available from Amazon: Every Woman's Encyclopaedia.
How To Enlarge Holiday Snapshots
An Ingenious Daylight Enlarging Apparatus which May be Set Up for Less than a Shilling The Necessary Outfi - Exposure - General Hints
By Gladys Beattie Crozier
Enlarging one's own photographs at home is one of the most fascinating hobbies the keen amateur photographer can pursue.
Often, cleverly chosen snapshots, taken with a small hand camera on a holiday trip, make the most charming and artistic pictures when enlarged up to half a dozen times their original size, to be enshrined in an album, hung on the walls of one's special sanctum, or sent off to win one fame and. glory at one of the photographic exhibitions.
The cost of an elaborate enlarging camera to enlarge films and plates of various shapes and sizes is considerable, but an admirable substitute may be contrived easily at home at an initial cost of about a shilling to eighteenpence, and excellent enlargements of one's own or other people's negatives, taken upon either plates or films, can be made with the help of any half-plate stand camera which has a pull-out bellows, a swing back, movable front, and stops. An old Lancaster "Instantograph" answers splendidly for the purpose.
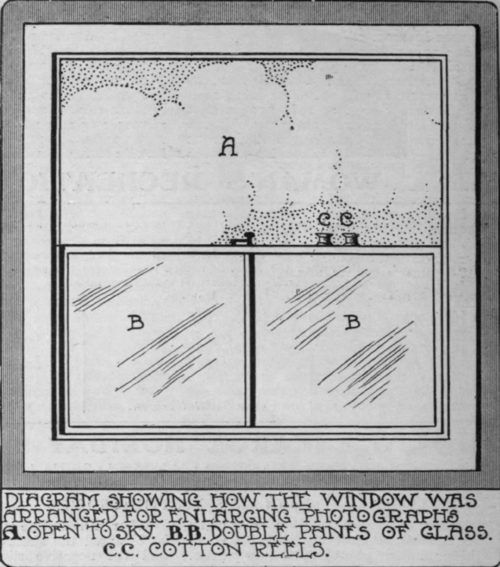
The use of an attic with a window with a north aspect, the upper part of which, at least, looks out upon the sky, will be required, besides a steady four-legged table, and a small table easel.
A stripped negative glass will be needed to put in the place usually occupied by the ground-glass screen, to which films or small plates to be enlarged can be fastened oy the corners with the help of narrow strips of gummed paper.
When a half-plate negative on glass is to be enlarged the sheet of glass is removed, and the negative slipped into its place. Provide a sheet of thick brown paper, such as is sold for laying under carpets, cut several inches larger than the window, several sheets of deep orange tissue paper, a couple of sheets of stiff white cardboard, a small piece of very stiff millboard, some long, sharp tin-tacks and some strong drawing-pins, and a couple of empty cotton-reels, besides a sharp penknife, scissors, hammer, and ruby lantern, and last, but not least, one or more packets of bromide paper, developer, and a couple of large-sized dishes for developing and fixing the prints, as well as basins of water for washing them.
The ruby lantern will be needed to light the room after the window has been blocked up, but the remainder of the developing outfit should be accommodated on a second table or in a corner out of the way.
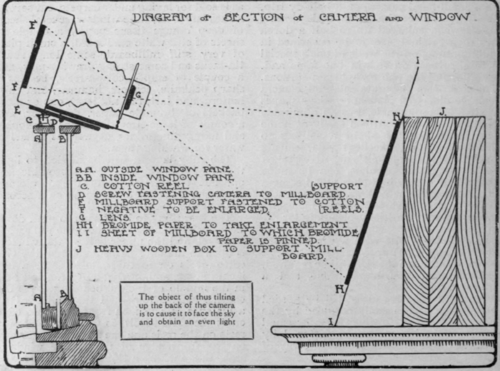
The first thing to be done is to push down the upper window-frame until the top sashes are level, and the upper half of the window is open to the sky. This done, nail the two cotton-reels on to the outside sash, a few inches apart, and, having bored a small hole in the middle of the millboard - to take the camera head screw - nail the millboard at a distance of one inch from the back edge on to the cotton-reels, so that the back of it rests on the reels and the front slopes to rest on the front edge of the double window-sash thus making a sloping support for the camera, which must next be screwed firmly into place on the millboard support, with the back of the camera outside the window, the front part of the camera with bellows and lens pointing into the room.
The object of thus tilting up the back of the camera is to cause it to face the sky, and so obtain an even light, for if the camera were fastened flat on to the top of the window-sash, the lower half, at least, of the camera back would be facing trees, chimney - pots, or roofs of houses, and so the light passing through the negative to be enlarged would not be of an even quality.
Now light the ruby lantern, and then proceed to block up the window with the sheet of brown paper.
Measure carefully to find the exact spot where the camera lens and bellows will come through, and cut a hole just large enough to admit the part which projects into the room, and, having fitted the brown paper carefully into place, proceed to fasten it to the window-frame with drawing-pins placed a couple of inches apart, leaving the left-hand top corner free for a distance of about eight inches each way, in order that the hand and arm of the operator can be placed through to change the negative to be enlarged as required. This flap is, of course, pinned up carefully before an exposure is made.
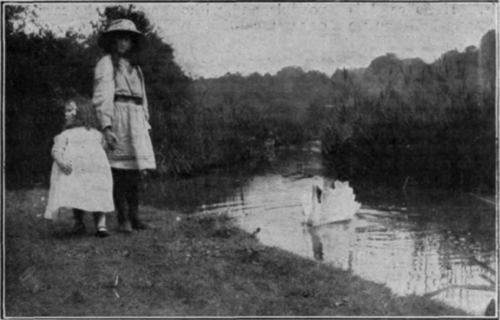
A charming little snapshot of a typical country scene, only part of which is to be enlarged
When the flap is pinned up it will be found that a bad leakage of light occurs where the bellows passes through the hole in the brown paper. In order to block this out successfully, fasten two sheets of orange paper together by their edges, to make a double thickness, and proceed to cut a hole in the middle of the double sheet just big enough for the lens-holder to pass through. Then paste the extreme edges of the orange paper on to the brown paper on three sides, just beyond the aperture, in such a way that a big puff of paper is left to allow the bellows to be racked forward for focussing purposes without straining or tearing the paper.
The fourth side is left open, so that the operator's hand can be passed through to work the rack and pinion by means of which the lens and bellows are racked backwards and forwards.
Some strips of stamp paper must be kept at hand, with which to fasten down the fourth side securely before an exposure is made. The enlarging camera is now ready for use, and the window-flap may be left hanging down to admit the light while the table and stand for the bromide paper are put in position.
Continue to:
My Books

