Dress Practical Lessons In Dressmaking. Seventh Lesson. The Skirt. Continued
Description
This section is from "Every Woman's Encyclopaedia". Also available from Amazon: Every Woman's Encyclopaedia.
Dress Practical Lessons In Dressmaking. Seventh Lesson. The Skirt. Continued
The Placket-hole - How to Make it Set Properly - Putting the Skirt into the Band - Turning
Up the Hem
The next thing to be done is the "placket-hole." This is generally made from 10 to 12 inches long; it depends on the width of the shoulders of the person for whom the skirt is being made.
Unpick the back seam from the top to the length the placket-hole is to be. At that point fasten the machine stitching of the seam securely, by hand, with strong silk.
N.B. - The reason the whole length of the back seam is stitched, and then unpicked for the placket-hole, is that the seam may be pressed perfectly flat from top to bottom of the skirt; and when the placket-hole is made, the turnings of it, and of the seam, may form one continuous line without any break.
Cut a strip of linen on the straight, selvedgewise, about an inch wide and the length of the placket-hole, and crease down a narrow turning along one side of it. Open it, and place the crease in the crease of the material of the right-hand side of the placket-hole, and tack it in this position, being careful not to stretch the opening. Run the turning of the linen to the turning of the material with long, running stitches, fold the turning over - linen and material - by the crease, and tack it down. Place a piece of Prussian binding or lute ribbon over the raw edges, and fell it down each side, making the stitches as small as possible on the right side.
N.B. - This strip of linen, on the straight, is placed down the placket-hole to prevent its stretching.
Avoid Stretching: the Placket-hole
For the wrap for the left-hand side of the opening, cut a strip of the material - on the straight, selvedgewise - about 4 inches wide, and about an inch longer than the opening, fold it in half lengthwise, wrong side out, and stitch it across one end; turn it right side out, and again fold in half; tack it down near the folded edge, and press it. Place the wrap down the left side of the opening, with the finished end well below the bottom, and tack the skirt to one fold of it only. Be careful not to stretch the opening, and to make both sides of the placket-hole exactly the same length. Stitch the skirt to the wrap exactly down the crease, so that the stitching of the placket-hole and of the back seam may form one unbroken line from top to bottom of the skirt. Press the seam open, tack the other raw edge of the wrap over it.
Place a piece of lute ribbon or Prussian binding over it, and fell it on each side in the same way as the right-hand side was done. Stitch the lower end of the wrap firmly half-way across to the seam of the skirt, but do not take any stitches through to the right side.
The placket-hole can be fastened with dress fasteners (described on page 229 in Part 2). If these are bought ready fixed on a strip of ribbon or binding, this is felled or stitched on by hand on each side of the placket-hole. If they are bought loose, they must be unfastened and sewn on separately, with twist, by buttonhole stitches - worked through the little holes that are in them - at equal distances down the placket-hole. About five of these little fasteners are necessary.
Another method of fastening a placket-hole is by patent hooks and small metal rings. These rings are first buttonholed round with twist to match the colour of the skirt. A long length of twist must be used for each ring, so that, after the buttonholing has been finished, sufficient twist may be left by which to sew the ring on to the skirt.
They must be sewn on the left-hand side of the skirt, over the wrap, in the seam of the placket-hole. The patent hooks must be sewn on the right-hand side of the skirt, and inside the placket-hole, about 1/4 inch from the edge. They should be put on by being buttonholed through the little holes on each side, and by two or three straight stitches across the shank, at the top. The stitches must not be taken through to the right side of the skirt, but securely fastened through to the strip of linen which was placed down the placket-hole to prevent its stretching.
The fastenings must be put on so that, when the placket-hole is hooked together, it may close evenly and securely, and show no break in the seam. Three or four of the hooks and rings are sufficient.
How to Put the Skirt into the Band
Having cut the turnings of the seams and of the darts even, and neatly oversewn them, proceed to put the skirt into the band. Take a piece of double belting the size of the waist, plus the width of the wrap and turnings - 3/4 yard is sufficient for a 24-inch waist - open the belting, turn up and pin back the under side the whole length of the band. This is to get it out of the way while the outer side is being fixed on to the skirt.
Place a pin, downwards, 1/2 inch from the right-hand end; from this pin measure half the size of the waist (12 inches), and place another pin, downwards (this pin marks the centre-front); from it measure the second half of the waist (12 inches), and place a third pin downwards.
This gives the entire waist size.
Do not cut off the piece of belting that is over, as it is required for a wrap and turning.
The Easiest Method of Fixing: the Band
The easiest way to fix the band on is to put the skirt on to the person for whom it is being made - or on a stand as near the same size as possible - and commence fixing it by placing the centre of the belting - where the rim is - to the centre of the front of the skirt, over the raw edge. Pin the belting in the proper position round the right-half of the waist to the back, holding the band rather tight, and slightly easing the skirt. Take the skirt off the figure, or stand, fold it in half down the middle of the front, pin it evenly together at the top, and " tailor tack " it round close under the edge of the belting - which has been fixed to the right-half of the skirt - to mark the exact position in which the belting is to be fixed on the left-half.
Unpin the skirt, cut the tailor tacking, and pin the belting on the left-half of the waist, holding the band rather tight, and slightly easing the skirt, so that the two halves may exactly correspond.
Tack the belting on all round, and then machine-stitch it as near as possible to the edge. Cut off all superfluous turnings on the wrong side.
Diagram 1. Work a silk cross in belt to mark the centre of front
Before finishing off the wrong side of the belting, work a cross to mark the centre of the front. In this narrow double belting this cross is worked on half the width, as shown in the diagram, so that no stitches may be shown on the wrong side. The twist with which it is worked should be of a contrasting colour to that of the skirt. Unpin and turn down the under side of the belting, tack and fell it down neatly ; turn down each end of the band on the wrong side, and "face" the raw edges with Prussian binding. Sew on the hooks and eyes - one hook at the end and one hook about 2 inches from it (the width of the wrap), and the eyes on the left side to correspond, as shown in diagram 2.

Diagram 2. Sew one hook at end of band, and another two inches from it the width of the wrap. The eyes should correspond
Measure the Skirt for the Hem
Place the skirt on a dress-stand, and hook it round the waist. Measure round half the skirt, from the waist to the bottom, the length it is to be when finished - in the front, on the hips, and at the back. The best way to do this is to pin a tape measure just below the waistband at the centre-front, and mark the measurements at intervals with tailor's chalk. Move the tape measure, and repin it at short intervals at the waist. Be careful not to shift the tape measure, but to let it drop straight down each time it is repinned, as shown on the sketch. Take the skirt off the stand, and turn it in - round the half which has been marked - for the hem. Keep the chalk marks at the edge. Pin, and then tack it neatly round the edge. Turn the skirt inside out, fold it in half down the centre of the front, and pin the skirt together perfectly even just below the band. Place the skirt smoothly on the table - with the side that has been turned up downwards - turn up the second half to exactly correspond, pin, and tack it carefully near the bottom.
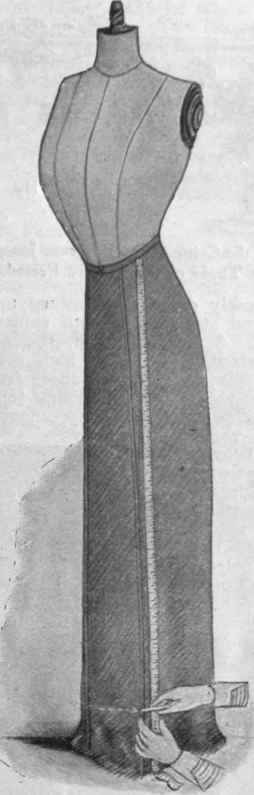
Diagram 3. The skirt on dress-stand. Pin a tape measure just below waistband, and mark the measurements for hem with tailor's chalk
Pin up the raw edges of the hem at intervals, to keep them in position while the skirt is being tried on.
Continue to:
My Books

