Pumping Fire Engine
Description
This section is from the book "Things To Make In Your Home Workshop", by Arthur Wakeling. Also available from Amazon: Things to Make in Your Home Workshop.
Pumping Fire Engine
The fire engine is illustrated in Figs. 2, 3, and 7. It is a good plan to make the tank and pumping arrangements before you build the wooden parts.
First get a half-gallon can of the type shown - a strong well-soldered can that may be made air-tight. If the can is new, the oil should be emptied out (the cooking oil, of course, may be put in glass jars until used). To empty it, remove the screw cap, carefully puncturing the top of the cap without destroying the threads on it. Use a blowtorch to melt off this entire piece, which is soldered to the can. It may be pushed off with a stick when the solder is melted. Use only enough heat to loosen the solder. This will leave a large round hole in the end of the can. Now wash out the can thoroughly with soap and warm water. Leave this hole open until all the other soldering is done to allow air and moisture to escape.
If the screw top provided with the can has a well defined thread ( which most of them have not) and will screw up air-tight, it may be used for the filler cap on the tank. It will generally be found much better to cut or melt off a better top from a can such as is used to hold liquids for mending leaky radiators.
Scrape away the label on the can where the filler top and the tire valves are to be soldered, and proceed to solder the filler top to the top of the tank. A job like this had best be done by someone who has done such work before, as it is apt to be difficult for one who has never tried his hand at if and does not understand soldering. (An excellent flux for tin and brass is made of equal parts of muriatic acid and glycerin.)
After soldering on the filler top, punch a hole in it to admit a small funnel in top of tank right under the open top of the filler.
Next obtain two bicycle tire valve stems, also one good valve inside assembly. Scrape the disklike ends of each valve stem clean; tin each one with a hot soldering iron, well charged with solder. Also tin the tank where the valves are to be soldered. Punch a hole with a sharp ice pick in the tank where each valve stem is to be soldered. Hold each in position with small pliers or a wooden clothespin while soldering it on the tank.
When the valve stems and filler top are soldered, cut out a disk of clean tin and solder it over the hole in the end of the tank left by melting off the filler cap. To see that the tank is air-tight, first screw the valve insides in the valve stem on top of the tank; attach a small bicycle tire pump to this in the usual manner; and then screw on an extra valve cap on the other open valve stem on the end of the tank. Place the whole tank under water and pump it up with a moderate pressure. If there are any leaks, the escaping air bubbles will show it. The filler top or screw cap should, of course, be provided with a leather or cork washer inside.
If all is well, remove the tank from the water, open the screw cap, and fill the tank about three fourths full of water. Remove the extra valve cap and attach a length of hose with a nozzle made of the spout of a sewing machine oil can. Pump up the tank after screwing on the filler cap. If you have made a good job of it, the water will certainly squirt out of the hose nozzle.
The chassis of the fire engine is 7/8 by 6 by 25½ in. Underneath this are attached a board ¼ by 7 3/8 by 10¼ in. to form the running boards and another ¼ by 73/8 by 5¾ in. to form the rear platform. The latter should be attached after the sides or body of the fire engine is in place, because the pieces of wire or rod forming the rear handles are first pushed in holes bored for them in the sides of the body. The platform, after having holes bored in it for the ends of the handles, is fitted on, glued, and nailed.
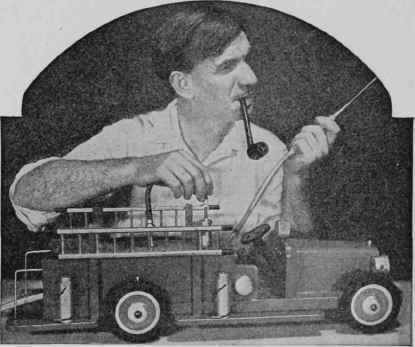
Fig. 7. - Toy "pumper" being demonstrated by Edward Thatcher, noted teacher and craftsman, who designed and built it as well as the sprinkler, tractor, and dump truck.
The radiator and hood are made of a single or built-up block of wood 3 7/8 in. wide, 3% in. high, and 6¾ in. long. The cowl board is ¾ by 3 7/8 by 6 in. In this board is drilled a slanting hole for the steering column, which is a length of dowel. The steering wheel is a 2½-in. disk of laminated wood with four holes bored in it. Tacks are driven in the cowl board to represent various gages and the foot and brake pedals.
The sides of the body are single pieces of wood ½ by 3 3/8 by 14¾ in., with a little strip of molding glued to the outer edges along the top. The seat is a single block of wood on which is glued a thinner strip to represent upholstery.
The ladder supports, provided with cup hooks to hold the ladders, are attached as shown in Fig. 2. The ladders are made of narrow strips of pine or whitewood drilled out for the rungs, which are made of a 3/16- in. dowel.
Just back of the front of the body-are two wooden blocks that fit between the body sides and the pump to hold it in place. A hole is drilled in the chassis for the end of the pump to rest in. Thick shellac may be used to cement the pump in place.
Two screws and washers in the top of the blocks hold the tank in place. One screw and washer hold down the rear of the tank; the washer engages the edge of the can, next to the floor, and the screw is driven into the floor.
The headlights are made of one large spool cut in two. The large end of each piece is turned to a funnel or reflector shape. When painted with aluminum, it catches the light realistically.
The searchlight on the cowl is a flat disk of wood 7/8 in. thick and 1% in. in diameter with the back edge rounded over. A hole is drilled through it for the long screw on which it turns and a metal washer is placed between the searchlight and the cowl. The red rhine-stone buttons used for the side and tail-lights, which are 5/16 in. in diameter, are set in shallow holes. Eighteen of the buttons cost ten cents at a ten-cent store.
The four dummy fire extinguishers are turned, or each can be made of a length of dowel with a short dowel of a smaller diameter glued to the top of it. Round shoelaces are used for hose and nozzles. The extinguishers may be set on dowel pegs mounted in the running boards and in the rear platform so that they may be lifted off.
A very small gong is mounted on the right side of the fire engine seat, but a small friction top can lid will make a good substitute.
The wheels are flat wooden disks ½ in. thick and 4 1/8 in. in diameter. A wooden button mold or spool end 1½ in. in diameter is glued on the outside center of each wheel. The toy tires, usually obtainable at large toy stores, are stretched over the wooden disks.
Except for the parts painted silver or black as shown in Fig. 7, the entire fire engine is painted a Chinese red.
Continue to:
My Books

