


Indoor Incinerator
Description
This section is from the book "Things To Make In Your Home Workshop", by Arthur Wakeling. Also available from Amazon: Things to Make in Your Home Workshop.
Indoor Incinerator
Disposing of paper, sweepings, and other combustible rubbish, which constantly accumulates in every home, is an endless task. Worse still, their storage while awaiting disposal creates a serious fire hazard. To burn the rubbish in the furnace quickly chokes the pipes, ruins the fire in winter, and heats the house in summer. If the house is equipped with an oil burner, the accumulated trash must be burnt out of doors where it may annoy the neighbors and possibly endanger surrounding property from flying sparks.
A simple solution of the problem is to build a brick incinerator in the cellar and keep the trash fires indoors where they belong. It is not necessary to be a mason to accomplish the feat; anyone can construct an incinerator like that illustrated in Figs. 22 and 23. The principal materials required are a bag of Portland cement, 15 lbs. of unslaked lime, about 150 common brick, a clean-out door, and a few other metal parts to be mentioned later.

A cement base is first laid, followed by three courses of brick. On top of the third course a grate is formed of metal strips; then the walls are built to the desired height. The top is then put on and a proper connection made to the chimney.
The incinerator shown has a capacity of about a barrel and a half of loose newspapers, but the dimensions may be varied, of course, to suit conditions. If the base of a fireplace chimney or a large main chimney is accessible, it may be used as one wall of the incinerator.
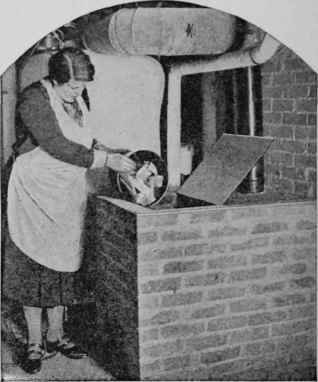
Fig. 22. - All the combustible waste of the household can be burned in this type of incinerator. At the left is shown how the brick walls are laid up after the first grate bars are in place.
The base should be made of one part of cement to three parts of sand. Its thickness should equal or exceed the overhanging flange of the clean-out door. An 8 by 10 in. door is recommended; it may be obtained at any large hardware store. When the base has set sufficiently, place the door in position by stacking bricks in front and in back of it. Next lay up three courses of brick. Break the joints and use a 3/8-in. layer of mortar. The top of the third course will come about level with the top inner flange of the clean-out door.
A strong, easily handled mortar is made as follows: To one bucket of sand sifted through fly screening add one quarter bucket of slaked lime and one third bucket cement, mixed in the dry state. This amount of lime should give the mortar a clinging quality not possessed by an ordinary cement, sand, and water mixture. To slake the lime, place the lumps loosely in a pan or a wooden box and slowly pour on water until the bubbling and steaming cease. The heat produced should dry out the lime quickly to a powdery state unless too much water has been added. If it remains in a smooth, pasty condition, it requires more mixing and should not be added to the sand, cement, and water until they have been mixed. Be careful not to touch the lime while it is slaking, as it is much hotter than boiling water; and do not try to mix the mortar in a pail, but use a mixing board or the concrete floor of the cellar. About two buckets of mortar should be sufficient for three courses of brick.
The grate should be built up of 1/8 by 1 in. steel strips laid 1 in. apart and supported down the middle with a % by 1½ in. steel bar, one end of which rests against the inside edge of the door and the other on the rear brick wall. If the steel strips do not lie flat on the side walls, bend them slightly in the middle so that they will just clear the middle support. They will settle into position later. About 17 lbs. (40 ft.) of 1-in. strips will be required for this, but 20 lbs. should be bought as a few strips are required to support the top.
Continue the bricklaying until the desired height is reached - a total of from ten to twelve courses. Point up the mortar with a rounded stick after it has set for about an hour. In order to make a true and square job, a carpenter's level should be employed unless the base of a chimney is being used as a starting point, in which case a straightedge will do.
Place steel strips edgewise between the joints of the brick to support the top, which is a piece of heavy galvanized sheet iron with a hole cut out with a cold chisel for the smoke pipe. A short piece of ordinary stovepipe should be attached to the opening thus made. This can be accomplished by using a pair of tin snips to make a number of cuts 1 in. long and approximately ¾ in. apart around one end of the pipe. Alternate tabs should be bent outward at right angles and the end of the pipe thus "fringed" thrust through the opening in the galvanized sheet. The tabs which pass through should be bent outward at right angles on the underside and both sets hammered tight so that the pipe is held rigidly.

Fig. 23. - A broken-away drawing of the incinerator, showing the prate, the top, and the cover; a longitudinal section through the top, and a detail of the joint between smoke pipe and top.
If the smoke pipe is joined to the heater pipe, an opening for it may be cut with a cold chisel, provided a piece of cord wood or any other heavy object is thrust into the pipe to cut against. It is not necessary to cut an accurate hole, as the joint can be sealed easily enough with asbestos cement. The top from .1 to B, Fig. 23, is covered with asbestos cement.
All that remains is to make a cover for the opening into which the rubbish is to be dumped. This is a piece of sheet steel 1/8 in. thick to which is attached a handle. If a hinged cover is preferred, the steel strip marked C should be drilled for rivets and hinged to the cover before it is set in the mortar.
Continue to:


My Books

