


How To Beautify Your Fireplace
Description
This section is from the book "Things To Make In Your Home Workshop", by Arthur Wakeling. Also available from Amazon: Things to Make in Your Home Workshop.
How To Beautify Your Fireplace
For ages the fireplace has been the most enduring memorial of home life - a haven of comfort and cheer. In our day the main purpose of the fireplace is an aesthetic one, and if it is not beautiful it has little reason for existence. It is not enough that its proportions simply be practical; they should be artistic and make the fireplace the most attractive feature of the room.
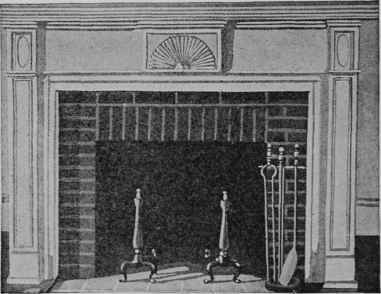
Fig. 18. - A Colonial mantel of unusual distinction, which was built at a cost of only $7.50 for wood and moldings.
Too often the design of the fireplace is left to chance. The result, although it may be a good job of carpentry, is of indifferent appearance. Frequently, of course, the funds available do not warrant the purchase of a well designed and correctly built mantel, but for the man with a home workshop this should be no obstacle. Enough material can be bought for about $7.50 to build a mantel which would cost $100 in the finished state.
As the tendency in small house architecture today is more and more toward the Colonial, the mantels to be described will be found particularly appropriate (Figs. 18 to 21).
The first step, after removing the old woodwork, if any, is to construct a hollow rectangle of the size required by the fireplace opening, allowing a margin the length of one brick on each side and 10 or 12 in. at the top. The horizontal edge should line up with one of the layers of mortar.

Fig. 19. - An unfinished mantel ornament, showing how the apparently carved parts are glued on.
The amount of lumber required depends upon the size of the opening, which may vary from 24 by 30 in. to 32 by 48 in. or even larger; a good average is 28 by 36 in. wide. Of the three large pieces required for the latter size, two should be 9½ by 40 in. and one 13 by 70 in. Whitewood, white pine, basswood, or any other available soft wood that will take paint readily and can be easily worked, may be used. The back should be reinforced and plenty of hot glue and wood screws used as indicated in Fig. 20.
To allow room for suitable moldings and ornamentation, the upper piece should not be less than 13 in. in. width and preferably of one piece. Stock this width usually can be obtained in white-wood; in fact, the writer once made the backs of some breakfast nook seats of stock 26 in. wide.
All Colonial mantels have pilasters of some form. The base for these is indicated in Fig. 20. It should be glued into position and clamped.
While the glue is hardening, visit a woodworking mill and select a number of moldings. Those used in the construction of the mantel in Fig. 18 are shown in detail in Fig. 21. It is seldom possible to obtain just what is wanted, but the required design can be improvised by planing down one or more corners or surfaces of stock moldings. Those marked Nos. 3 and 4 were obtained in this way, as indicated in cross section. An old wooden molding plane was used to make the flutes in the pilaster, marked No. 7.
The central decoration is what really gives a Colonial mantel its character. The Colonial motifs are carved from one piece, but the home "workshopper" can successfully imitate the carved ones by building up the designs piece by piece.
The design should first be laid out directly on the wood with compass and rule, and lines drawn to indicate the location of each individual piece. Only in this way can an accurately symmetrical design be built up.
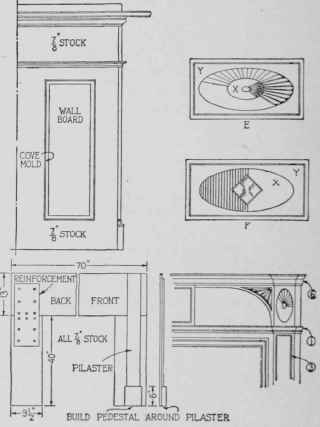
Fig. 20. - How the foundation work is erected, end view of the mantel, and two suggestions for central ornaments, which are built up like that in Fig. 19.
Jackknife, plane, file and sandpaper will quickly shape the fan "blades" and sunburst "rays." These "rays" and "blades" should be made about half as thick at the narrow end as at the wide end, which will be either ¼ or 5/16 in., depending on the thickness of the upper part of the panel, mentioned later. Bass-wood is excellent for these small parts as the grain is absolutely straight and never turns the cutting tool from its course.
The easiest motifs to make are those with the vertical half-round pieces worked into the design( Fig 19 at left; Fig 20, F and Fig 21, C). Each piece should be glued and bradded firmly in position, but it is not necessary to use hot glue as there is no strain on these parts.
The panel upon which the designs are built up consists of two parts, the 3/8-in. base marked X in Figs. 20 and 21, and the ¼ to 5/16 in. cut-out part, Y. In making the latter, a fret saw is brought into play to make the long oval or half-round cuts. This piece first should be attached to the base; the centerpiece, where required, next, and lastly the blades or strips, as the case may be. All brads should be countersunk.
In placing the molding, the cut-and-try method is recommended. The corners must be mitered perfectly. If the miter box has a tendency to play tricks, the file and plane must be resorted to. All of the molding should be glued on, as well as bradded, for the mantel will be heated and cooled and accordingly subjected to many strains.
Enough moldings, center and corner motifs have been shown to make up a dozen designs by putting together various combinations. It is not wise, however, to put on too much decoration.
A coat of thin white shellac should be applied both front and back in order to minimize the absorption of moisture. Leave the top piece of molding loose until ready to set the mantel up. Then drive in a screw wherever a stud can be located through the plaster. The lower end then is toenailed to the floor and a quarter round molding applied as a final finish at the point where the mantel meets the floor.
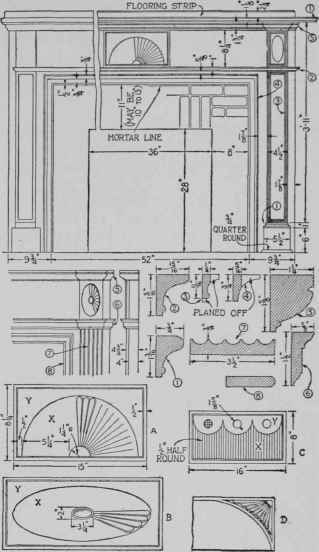
Fig. 21. - Working drawings of the mantel shown in Fig. 18, a key to Fig. 19, and several alternative designs.
The shelf is put up last and may be of 7/8 -in. stock as the molding marked No. 1 is used around the edge to make it appear of heavier construction. A piece of flooring or other 2½-in. or 2¼-in. strip should be beveled on one corner and used as a finishing strip between the shelf and the wall.
The painting is a part of the interior decorator's job and may safely be left to his discretion. Two coats of enamel undercoater and at least two coats of the highest grade of enamel are required.
Continue to:


My Books

