


Projects For The Living Room. Part 2
Description
This section is from the book "Do It Yourself With Aluminum. 125 Projects For The Home Craftsman", by G. W. Birdsall. Also available from Amazon: Do It Yourself With Aluminum.
Projects For The Living Room. Part 2
Cocktail Table with Magazine Rack (Fig. 11-4) has top surface 20" wide, 38" long, trimmed with 1/4" x 1" bar on edge. One piece of bar goes down the front side and half the length of each end. Other piece goes down the back side and meets the first in the center at each end. Attach bar to the 1/2" thick plywood panels (12" x 20") with screws as in Fig. 4-32.
Form the center-depressed section from 21" x 23" embossed sheet. Make the bottom surface 14" long, sides 4" deep, with a 1" flange on each end for attaching to the underside of the end panels. Paint panels black. Cut and fit a piece of double-
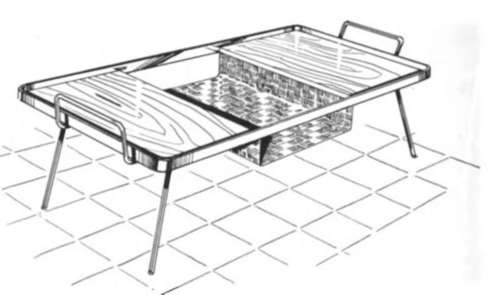
11-4 weight glass to cover entire table top (approximately 20" x 38"). Note that outside corners of end panels and glass top must be rounded (about 1" radius) to fit the inside bend of the bar.
Legs are %" rod, bent so that one piece forms both legs and handle at one end. Handle is 8" long and extends 2" above top of bar edging. Cut legs so table top is 16" or 18" above floor. Round off bottom of legs, or add rubber tips per Chap. 4.
Double Cocktail Table (Fig. 11-5) is a novel design ideal for various types of table groupings. Both table tops are 1/2" plywood framed with ;1/4" x 1" bar on edge attached with invisible screws, per Fig. 4-32 and accompanying instructions. Top table is 18" wide at the planter end, 22" wide at other. Lower table is 16" wide under the intersection and 10" wide at the free end. Make all corners with 2" radius curves.
At the intersection of the two tables, use two 171/2" lengths of 3/4" tube for legs, set into blocks, per instructions accompanying Fig. 4-57. Opposite ends of both tables use 3/8" rod supports with 3" sections bent at right angles at top for screwing against underside of tables. Make bottom bends on 1" radius. Planter box is embossed sheet 5" deep sunk flush with table top and made to fit an 8" x 14" opening in table.
Cocktail Table (Fig. 11-6) is highly modern design with exceptionally attractive appearance when finished in deep lustrous black for the wood parts and bright satin finish for the aluminum. Use cull door for top, or cut 3/4" plywood panel to 16" x 42" and increase thickness at edges to 11/2" with 3" wide strips of 94" plywood screwed underneath all around the edge.
Begin table ends by cutting 31/2" x 10" wood blocks which must be a full 1" in thickness to match the 1/4" x 1" bar stock. Cut two pieces of this bar stock 251/4" long. Starting from the bottom (Fig. 11— 7), make a 30° bend 1" from end of bar. Clamp in vise between two wood blocks, and make bend by hammering with rubber mallet. Do not bend past 30°.
Now 6" from this bend, form a 60° bend in the same direction as the first. Make the same two bends in the second leg. Next assemble these two legs to the 31/2" x 10" wood separator, using two 3/8" rods as big rivets. To be sure of proper assembly, examine Fig. 4-31 carefully. Countersink bar surfaces for invisible riveting, per Fig. 4-31 and associated instructions.


Fig. 11-8.
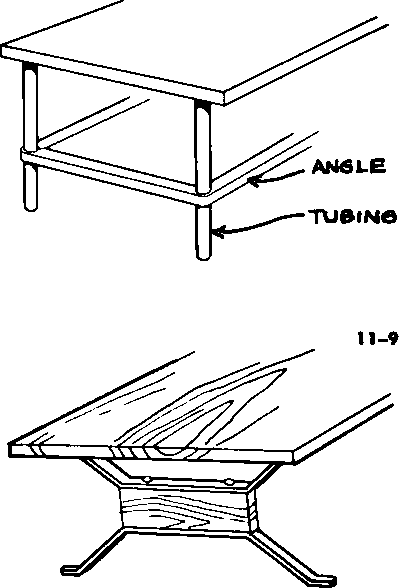
Fig. 11-10.
Continue bending the two legs by clamping in a vise and making 60° bends at top of separator block as shown in Fig. 11-7. A 30° bend 6" from this last bend completes the legs. Drill two holes in top end of each leg for screws into underside of table top.
Fit a 31/2" piece of 1" bar just below the separator block (Fig. 11-7). Cut a piece of 1" bar about 18" long, and bend to fit snugly under the two legs as shown. Rivet this piece to both legs on the sloping side as indicated. Countersink for "invisible" riveting.
Attach each pair of legs to the table, and install a brace of 1" bar stock to center of each separator block (Fig. 11-6). Satin-finish all the aluminum with fine sandpaper, and apply wax or clear lacquer.
Cocktail Table .... Angle Legs (Fig. 11-8) employs 1/16" x 1" x 1" angle for legs and bottom brace with the corner bends made as in Fig. 4-41 and locked by riveting the overlapped sections. Top end of legs is cut, bent, and screwed to underside of table top, per Fig. 4-47. Braces are 94" bar riveted to leg and bent over at upper end to permit screwing to table.
Since cocktail tables vary in size from 3' to 4' or more in length, 16" to 24" in width, and 16" to 18" in height, proportion the legs to suit your own ideas. Inset table edge with 1/4" bar (Fig. 4-32) or 1" angle (Fig. 4-50).
Cocktail Table .... Tube Legs (Fig. 11-9) has 94" tube legs set into table top with stretchers of 1/16" x 1" x 1" angle. Tube-to-angle joint is made per Fig. 4 44. This table design has the added possibility of reversing the position of the angle frame to form a retainer for a piece of glass which then provides a shelf under the table without added structural elements. Inset table edge with 1/4" bar (Fig. 4-32) or 1" angle (Fig. 4-50).

Fig. 11-11.
Cocktail Table .... Bar Legs (Fig.
11-10) offers a novel design that is easy to make following the suggestions of Fig. 4-31. The 1" x 3" wood piece is secured between the bars by two pieces of 3/8" rod which act as huge rivets. Rod ends may be upset or countersunk flush with bar if you wish. To stiffen this design, rivet another length of bar across the bottom as a stretcher. Finish by installing 1/4" bar as table edge (Fig. 4-32) or by insetting 1" angle (Fig. 4-50).
Continue to:


My Books

