


Projects For The Kitchen. Continued
Description
This section is from the book "Do It Yourself With Aluminum. 125 Projects For The Home Craftsman", by G. W. Birdsall. Also available from Amazon: Do It Yourself With Aluminum.
Projects For The Kitchen. Continued
Serving Cart (Fig. 7-12) has plywood serving top 17" x 21". Box of plywood is 12" high at front end, 15" high at back end, 26" long front to back, 18" wide, outside dimensions, with sides open and a hole in the top 121/2" wide, 10" long to fit the ice well made of plain sheet. This well is 141/4" high, 12" wide, 12" long at top, sloping to 8" long at bottom. To make watertight, seal edge with solder or aluminum mastic compound.
Note crossbar on handle with hooks for hanging cups. Rubber bumpers on bottom of box support the ice well and prevent it from scratching. An 8"-square sheet of plain aluminum on top provides a surface for hot dishes. Finisli as in Fig. 5-3, and cement to wood top. Use 6" diameter rubber-tired wheels from your nearest cycle shop. See Fig. 4-20 for end-riveting of crossbar on handle and for the bottom of the tripod-type legs. The 3/8" rod ends are bent parallel to wood surface and attached to wood box and serving top with round-head wood screws as on front panel (Fig. 7-12).
Serving Table (Fig. 7-13) employs simple construction. Make top frame of 1/16" x 1" x 1" angle 23" wide, 39" long over all. including 71/2" extension to handle per Fig. 7-14. This allows for a double-weight glass top 221/4" x 31/4" and the bottle well 23" long, 4" deep, 3" wide. A flange 1" high is bent out toward the handle to stiffen that edge and provide means for riveting to side frame members. Handle is 3/4" tube joined to angle as in Fig. 4-68.

Fig. 7-12.
Fig. 7-13.
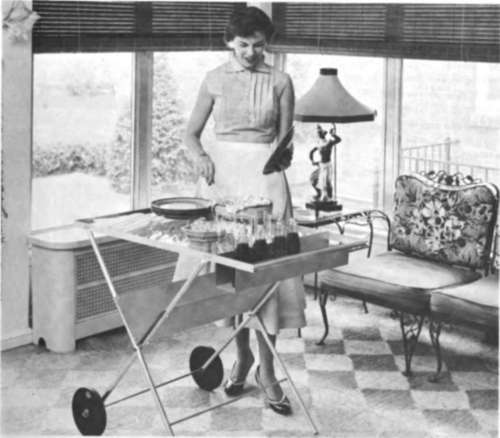
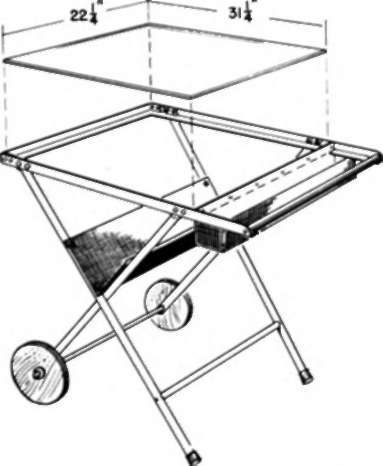
Fig. 7-14.
From 1" tube, cut two back legs 42" long and two front legs 38" long. Join to top frame as in Fig. 4-60. Wheels are 3/4" plywood, 8" in diameter (see Fig. 4-84). Drill hole where legs cross 21" from top end of each, and bolt before attaching to top frame.
The V-shelf is embossed sheet 18" x 24". Put a 1" hem (Fig. 3-5) along each 24" side. Make a 90° bend in center of sheet lengthwise. Attach to legs with sheet-metal self-tapping screws. This shelf stiffens the structure; so use enough screws or bolts to assure solid connections. Spacer bar between back legs is 3/8" rod 9" from leg ends, end-riveted per Fig. 4-21.
Utility Stand (Fig. 7-15) has four shelves of 3/4" plywood cut to the same size. The unit pictured was made to fit an electric roaster, employing the same radius of corner curvature as the roaster. The top of each shelf is protected with a sheet of plain aluminum, cemented in position, per instructions at the end of Chap. 4. Trim aluminum sheets to exact size and contour of shelf. Add the edge trim to each shelf.
Next drill four 3/4" diameter holes 21/2" in from edge and side of each of the three lower shelves. Wobble drill slightly after it emerges through the shelf to provide clearance in assembling tubes. Drill top shelf only 5/8" deep from under side. To assemble the 3/4" tube legs into the shelves, position top shelf upside down on a mat or thin rug on the floor. Then drive the four legs into the top shelf.
Lubricate tube thoroughly with paraffin or an old candle. Now position second shelf on legs and drive down into place, using a rubber mallet or a wood scrap to protect shelf during hammering. Drive third and fourth shelves into position in same manner.
Lock shelves in position by driving finishing nails through edge of shelf and into each of the four legs.
Fig. 7-15.

Fig. 8-1.
Continue to:


My Books

