


Chapter 8. Projects For The Dining Room
Description
This section is from the book "Do It Yourself With Aluminum. 125 Projects For The Home Craftsman", by G. W. Birdsall. Also available from Amazon: Do It Yourself With Aluminum.
Chapter 8. Projects For The Dining Room
Dining-Room Table (Conference Table)
With the color scheme suggested, the table shown in Fig. 8-1 presents an exceptionally bright, highly modern appearance. The table top proper consists of two 3/4" thick sheets of plywood. Use pine Nov-A-Ply for the top sheet, and trim with side rails of maple, stained cherry red.
Fig. 8-2.
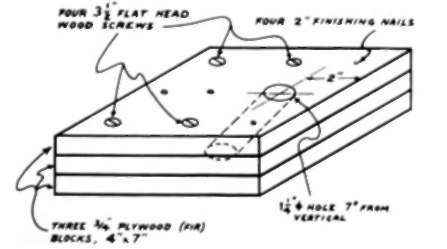
Inset the outer edge with 1/4" x 1" aluminum bar.
While it is easy to make this table in any size up to 4' x 8', the 3' x 5' size (for six people) or the 42" x 6' size (for eight people 1 is best for most dining rooms. The 3' x 6' size makes an excellent conference table.
Since side and end rails are 11/4" thick, cut the two panels 21/2" shorter and narrower than over-all dimensions selected. Place the two panels upside down, and screw them together from the "underside," using flat-head wood screws long in a line 4" in from the outside edges and spaced on 6" centers. Put a final row down center of the panels lengthwise.
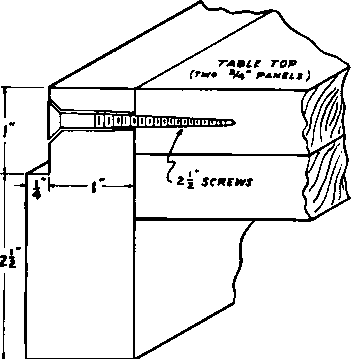
Fig. 8-3.
Two 11/4" diameter aluminum tubes are used for legs at each corner of the table. So make eight plywood blocks (Fig. 8-2). Drill them to fit the tubes, making the holes 7° from the vertical, using angle block and setup pictured in Fig. 4-57. Assemble 36" lengths of tube into these blocks as directed in instructions accompanying Fig. 4—57. With blocks on level surface, make horizontal cut on legs to provide vertical height of 29". This, plus the 11/2" thickness of the two panels, makes the table surface 30 1/2;" from the floor. This height allows most chair arms to easily clear the bottom of the side rails which are 31/2" deep.
Make alignment jig per Fig. 4-58 and accompanying instructions. Use it to position the legs. Secure the blocks to the underside of the table while it is still upside down on the floor. Use 31/2" flat-head wood screws. Drill and countersink holes for them in the blocks before positioning blocks. Use these clearance holes to mark for drilling pilot holes in table top.
Drill pilot holes only 1" or 11/4" deep. Use the depth stop (Fig. 6-4) with a portable electric drill to avoid drilling too deeply.
Now reposition the blocks, and drive the 31/2" screws, using a hand brace fitted with a screwdriver bit, instead of a screwdriver. Then join each pair of legs together at the tip with an aluminum bolt, drilling down through open end of one leg. File leg tips to remove burrs and sharp edges.
With legs anchored to table, turn table right side up for attaching side and end rails and for finishing. Side rails are 11/4" x 31/2" pieces of maple, which must be absolutely straight and true to make the assembly go together properly. If you have any doubts about being able to purchase such items, buy them oversize and cut down to exact dimensions yourself on a jointer to make them straight and true.
Next, cut out upper corner of rails to take the aluminum bar. Make a 1" deep cut first, with saw fence adjusted to make cut exactly 1/4" from outside surface of rail. Then make the 1/4" deep cut with fence set to cut exactly 1" from top of rail. Use scrap pieces of wood to check these settings before cutting rails.
Before mounting rails, go over edges of table panels with a belt sander to make them absolutely straight and true. Be especially careful of the top outer edge. Panel edges must be exactly 90° with table surface.
Now cut rails to exact over-all lengths required to fit sides and ends of table top, with 45° miters at corners. Mount rails with 21/2" flat-head screws on 6" centers into the top panel, as indicated in Fig. 8-3. Drill clearance holes in rail and countersink so screwheads come below rail surface. Mount rails in correct position, and clamp with large C-clamps across table top. Then drill pilot holes into panel edge, using clearance holes as a guide. Now drive the screws.
Cut 1/4" x 1" aluminum bar to lengths required. Do not miter bar joints at table corners. Instead, lap the side bars over the end bars at corners. Before applying end bars, bow center outward slightly. Then a single screw at the center will hold the entire bar snugly in position.
Side bars require three screws each, one about 8" to 10" in from each end and another in the middle. After drilling holes in the bars, glue bars in position. Hold with C-clamps across table top. Bars are also anchored mechanically with 1"flat-head aluminum screws. When countersunk, filed smooth, and finished according to Fig. 4—32 and accompanying directions, screws will blend with bar and not be visible.
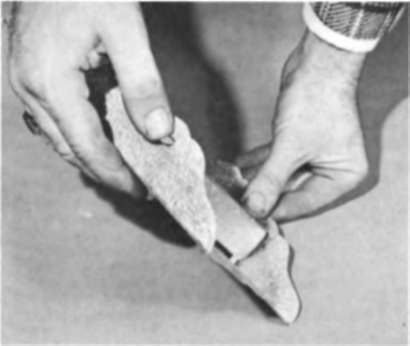
Fig. 8-4.
Continue to:


My Books

