Sliding Sashes In Railway Carriage Doors
Description
This section is from the book "Cassell's Cyclopaedia Of Mechanics", by Paul N. Hasluck. Also available from Amazon: Cassell's Cyclopaedia Of Mechanics.
Sliding Sashes In Railway Carriage Doors
Fig. 1 is an elevation of the inside of a railway carriage door showing the strap for lifting the sash; Fig. 2 is a section through the door; whilst Fig. 3 is a detail showing the bottom rail of the sash and the method of holding the same in position when closed. The brass angle bar A is screwed to the underside of the bottom rail of the sash, and hooks over the bar B, fixed to the middle rail of the door. Sufficient space is left at the top to allow it to clear the bar B and fall into the groove E (Fig. 2). Differing in detail from the above is the railway carriage door with sliding sash, of which Fig. 4 shows a half inside elevation. From the section (Fig. 5) it will be seen that the door pillar is grooved from the top to within a few inches of the bottom, where a padded rail is put across the door; on this the sash falls. To take out the sash, the door is opened; the sash may then be pushed up through the top of the door, although some companies screw stops into the grooves above the sash to prevent the sashes being removed without the use of a screwdriver. In Fig. 6 the joint at the top of the sash at A has a circular corner, the square-cornered joint of the bottom rail being shown at C, Fig. 7. Sometimes the corner at C is mitred 5/16in., but as a rule the round is stopped on the stile and the mitre of the round worked up with the chisel. B, Fig. 6, is a section of the top rail and D, Fig. 7, a section of the bottom rail finished. The grooves are run right through the length of the stiles and rails, the tenons being made of the same thickness as the width of the grooves. From 3/16-in. to 1/4-in. polished plate glass is used, and the grooves are made larger to allow for a bedding of white-lead putty stained a mahogany colour.
At I) the method of fastening the strap and the bottom plate is shown. The sashes are planed, grooved, mortised, etc., by machinery, and knocked together; then the corners are cleaned up roughly by hand. The frame is then puttied and the glass put in. The joints are next cramped up, and the wedges (see Figs. 6 and 7) are dipped in glue and driven in. When these are dry the ends of the tenons and wedges are cut off level, and the frame is fitted into a gauge or into a door. It is then cleaned up, a piece of zinc being used to prevent the sandpaper scratching the glass; the top edge is then rounded, and the plate put on the bottom edge, when the sash or glass frame, as it is generally called, is ready for varnishing and polishing. On many railways the angle plate is not used, the rail under the sash inside being hinged to fall under the glass frame when it is raised; also some railways vise both the angle plate and the falling " garnish" rail.
Fig. 2.
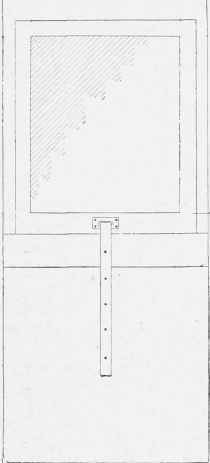
Fig. I.
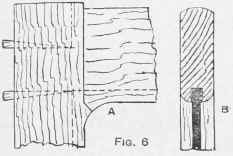
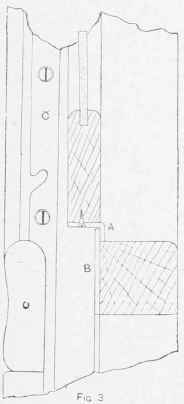
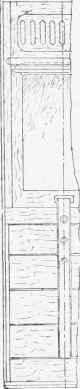
Fig. 4.

Fig. 5.
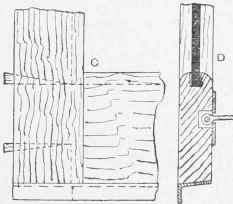
Fig. 7. Sliding Sashes in Railway Carriage Doors.
Continue to:
My Books

