Cabinet For Beadwork
Description
This section is from the book "Cassell's Cyclopaedia Of Mechanics", by Paul N. Hasluck. Also available from Amazon: Cassell's Cyclopaedia Of Mechanics.
Cabinet For Beadwork
The cabinet or workbox here described is suitable for holding beadwork articales It can be made of deal, and almost enough wood can be obtained from an old cube-sugar box; tins, when sandpapered, stained, and varnished, will repay the time and labour expended. The following pi will be required for the top case A (Pigs. 1. 2, and 3). Two, 11 1/2 in. by 7in. by 1/2in., for the top and bottom; two, 10in. by 7in K by 1/2in., for the sides; two, 101/2 in. by 6 1/2 in. by 1/2 in., for the shelves; one. l0 in. by 6 1/2 in. by 1/2 in., for the vertical partition; six, Sin. by 3in. by 1/2in., for the fronts of the drawers; twelve, 6 1/4 in. by 3 in. by tin., for the sides of the drawers; six, 4 1/2in. by 3 in. by 1/4in., for the backs of the drawers. The bottom for the drawers should be cut to fit the inside of the framework. The racks B (Figs. 1, 2, and 3) are 7 in. by l/2 in. by 1/2in., and should have three holes bored in them to hold the tools. To make the desk C (Fig. 3), use two pieces of wood, each 15 in. by i in. by I in., for the sides; one piece, 8 1/2 in. by 10 1/2in. by 1/2in., for the top; one, 10 1/2in. by 15in, by | in., for the bottom; one, 10s in. by 14 in. by 1/2 in., for the back one, 10 1/2in. by Sin. by 1/3 in., for the front of the drawer: two pieces, 14 1/4 in. by 3 in. by 1/4 in., for the sides of the drawer; and one piece, 10in. by 3 in. by \ in., for the back of the drawer. To make the case, nail the top and bottom to the sides of the case A (Fig. 1). The partition and shelves are notched so that they will fit in flush with one another. The partition should be nailed to the top and bottom of the case, as should the shelves to the sides. The last are nailed to the top and bottom, and the case A is fastened to C by nails or (preferably) screws. The back, when fastened in, holds the top and bottom together. In C six holes should be cut to hold the saucers; these should be 1/4in. deep and 1in. in diameter. The fronts of the drawers are rebated so that the sides will lit into them. After making the drawers, bore a hole in the centre of each of the fronts and glue a knob in to serve as a handle. The bottom drawer should have a partition in the centre, so that there will be a drawer for the finished articles; the other part can be used for the wire, etc. It would be advisable to label each drawer with the name of the beads it is intended to hold. The labels can be of paper glued on, or of tin nailed on; or if the necessary skill be possessed an attempt may be made at painting the name on the front of each drawer, the black letters being on a rectangular background of white.
If glue also is used it will make the case look much stronger.
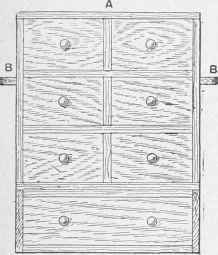
Fig. I.
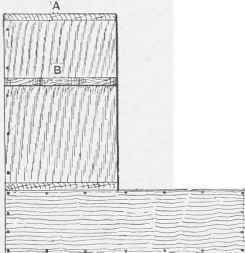
Fig. 2.
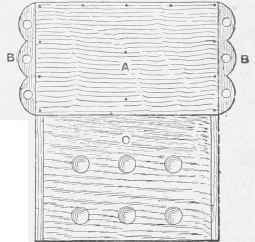
Fig. 3. Cabinet for beadwork.
Continue to:
My Books

