Towline Glider. That You Can Build Of Pine
Description
This section is from the book "Boy's Fun Book Of Things To Make And Do", by Grosset & Dunlap Publishers. Also see: The Pocket Dangerous Book for Boys: Things to Do.
Towline Glider. That You Can Build Of Pine
MODEL airplane building need not involve the use of costly and varied materials. The glider pictured here is an example of the fine models you can easily build from inexpensive supplies and which will afford you plenty of excitement.
This towline glider is simple in design and easy to construct. Pine was used throughout in building the model shown, but if balsa is available the same sizes given for pine may be used for ribs, covering, bulkheads, and trailing edges. For other parts, balsa members should be of about double the cross section specified for pine.
Templates for the wing and stabilizer ribs are made first. Do not cut out the spar slot on the template. Instead, prick both the spar outline and the slot through the template on the rib stock. After the rib is cut, the pin marks will serve as guides for cutting the slot.
Before cutting the outline for the front portion of the fuselage, cement the pieces together. Cut the triangular bulkheads individually to the dimensions given. Notice that all are 1/4" wide at the top and 1/16" wide at the bottom except No. 1 and No. 2. On a 1/16" by 1/4 " by 151/2" strip; mark bulkhead locations 13/8" apart. Fix the bulkheads at these points with model cement, making sure that they are all perpendicular.
The assembly should now be pinned to a board so that it will keep its shape while the bottom longeron is cemented to the bulkheads from No. 3 back. Attach the front portion as shown in the drawing. When the cement has set, attach the side longerons. These are straight from front to back. The front portion of the fuselage is covered with 1/32" sheet pine. Leave one lower side (between bulkheads No. 1 and No. 2) open so that the balancing weight can be cemented into this space.
In constructing the wing and stabilizer, draw a full-size view over which to assemble them. It is a good idea to cut the roots of the spars to the correct dihedral angle before assembly. The joint between the center spars is reinforced by two 1 16" by 1/4" by 11/2 " strips as shown. This joint is further secured by a strip 1/16" by cemented to the leading and trailing edges and smoothly bent to go over the spar joint. Ribs are cemented to each side of this strip, forming a slot.
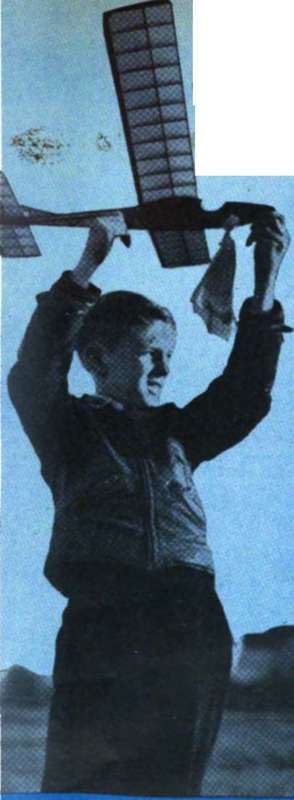
Only the simplest of materials needed for building this all pine model for new thrills in motorless gliding.
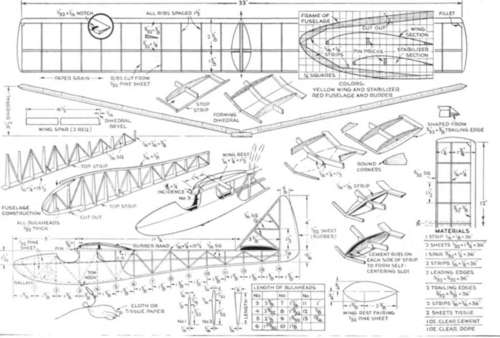
Dimensions ore based on pine construction. If balsa is used, some members should be larger
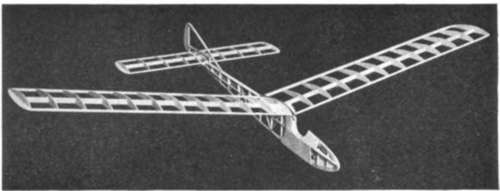
The framework before covering. One side of the nose is left open so that balancing weight may be added.
The upper fuselage member has a 1/16" by 1/4" by 11/2" strip mounted on it crosswise, with a similar strip running forward to form the base for the incidence block. The wing is fastened on the fuselage by a rubber band looped from bulkhead No. 6 and hooked under the incidence block. As the rubber band lies in the slot, it automatically centers the wing on the fuselage.
Cover the fuselage, wing, and stabilizer in the usual manner. Use cement-thickened dope for adhesive. Fasten paper only to the spars and longerons of the fuselage. Dampen it to smooth out any wrinkles. Later, apply one or two coats of clear dope over it. - Make the rudder by cutting a 1/32" pine sheet to the outline shown in the drawing and cementing a 1/16" by 1/16" strip to its front. Then fasten both to the fuselage. Form a triangle by adding another strip for the leading edge and add the other straight strips. Complete the framework by bending a strip over the center stabilizer rib. Before covering the rudder, trim the tissue to fit snugly against the stabilizer.
Now the model is ready to be balanced. First fix the wing in place with the rubber band. Then place a sufficient amount of weight in the space between bulkheads No. 1 and No. 2 to balance the model about 1" from the trailing edge of the wing. When the proper balance has been achieved, glue the weight in place, cover with sheet pine, and cover the front of the fuselage with paper and dope. Cement the tow hook under bulkhead No. 3.
To fly the model, glide it into the wind and note whether it dives or stalls. Add weight in the form of clay accordingly. Note the shape of the tow ring and how closely the pull-off tissue is tied to it. Be sure the tow is straight into the wind, as indicated when the sag of the line is straight down. It is best to note the natural turn of the model before making any adjustments on the rudder.
This model is not eligible for contest flying, since the fuselage lacks the required cross-sectional area and the wing loading is too low, but it might, if desired, be built with a larger, heavier fuselage.
Continue to:
My Books

