


Anti-Freezing Outside Faucet
Description
This section is from the book "Handy Man's Workshop And Laboratory", by A. Russell Bond. Also available from Amazon: Handy Man's Workshop And Laboratory.
Anti-Freezing Outside Faucet
It is at times convenient to be able to use an outside faucet in winter as well as in warm weather. To do this change the location of the stopcock, which is always placed just inside the cellar wall, from the dotted position A to the position shown by full lines. Then make an extension handle out of a piece of 1/2 inch pipe B. After first cutting a thread on both ends, slot one end to receive the T handle C of the stopcock. The other end of this pipe should be slotted, or a hole drilled through it large enough to receive a piece of 1/8-inch gas pipe E or a piece of iron of about the same diameter (a 20-penny wire nail will answer). Now screw on a gas cap so that it presses tightly against this cross-piece and holds it in place. An extra hole must be drilled through the brick wall for the extended handle. For this make a drill out of a piece of gas or water pipe of the same diameter as the handle, having teeth filed in the end. Pass the handle through the hole in the foundation and secure it to stopcock C by two locknuts F, leaving a little play so as not to bring any strain on the stem. If locknuts are not handy wrap a few turns of wire around the end of pipe after slipping it over the T handle.
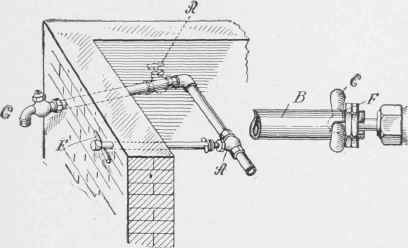
Fig. 302 - Anti-freezing outside faucet.
Of course the hose faucet must always be left open, and the best way to insure this is to remove the handle and working parts, and cap the stem hole by placing under the stuffing cap a piece of tin with a leather washer under it, or take off the faucet and put on an elbow.
Be sure that the pipe slants downward from A to G or the water will not run off when the stopcock is closed.
The best kind of stopcock to use is the compression type, as it works more easily than the ground seat kind and does not become leaky as soon.
Continue to:


My Books

