


To Re-Cover A Worn Baren With Bamboo Sheath
Description
This section is from the book "Wood-Block Printing", by F. Morley Fletcher. Also available from Amazon: Wood-Block Printing.
To Re-Cover A Worn Baren With Bamboo Sheath
Damp the new leaf in water with a brush on both sides thoroughly.
Wipe dry both sides. Lay it on a flat surface and stretch wider with the fingers on the inside, keeping the leaf flat with the palm of the hand.
Rub the leaf with something hard and smooth across the width on both sides.
1. Cut AG, BG with leaf folded.
2. Place the round pad in position on the flat leaf.
3. Stretch the leaf to lap at sides EF.
4. Turn in EA and BF fold by fold, first one side and then the other.
5. Pull hard before beginning the other end.
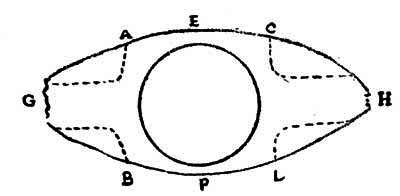
Fig. 19. - Method Of Re-Covering Baren
6. Cut away CH, DH, holding down firmly the end done.
7. Twist up the ends tightly, pull over to the centre, and tie tightly together; cut off ends.
8. Polish on board and oil slightly.
Twist the inside part of the baren occasionally to save wear by changing its position within the sheath.
Several substitutes have been tried in place of the Japanese baren, with coverings of leather, shark's skin, celluloid, and various other materials, but these necessitate the use of a backing sheet to protect the paper from their harsh surfaces.
An ingenious rubber of ribbed glass which works directly on the paper has been devised by Mr. William Giles, who has produced beautiful results by its means.
If one is using the Japanese baren, its surface needs to be kept very slightly oiled to enable it to run freely over the damp paper. A pad of paper with a drop of sweet oil suffices for this, and may lie on the right of the printing block where the baren is put after each impression is taken.
An even simpler method is that of the Japanese craftsman who rubs the baren from time to time on the back of his head.
Continue to:


My Books

