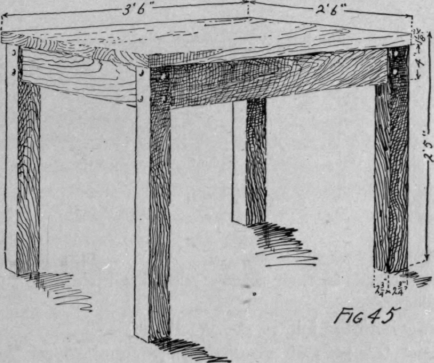
Fig. 45. Table
Description
This section is from the "Handbook In Woodwork And Carpentry" book, by Charles A. King. Also available from Amazon: Handbook in woodwork and carpentry.
Fig. 45. Table
New subject: Draw boring. See W, Topic 65 C.
Wood: Oak.
Preparatory: Make working drawing and stock list. Cut necessary-pieces, making usual allowance for working.
In cutting the material for the top, 1 1/8" boards may be used, or thicker material, if desired.
The appearance of thickness may be secured without the expense or the weight of using the thicker stock, as follows : Cut the material for the top from 7/8" stock, and glue it in the ordinary way, making a doweled glue joint. Cut the top to its required size roughly, and straighten the under side across the ends by traverse planing. Glue pieces
about 5" wide and as long as the top on the under side of the top, flush with the edges. Cut pieces 5" long, and enough in width to fill in between these edge pieces, and glue them flush with the end of the top. The whole may now be treated as though the entire top were glued of thick material. Exercises. 1. A. The legs and rails should be made of solid oak. Allow a tenon of about 2 1/4" on the end of each rail to enter the legs. B. Cut shoulders and tenons on the ends of each rail, marking them by the mortise gauge.
C. Set the head of the mortise gauge back, the amount of sinkage required between the face of the legs and the face of the rails, and mark the tenons on the legs. In doing this, be careful that the best sides of the legs are kept on the outside
2. A. Cut the tenons with a ripsaw, and the shoulders with a backsaw B. Miter the ends of the tenons so they will clear each other in the mortise.
3. A. With a ripsaw, make a cut to the lines of the mortises of each side of each leg, making the cut upon the inside of the lines to maintain the size of the mortise. B. Trim out the corners, bottom, and sides of the mortise, working
carefully to the lines. C. Fit the rails in their places. Mark all joints for future identification.
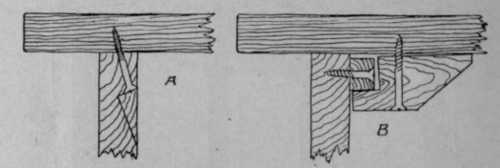
Fig 46. Detail.
4. A. Draw bore the joint. See W, Topic 65 C.
B. Make the pins of required length, and round the top over carefully. If it is desired to save a little work, the draw boring may be done from the inside, in which case the end of the pins will not show on the outside.
5. Plane, scrape, and sandpaper all pieces; leave no sharp on ragged corners. The corners of the legs should be rounder quite perceptibly.
6. A. Glue end rails and legs together. Pin them.
B. Glue side rails and legs together, and drive the pins in their places. Drive the pins so that their rounded tops will just project beyond the surface of the leg, if the pegs are driven from the outside.
7. A. Place the boards of the top together and match the figure of grain. If possible, the grain of the boards should run in the direction easiest planed from that side. This is not so important as it is that the figure should match well.
B. Joint edges. See C, Topic 54 and Topic 69 A, for instructions in jointing and doweling. The dowels should be placed not more than 15" to centers.
C. Glue the top, using clamps. Put the glue in the dowel holes and along the whole length of the joint. See W, Topic 66.
D. Cut top to approximate size. (If piece is to be glued on to make the top appear thicker, refer to preparatory instructions of this model.)
E. Make top of required dimensions.
F. Joint the tops of the legs and rails straight and true.
G. Straighten under side of the top, and fit it and the legs and rails to each other.
8. Fasten the top on by method indicated in C, Fig. 46, A or B.
The latter method is to be preferred, as it allows the top to shrink and swell without danger of opening the joints.
9. A. Traverse plane the top. Take a very light shaving.
B. Plane lengthways with jack plane.
C. Traverse lightly with jointer if necessary, and make the top straight in all directions.
D. Smooth with finely adjusted smoothing plane.
E. Scrape with a sharp scraper; remove all grain marks, and be careful not to dig a hole which can be felt in passing the hand over the top.
F. Sandpaper lengthways. Do this very thoroughly, being sure that the sandpaper does not slip off of the corners.
G. Give the corners a perceptible round; do this accurately, or it will look worse than if it were not done at all.
10. Inspect for defects, and remedy them.
11. Stain and finish as desired.
Continue to:
My Books

