70. Mitered Doweled Joint
Description
This section is from the book "Elements Of Construction", by Charles A. King. Also available from Amazon: Elements of construction.
70. Mitered Doweled Joint
Mitered Doweled Joint. Fig. 133.
Material:
2 pieces, 6" X 2 1/2" X 7/8".
Fit the joint; then fit the dowels by Method 1, Fig. 130.
A. Gluing a mitered joint: Method 1. It is plain that a joint of this shape will be hard to clamp rigidly, but pieces a and 6 indicate a common method of holding joints of this nature. The same principle may be applied to any irregular forms. These pieces are glued on by a rub joint, after the miter joint is fitted; when they have set perfectly, they are ready for use. It will be seen that they furnish a grip for the hand screws or clamps; therefore it is necessary that the faces which receive the clamps should be approximately parallel. The joint may now be treated as a doweled edge joint.
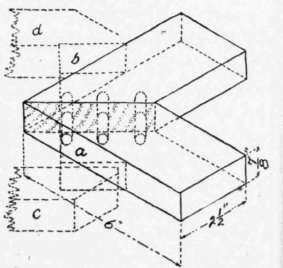
Fig. 133. - Mitered Doweled Joint: Method 1 of Gluing Angles.
After the glue is set, remove the pieces a, b carefully; otherwise, they may take some of the wood of the model with them. Smooth and sandpaper the model.
B. Gluing a mitered joint: Method 2. Fig. 134 shows another method of holding a mitered joint, which is an application of the same principle, its advantage being that it may be used without waiting for the glue to set. After the joint is fitted, the clamp strips e and f should be prepared of any convenient material, and notches cut in them as at g g, faces h h being parallel. These clamp strips should be held rigidly to pieces j, k by hand screws, l, m. After the glue is applied, hand screw n will hold the joint rigidly in place until the glue has set. Smooth and sandpaper the model. Either of the above methods may be applied in gluing pieces of any angle or of any irregular shape.
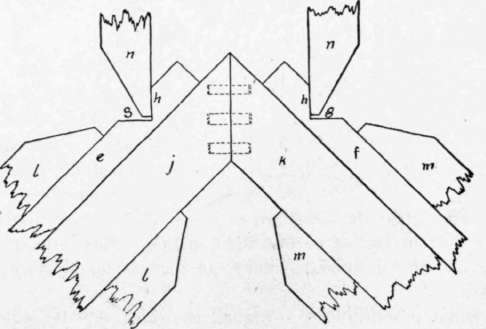
Fig. 134. - Mitered Doweled Joint: Method 2 of Gluing Angles.
Continue to:
My Books

