


Lesson III. Measurement
Description
This section is from the book "Elementary Woodwork", by George B. Kilbon. Also available from Amazon: Elementary woodwork.
Lesson III. Measurement
In practical work measurement precedes gauging, which was the subject of Lesson II (Use Of The Gauge). In this course of lessons it is placed after gauging in order that lines may be gauged on the board used in the measurement problems.
Problem I. Measurement With Pencil
Take a board 8 in. X 2 in. X 5/16 in. Set the gauge successively at 1/4 in., 1/2 in., and 3/4 in., and at every setting gauge two lines on each side of the board. Set the gauge 1 in. and gauge one line. Each side will appear as in Fig. 41.

Fig. 41.
See that the pencil has a sharp point. This can be done by first whittling it with the knife, making a cone 3/4 in. long, as in Fig. 42, and then perfecting it with a piece of No. 0 sandpaper as follows:-

Fig. 42.
Hold the sand-paper on the bench with the left hand, as in Fig. 43. Hold the pencil-point on the sand-paper near to the end a, the fingers of the right hand being in the position shown at A, and draw the pencil toward b, rolling it underneath while doing so, bringing the fingers of the right hand to the position shown at B, thus preserving the cone shape while sanding. Release the grasp which the thumb and the two fore-fingers have on the pencil, and, holding it by the remaining fingers, as at C, carry it back to a and repeat the sanding process until the pencil-point is sharp.

Fig. 43.
Hold the rule on the board, one end of it exactly agreeing with the end of the board, and the graduated edge of the rule near to one of the gauged lines, as in Fig. 44.

Fig. 44.
Place the pencil-point on the gauged line and successively against each 1/2 in. graduation of the rule, holding it as in Fig. 44, and giving it a slight revolution to imprint a dot.
Repeat on a second line at every 1/4 in., and the work will appear as in Fig. 45.
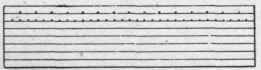
Fig. 45.
Problem II. Measurement With The Knife
To sharpen the knife-point, first grind it till the edge is thin. This is a difficult operation, requiring skill, and a workman of experience must do it. Next put a few drops of kerosene oil on the oil stone, and hold the knife-blade on the stone, as in Fig. 46. Keep the ground face of the blade in perfect contact with the stone, and make a few elliptical motions, as indicated by the dotted line, so adjusting the strain of the muscles in grasping the knife that the rubbing will be done at and near the edge and not at or near the back of the blade, also constantly raising and lowering the hand about 1/4. to cause the stoning to be effective from the extreme point of the blade along the curve of the edge to the place where the blade is of full width, that is, from c to d, Fig. 47.
It is manifest that both sides of the blade need this treatment. After a few motions inspect it to see if the stoning is being done as above directed. If not, strain the muscles differently next time according as the error suggests. Test the edge by touching it to the ball of the left thumb, or by cutting a piece of soft pine. Sometimes an edge will be inadvertently ground or stoned too thin, that is, so as to leave a feather which is shown exaggerated at a b, Fig. 48.
This must be worn off at a by light stoning or by rubbing on the palm of the hand, or on a piece of leather into which has been rubbed a little lard and emery flour, or on the clean upper of one's shoe.
Take the board used in Problem I. Hold the rule on it near the third line; hold the knife as in Fig. 49, and press it vertically, making points at every 1/4 in. graduation of the rule.
See that the points made are large enough to be easily seen at arm's length, that they are of uniform size, and all at exact right angles to the gauged line.
Repeat the effort on the fourth line, placing points at every 1/16 in. of alternate inches. The object of utilizing only alternate inches is to give opportunity to rest the hand. The work will appear as the third and fourth lines in Fig. 50.
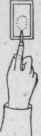
Fig. 46.

Fig. 47.

Fig. 48.

Fig. 49.
Rapid workmen may place points on additional lines. Slower workmen need not complete the sixteenths, but should do accurate work as far as they proceed.
Problem III. Varying Measurements
Let the class work in unison, placing the rule on a fifth line and making measurements at the teacher's call. If the measurements commence at the right, and the calls are successively 1 in., 1/2 in., 1/4 in., 1/8 in., 1/4 in., 1/2 in., their sum will be 2 5/8 in. as in the fifth line Fig. 50.
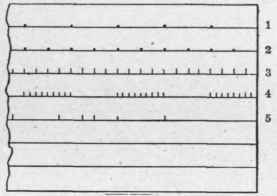
Fig. 50.
Place points on the remaining lines in a similar manner, calling a different succession of measurements for each line, until the entire class during a given effort reach the correct sum.
Continue to:


My Books

