


Chapter IV. A Scrap-Basket
Description
This section is from the book "Design and Construction in Wood", by William Noyes. Also available from Amazon: Design And Construction In Wood.
Chapter IV. A Scrap-Basket
In designing a scrap-basket, matters for early consideration are:
I. The fixing of the essentials, a. Of these the size must be approximately determined at the beginning. For ordinary purposes a waste-basket should not be more than 18" or less than 14" high, depending - so far as looks go - upon the size of the desk beside which it is likely to stand. As to breadth, it may be properly between 7" and 10", depending on the height. The shape may be square, Fig. 9, the easiest construction; or six sided, Fig. 7; or eight sided; or square with the corners cut, Fig. 8.
b. The next point to decide is the kind of wood to be used. Pine is easier for a beginner to work, but it is more expensive than cypress or spruce. Cypress is softer than spruce and hence easier to work, and has a pleasing grain. On the other hand, spruce is stronger. Take it all in all, cypress answers more requirements. The more expensive and harder cabinet woods, oak and mahogany, are all right for the experienced worker.
c. As to the construction, the simplest is the best; the slats are nailed to the flat bottom and to a frame consisting of a band of cleats at or near the top. If the cleat is made as in Fig. 9 this band or rail may be boxed together very strongly with an end-lap joint as described below. If the rail is outside the slats, a miter joint should be used for appearance sake, Fig. 10. If the top is finished with a nosing, as in Figs. 10 and 17, the frame will serve as a ready means of lifting the basket. On the other hand, if the basket is finished with the frame inside it is more conveniently lifted if handles of wood or copper or leather are added on two opposite sides. See Figs. 8 and 11.
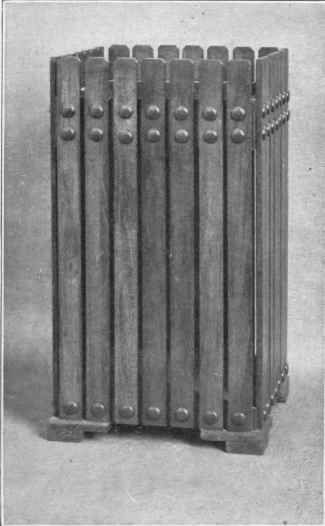
Fig. 9. Scrap-basket.
II. Proportions. With these essentials fixed, we pass to the refining of the proportions.
The proportion of width to height should be subtle, not obvious, as 1 to 2 or 2 to 3. The width may be increased by changing the number of the slats or the spaces between them. To vary the width of the slats themselves increases the difficulty of planing which, for a beginner, is better kept easy. Various arrangements of slats are shown in the illustrations. A variety of designs is possible by changing the position and width of the frame. By putting it at the very top of the slats with a mitered nosing over both slats and cleats, a neat substantial finish is obtained. Fig. 13. If the frame is lowered, some of the slats may be cut to different lengths and so shaped as to make a pleasing outline at top and bottom. Fig. 19. By the same method a handle may be introduced, Fig. 15.
III. Decoration. Several features may be added for decorative purposes as, for example, feet at the corners, perhaps with a little line carving, Fig. 9; lacing, instead of nailing at the corners, Fig. 7; not to speak of the handles already mentioned. For those who have facilities for working in copper, well designed handles and corner braces give an added charm to the appearance of the basket.
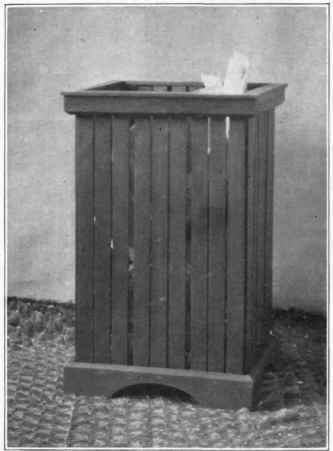
Fig.10. Basket with mitered frames at top and bottom.
The use of upholstery nails, or large copper tacks (12 oz.), with the heads hammered into knobs or filed square, gives an artistic touch. See Figs. 7, 8, 11, 12, 13, 18.
IV. The Finish. The stain chosen should make the basket harmonize with its surroundings. Soft browns and grays are the safest. Dull red or gray-green may be suitable. Finally the basket may be waxed or oiled as described below.
The following directions describe the making of the basket shown in Fig. 9.
The scrap basket is chosen for the first project because it involves much sawing and planing, both of which processes it is essential to master at the outset. Moreover the planing is chiefly narrow-surface planing, which is easier for the beginner than broad - surface planing. Furthermore, when the project is successfully completed, it is worth having. The following materials are required:
Continue to:


My Books

