Seed Corn Rack
Description
This section is from the book "Shop Projects Based On Community Problems", by Myron G. Burton. Also available from Amazon: Shop Projects Based on Community Problems.
Seed Corn Rack
Materials
Yellow Pine (Chap. III., Par. 48) or any soft wood.
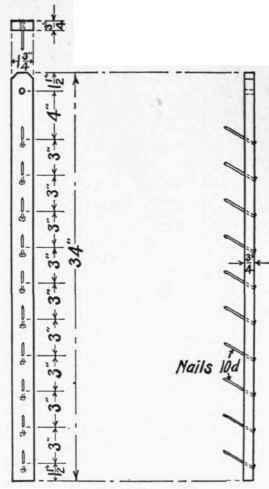
1 pc. 7/8"x2"x36" Rough or S 2 S 10 nails, l0d common.
Introductory Statement
People who are interested in agriculture, or in fact in the growing of any sort of plants, are beginning to realize the value of planting only good seed. In order to produce excellent, high-yielding corn it is necessary to use seed from that sort of corn plant. Men who have made a scientific study of corn tell us that seed corn should be very carefully selected, taking into consideration not only the size, shape, kernel depth, variety and vitality of the ear, but also the proper characteristic of the mother plant. Seed corn should be very carefully stored during the winter where it will be free from rats and mice, dampness and other conditions which render it unfit for use.
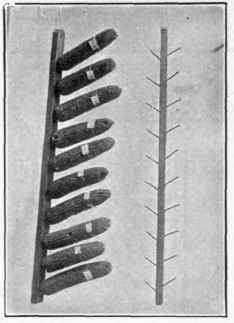
This lesson shows you how to make a very convenient rack to hold ten or twenty ears. When it is filled with the selected corn it should be hung from a rafter or other timber in the barn or shed loft.
References:
U. S. Bulletin No. 229, The Production of Good Seed Corn.
U. S. Bulletin No. 409, School Lessons on Corn.
U. S. Bulletin No. 313, Harvesting and Storing Corn.
U. S. Bulletin No. 298, Food Value of Corn and Corn Products.
Book of Corn, Prof. J. R. Steward, Muncie Normal, Muncie, Ind.
The Book of Corn, Herbert Myrick. Orange-Judd Co., Publishers.
U. S. Bulletin No. 81, Corn Culture in the South.
U. S. Bulletin No. 199, Corn Growing.
The Tree Doctor. Davey.
Seed Corn Rack
Suggestions For Original Design
Twisted Wire
No.1
Halls Driven From Each Side
No.2
Seed Corn Rack Specifications
As one of the principal things for you to learn in this lesson is to plane a long strip of material so it will be perfectly straight and square, you should perform each operation very carefully. If your material is furnished S 2 S, it will not be necessary for you to surface the sides; if not, first plane one surface smooth and straight for your working face (Chapter II., Paragraph 2). Plane one edge perfectly straight and square with the working face (Chapter II., Paragraph 4); mark this the working edge. With your try-square lay out, and with the back saw or panel saw saw one end perfectly square with the working face and the working edge; mark this the working end (Chapter II., Paragraph 5). With your marking gauge (held against the working edge) gauge the width on each surface (Chapter II., Paragraph 6). Carefully plane to the gauge line. From the working end measure the desired length and square off the end. Lay out and chamfer the upper corners, as indicated in the drawing.
This chamfer may be cut in a miter box, if your shop is provided with one, or you may lay out the regular half-pitch cut (Chapter II., Paragraph 24) with the large steel square, and from this cut set the T-bevel and use it in laying out. These marks should be squared across the edges with the T-square. Fasten the material in the vise, or hold it on the bench hook (Chapter II., Paragraph 5), and saw off the corners as laid out.
Bore the hole for the hanger (Chapter II., Paragraph 9). Lay out positions for the nails 3" apart. To do this gauge a pencil line (Chapter II., Paragraph 7 or 8) in the center of the working face. Set the compasses with the points 3" apart; step off the spaces on the pencil line to mark places for the nails. Holes should be bored with a small bit before attempting to drive the nails. Make sure that all the holes are bored at the same angle (Chapter II., Paragraph 12).
Continue to:
My Books

