Lapped Dove-Tailed Joint
Description
This section is from the book "Shop Projects Based On Community Problems", by Myron G. Burton. Also available from Amazon: Shop Projects Based on Community Problems.
Lapped Dove-Tailed Joint
Paragraph 71. The lapped dove-tail joint is simply a lapped joint in which the farther end of the tenon is wider than the portion that is next the shoulder. This makes it impossible for the joint to pull apart without splitting the material. The lapped dove-tail joint is not very common because it is rather difficult to construct and presents but few advantages, which are hardly sufficient to justify the efforts required in making it. It is very suitable in installing mullions or cross ties in any sort of large frame work. The dividing strips in large window screens would offer an opportunity for the application of this joint.
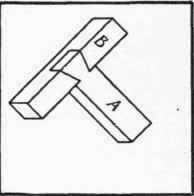
Figure 50.
To Lay Out The Lap And Dove-Tail
The angle at which the dove-tail is cut is not material. Whatever angle is decided upon should be set on the T-bevel. The materials should be planed exactly square. On piece A cut the lap joint the same as when making an end half-lap (Paragraph 63). Then with the T-bevel lay out the angle of the dove-tail on the working face. With the back saw, saw down the shoulder and rip down the lines laid out with the T-bevel just as you would saw out a tenon. Lay this piece of material across the piece B in the desired position. With the sharp point of a knife indicate the width for the gain. With the T-bevel lay out the gain on the working face. (Sometimes this gain is laid out merely by marking on each side of the tenon. It is more desirable, however, to lay it out with the T-bevel in order to have it absolutely accurate.) Square these lines down on both edges of material B, with the marking gauge set exactly as it was used in laying out the tenon, gauge the depth which the gain is to be cut. Saw down to the gauge line, then with a sharp chisel pare out the gain. Assemble this joint with glue, brads, nails or screws as the nature of the work may indicate.
Continue to:
My Books

