House Building. Part 2
Description
This section is from the book "Carpentry for Boys", by J. S. Zerbe. Also available from Amazon: Carpentry for Boys.
House Building. Part 2
General House Building
We are to treat, generally, on the subject of house building, how the work is laid out, and how built, and in doing so I shall take a concrete example of the work. This can be made more effectual for the purpose if it is on simple lines.
Building Plans
We must first have a plan; and the real carpenter must have the ability to plan as well as to do the work. We want a five-room house, comprising a parlor, dining room, two bedrooms, a kitchen and a bathroom. Just a modest little home, to which we can devote our spare hours, and which will be neat and comfortable when finished. It must be a one-story house, and that fact at once settles the roof question. We can make the house perfectly square in plan, or rectangular, and divide up the space into the proper divisions.
The Plain Square Floor Plan will first be taken up, as it is such an easy roof to build. Of course, it is severely plain.
Fig. 221 shows our proposed plan, drawn in the rough, without any attempts to measure the different apartments, and with the floor plan exactly square. Supposing we run a hall (A) through the middle. On one side of this let us plan for a dining room and a kitchen, a portion of the kitchen space to be given over to a closet and a bathroom.
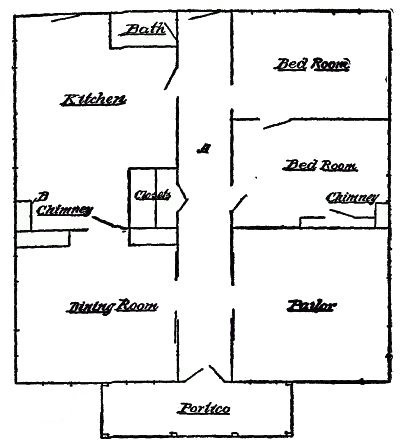 Fig. 221.
The chimney (B) must be made accessible from both rooms. On the other side of the hallway the space is divided into a parlor and two bedrooms.
The Rectangular Plan
In the rectangular floor plan (Fig. 222) a portion of the floor space is cut out for a porch (A), so that we may use the end or the side for the entrance. Supposing we use the end of the house for this purpose. The entrance room (B) may be a bedroom, or a reception and living room, and to the rear of this room is the dining room, connected with the reception room by a hall (C). This hall also leads to the kitchen and to the bathroom, as well as to the other bedroom. The parlor is connected with the entrance room (B), and also with the bedroom. All of this is optional, of course.
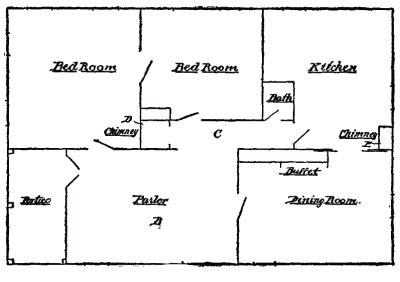 Fig. 222.
There are also two chimneys, one chimney (D) having two flues and the other chimney (E) having three flues, so that every room is accommodated.
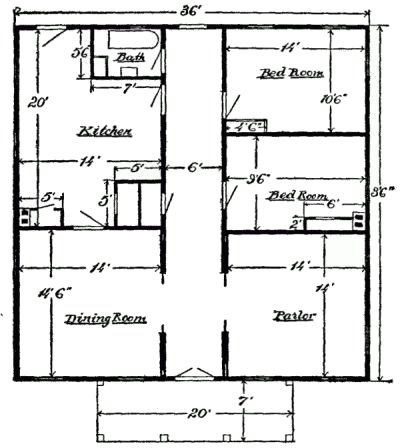 Fig. 223.
Room Measurements
We must now determine the dimensions of each room, and then how we shall build the roof.
In Figs. 223 and 224, we have now drawn out in detail the sizes, the locations of the door and windows, the chimneys and the closets, as well as the bathroom. All this work may be changed or modified to suit conditions and the taste of the designer.
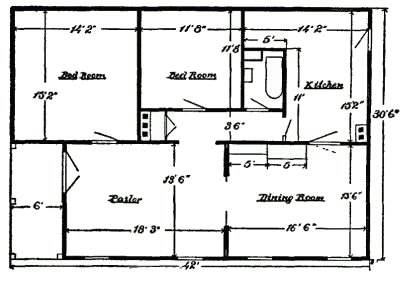 Fig. 224.
Front And Side Lines
From the floor diagram, and the door and window spaces, as marked out, we may now proceed to lay out rough front and side outlines of the building. The ceilings are to be 9 feet, and if we put a rather low-pitched roof on the square structure (Fig. 223) the front may look something like Fig. 225, and a greater pitch given to the rectangular plan (Fig. 224) will present a view as shown in Fig. 226.
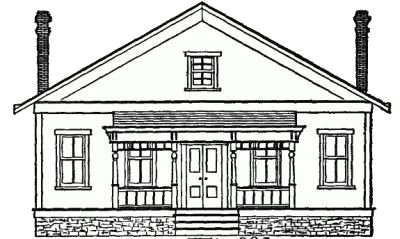 Fig. 225.
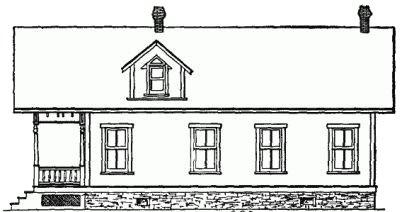 Fig. 226.
Continue to:
My Books

