Method Of Wiping Joints. Part 3
Description
This section is from the book "A Working Manual Of American Plumbing Practice", by William Beall Gray, Charles B. Ball. Also available from Amazon: Plumbing.
Method Of Wiping Joints. Part 3
Fig. 239 is a supply-pipe branch with swell neck, much more difficult to wipe than the style shown in Fig. 238.
Fig. 240 is a double-branch cross. This style of cross looks well, and is very easy to wipe, because one branch may be wiped at a time by protecting the first with chalk or paste.
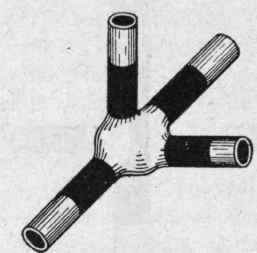
Fig. 242. Angle Cross..

Fig. 243. Combination Branch and Round Joint..
Fig. 241 is a regular cross-joint, more difficult than the double branch because there are four edges to take care of at one heat.
Fig. 242 is an angle cross, more difficult if anything than the wiping of Fig. 241.
Fig. 243 is a combination branch and round joint, sometimes made where it is most convenient to have a branch joint come at a point where two ends of the supply line must also be joined.

Fig. 244. Y-Joint, Used Generally on Telephone Branch Cables..

Fig. 245. Y-Joint on Lead Waste-Pipe..

Fig. 246. Common Flange Joint..
Fig. 244 is a Y-joint. This form of Y is rarely wiped except for branch cables on telephone work. Many so-called Y-joints are made at a Y-angle on lead waste-pipe work, as shown in Fig. 245. As a general rule, none of these combination joints are made frequently enough of late years to keep a plumber in good practice. A common wiped flange joint is shown in Fig. 246.
An inclined joint can be set easily with two pairs of old dividers and two blocks to hold the pipe away from the wall. The table to catch what falls, should be a little toward the low side rather than centered under the cleaning. To wipe a joint in this position, pour well out on the soil, and let it stand without attempting to do much with the cloth. Temper the solder from the pot by digging out of the stack on the joint, and pour liberally. After the cold edges get melting hot next the cleaning, lift them into the pot. Then begin to pass the solder around with the cloth. Keep a good mass on the pipe. Pat up when hot enough, and cut the high edge clean first; then the top of the low edge. Then make some trial wipes, without pulling off any solder, to see if the joint is filled out to the proper contour all around. If not, use the surplus to fill the low places; then wipe down to the desired shape quickly.
If the joint takes on any symptoms looking as if it had been stung by a bee on the low end at the bottom, cool it quickly with water.
To protect the wall on a flange joint over new wood wainscoting, such as is often made on sink wastes and vents, a large piece of pasteboard should be fitted over the pipe before the end is flanged. A blind flange joint requires a lead flange to be tacked to the wall over the pipe to support the joint. It is best to fit a lead flange the size of the joint in all cases, as less stretching of the pipe end is then necessary where the flange is also a union of two pieces of pipe. After the joint is finished, the pasteboard can be carefully cut around it and removed, leaving the wall clean. If the flange is to be made over marble, the pasteboard keeps the heat from running away from the edges, and there is less danger of cracking the marble by heat.

Fig. 247. Upright Cleaning Ready to Wipe..
An upright cleaning is shown ready to wipe in Fig. 247. Plain upright joints are so easy, and occur so frequently, that the art of wiping them is soon mastered. The receiving end should be below and should be opened with the turn-pin and rasped off to suit. Its lower, inner edge and the tip of the spigot should be soiled. The ends should fit well, and the open part taper a little more than the spigot. The bulge helps to keep the solder up; and the cup, if well cleaned, will make a good joint alone. When wiping, either spit the solder on with a stick or pour on the cloth and drift it against the cleaning. Keep the mass up. Endeavor to pour solder on solder instead of on the cleaning. Leave the bottom edge alone until the cold fringe loosens of its own accord. When hot, form up roughly, high, and cut the top edge off clean first; then drag up the settling bottom edge, and fill out the low places; then wipe to finish, bearing the hardest on the upper edge of the cloth. The table can be made of two pieces of pasteboard as shown. Set it low enough to let the cloth and hand clear what drops when wiping. If cold solder surrounds the pipe when finished, melt it apart with the copper.
The overhead joint, shown in Fig. 248, is wiped in the same way as though it were on the floor. The position is a trying one, and the cloth and ladle are kept in place at a great disadvantage. A stiff cloth is best to get the heat with; while a second, more flexible and previously warmed, can be used in conjunction, to do the shaping and wiping. Some heat previously applied with the torch to the edges, will shorten the time of getting the heat, and save the wrists and fingers from cramp and excessive tiring. Some provision for straightening the line is necessary, if a straight shoot is too high to wipe. Sometimes the surplus pipe is snaked into one horizontal plane with proper incline so that the pipe will drain, and is supported by a shelf.


No. 248. Wiping an Overhead Joint.
Continue to:
My Books

