Chapter 9. Working With A Helper. Part 3
Description
This section is from the book "Reichian Therapy. The Technique, for Home Use", by Jack Willis. Also available as a hardcopy from Amazon.com.
Chapter 9. Working With A Helper. Part 3
The Abdomen
This pressure can be very tiring on the helper (Figure 56), so just do it as long as it does not wear you out.
The purpose of this pressure and why it is included in Part
One of the book on breathing is that it is another way to stop the use of the diaphragm to push the chest up. The idea is to press in on the abdomen to keep if from expanding or tensing. This pressure, especially if the worker does not tense against the pressure during the inhale, can greatly aid the worker in learning to use the muscles between the ribs as opposed to using the diaphragm to push the chest up.
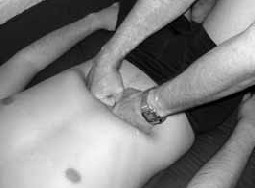
Figure 56
The Pectorals
The helper can easily feel the tension in the pectoral muscles. If the muscles are relaxed they are both soft (no felt tension) and they feel like corduroy. When I say a muscle feels like corduroy I mean that the helper can feel, as he or she moves his or her fingers across the muscle, the individual muscle fibers just as though one were rubbing corduroy cloth.
If the pectoral muscle is tight, then there are several possible ways to get it to relax. One is simply to put gentle pressure on the whole muscle and hold it for as long as possible without tiring while the worker breathes. This is shown in the next photo.
If the worker is female, the pressure should be above any breast tissue. Pressure on breast tissue is very painful with absolutely no benefit. We are interested in muscles, not the glandular fat tissue of the breast.

Figure 57
If this gentle pressure does not work after a complete session of breathing, then more forceful pressure can be used (Figure 58). Using the knuckles is much easier on the helper and is often more effective than keeping the fingers straight as in the above photo.

Figure 58
This pressure can be somewhat painful. Pain IS NOT the goal. The goal is getting the muscles to let go of their chronic tension. This might be a good place to illustrate the idea that pressure on tense muscles can cause pain but pain is not the goal, it is an unfortunate side effect.
Start with your arm straight. Now grip your biceps muscle using as much pressure as you can apply. Now slowly bend your arm and feel, as you bend, the change of the feeling in your arm from one of pressure to one of near pain. With your arm straight, the biceps is relatively relaxed (weight lifters may have chronic tension in this muscle). As you bend your arm the biceps gets increasingly tense. This is an easy way to feel the difference between pressure on a relaxed muscle and pressure on a tense muscle. In Figure 59 the left panel shows the pressure on the biceps while the right panel shows the arm bent with the same degree of pressure on the biceps.
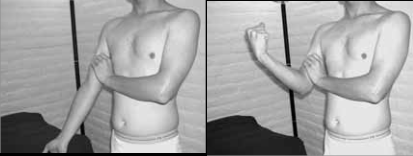
Figure 59
Returning to our discussion of the pectoral tension, if the gentle pressure does not work then knuckle pressure can be used. The amount of pressure us ed should be enough to be uncomfortable and slightly painful but not to be extremely painful. Keep in mind that there is pain only with an overly tense muscle and that the same pressure on a relaxed muscle is not painful. The implication of this is that as the pectoral tension gradually lessens over time then more pressure can be applied until there is no tension in the muscle.
The Muscles At The Front Of The Neck
The muscle at the front of the neck which concerns us is the sternocleidomastoid. It is easy to feel the tension in this muscle (Figure 60 on page 163).
Lightly pinch the muscle during a breath cycle. If these muscles are being used you will easily feel (and see) the tensing.
While the sternocleidomastoid (SCM) is a major accessory muscle of inhalation, pressure here is used only when absolutely necessary. The amount of pain produced with pinching this muscle is often not worth the benefit. The use of a pillow was discussed at THE MUSCLES IN THE FRONT OF THE NECK on pages 130 through 133. The helper can greatly assist the worker by placing the pillow and moving it as needed to insure that the head is firmly pushed against the chest.
The only way to apply pressure to the sternocleidomastoid is to pinch it (Figure 60). This means that pressure is being applied to the same muscle from two different directions, in effect, the degree of pressure is doubled. As is often the case, moderate but sustained pressure is the best answer. The pressure can be applied at the end of the muscle near the collar bone and again in the middle of the muscle (about mid-neck). If you want to get an idea of how much pain is produced in this muscle by pressure, put your head back and then pinch your own SCM. As you can feel, it does not take much pressure to produce a lot of pain. As always, pain is not what we are after.
It is truly amazing how much trouble is caused by tension in the neck. You can think of it as a choke point separating the intellect from the emotions or as the point of separation of thinking from the acting. One way to look at body-based psychotherapy is getting the thinking and feeling working together. Wouldn't that be nice?
While we're on the subject, consider why so many people get so tense in their shoulders and why it feels so good to have a massage? Or think about the number of people who get tension headaches or the number of people who have pain in the back of their neck from the muscle tension there.

Figure 60
The Muscles At The Side Of The Neck
An explanation of the anatomy of the neck
How to locate these muscles and how to apply pressure:
A. front of the side of the neck
B. middle of the side of the neck
C. back of the side of the neck
Another way for the helper to aid the worker to open the neck
Anatomy Of The Neck
There are no medical reasons why pressure can not be applied to the side (and the back) of the neck. However, both to locate these muscles and know where to apply the pressure, we have to go through some anatomy. Don't be scared of this, it is relatively simple and, best of all, there won't be any midterm exam.
Our discussion is based on Figure 61.

Figure 61
I'll start with just pointing out the items in the figure. You are looking at the right side of the neck. The first muscle on the right is the one we have already discussed, the sternocleidomastoid (SCM). That is the muscle I am pinching in Figure 60 on page 163 and the muscle that is highlighted by arrows in Figure 39 on page 132.
Before continuing, a note on the anatomy diagram: everyone has the same anatomy but not in the same exact place and not the same exact size. Everyone is slightly different. In the diagram I have made some of the muscles bigger than they normally are so that it is easier to talk about them. I have also left out some things that we are not concerned with or that made the diagram just too messy to easily talk about.
OK, just behind the SCM is one of the three scalene muscles. I have drawn this muscle considerably larger than it usually is. Instead of coming almost half way up the neck as I have it, usually you can barely feel it right at the clavicle. We will go over all this again when we talk about pressure on each of these muscles.
Directly behind the anterior scalene is the medial scalene. Usually you can, if you practice, find this muscle by the slight indentation that is just before it. That is, as you move from the anterior scalene backward your finger will feel just the slightest indentation before it comes onto the reasonably prominent medial scalene. We will return in a moment to the issue of the anterior scalene and the medial scalene after we finish with the muscles in the diagram.
Just behind (posterior) to the medical scalene is the posterior scalene. The easiest way to find this one is to place your finger on the trapezius and then slowly forward until you fall off (or sink in slightly) from the trapezius.
Figure 61 also shows another muscle at the top back of the side of the neck. This is the splenius capitus, you can ignore that muscle. It has little relevance to this work.
The only other muscle is the levator scapulae. This muscle runs all the way down to the scapula (the wing bone). As Figure 61 indicates, if you place you finger in about the middle of the side of the neck on the trapezius and then come slightly forward you will fall off the trapezius and be on the levator scapulae.
For the anatomists among my readers, I know I have left out the omohyoideus but it is usually small and has no importance for this work.
Now, before I continue, I have to cover another anatomy issue at the side of the neck. It is nothing to worry about, it is not a health issue or a danger warning. I deliberately left it out of Figure 61 since it makes the diagram too difficult to follow but it is not that hard to describe it in words.
See if you can picture this. The nerves that feed your arm and upper chest and upper back exit from the spinal column in the neck region. They pass, as a bundle, through the side of the neck, pass under the clavicle and then outward from there. As this nerve bundle passes out through the side of the neck it passes between the anterior scalene and the medial scalene. Whether it passes between the muscles at the bottom of the neck or in the middle of the neck varies from one person to another and even differently from the right side of the neck to the left side of the neck on the same person. When you are using pressure on the anterior scalene or the medial scalene you might produce radiating pain into the arm or the upper back because you are pressing on this nerve bundle. This pain is unnecessary; it does not accomplish anything for this work. Simply move your finger off that spot and move upward or downward as needed to get away from this nerve bundle. I'll come back to this shortly with some photographs.
Now let's turn back to the work at hand.
Front Side Of The Neck (anterior scalene)
To locate the muscle at the front side of the neck, very lightly pinch the SCM muscle at the front of the neck with your first finger at the front of the neck and your thumb at the side. In this position your thumb is now on the muscle at the front side of the neck (Figure 62 at arrow).
You can apply moderate pressure to this muscle (the anterior scalene) either with your first finger or with your thumb. Note the direction of the pressure in Figure 63. The muscle you are applying pressure to is hard to get to because of other muscles which cover it. To apply pressure, the direction of the pressure should be down toward the feet and slightly toward the bed.

Figure 62

Figure 63
Middle Side Of The Neck (medial scalene)
This muscle (the medial scalene) is a little more difficult to locate but once you have done it the first time it will not be a problem after that. Here is how to locate the medial scalene.
With you first finger on the anterior scalene (above, Figure 63) start slowly moving backward toward the bed. The first muscle you will pass over is a tiny muscle we don't care about. It is a long muscle in that it travels far in the body, but it has not effect on breathing and is not even shown in Figure 61 on page 164. This tiny muscle lies almost against the medial scalene so it may or may not be felt (there is a picture of this muscle in Figure 86 on page 215 when it bulges during the jaw open exercise).
Continue to:
My Books

