Practical Lessons In Tailoring. Fourth Lesson. Pockets. Continued
Description
This section is from "Every Woman's Encyclopaedia". Also available from Amazon: Every Woman's Encyclopaedia.
Practical Lessons In Tailoring. Fourth Lesson. Pockets. Continued
Examiner in Dressmaking, Tailoring, French Pattern Modelling, Millinery, and Plain Needlework of the Teachers in Training at the University College of South Wales and Monmouthshire, Cardiff, the London Technical Examination Centre, etc. Author of " Up-to-date Dresscutting and Drafting" also" The Practical Work of Dressmaking and Tailoring."
Flap Pocket - Patch Pocket - Circular Pocket
Flap Pocket-coatiausd
Fhasten off the threads of the four ends of the stitching firmly, pull each thread through, and tie it to its own under-thread; but on no account must the threads of the upper and lower row of stitching be tied together. Take a small, short, sharp pair of scissors, and cut carefully between the two rows of stitching; cut from the centre to each end, but not beyond, or there will be a hole in the coat at each end of the flap. If the space between the stitching will allow of it, the cut at each end can be made slightly slanting almost to meet each row of stitching, thus leaving a tiny tongue of the cloth at each end - this little tongue is made in order that the corners may set perfectly flat when turned in - but if the rows of stitching are too close
Dress together for the opening to be cut in this way, it is not only unnecessary, but cannot be done. The lower of the two pieces of lining must now be passed through the opening and tacked down quite close to the turning - the lining and cloth being level at the edge. A row of machine stitching should then be placed as near as possible to the edge of this turning.
The upper piece of lining must now be passed through the opening - the flap only being left on the right side.
The small seam which attaches the flap to the coat must next be pressed open, and as flat as possible, and a row of machine stitching worked on the coat just above the flap, and close to the seam. This row of stitching must correspond with the one which is round the edge of the flap - if there are two rows of stitching round the flap, there must be two rows at the top; and the second of these must be continued down each end, to appear as if it continued beneath the flap. The two pieces of lining which are to form the pocket must be tacked together and stitched round, without, of course, taking any stitches through to the coat. A small piece of linen must be placed and pinned at each end of the opening, on the wrong side of the coat, and over the pocket just made.
The small tongue of the material which is on the right side must be turned in with a strong needle, and firmly fastened down by a sort of felling stitch.
This is done by prodding the needle up and down, passing it from the wrong side (through the small piece of linen) up close to the turned-in edge of the tongue, and down again well under the edge, so that no stitch is visible on the right side. As many of these stitches as are necessary must be made at each end of the pocket. These ends must not be puckered, and great care must be taken to make them lie perfectly flat, and not to show beyond the flap.
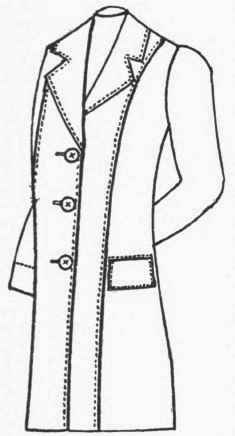
Diagram I. A flap pocket as it should appear on the right side of coat
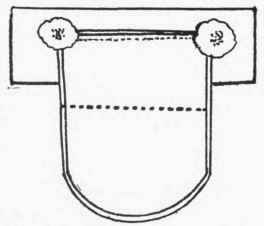
Diagram 2. Shows a flap pocket on the wrong side
N.B. - If the pocket has been properly made the flap, if passed into the pocket, should lie quite flat without the opening showing beyond it at either side.
The pocket must be well pressed (on the wrong side) with a tailor's goose.
When finished, the right side of this pocket should appear as in diagram No. i. and the wrong side as in diagram No. 2.
Patch Pocket
A patch pocket is simply a piece of the same cloth as the coat or other garment being made, or a piece of the lining - if the pocket is to be inside and the coat or other garment is to be lined - cut to the desired shape and size and turned in and tacked all round. Before the pocket is put on, the top edge must be finished off by being turned in and "faced" with lute ribbon or Prussian binding; or turned in and "faced" to the lining (if there is one), and one or more rows of machine stitching may be worked across, if desired.
It must then be well pressed, tacked on to the garment, and either machine stitched or sewn on by hand, if the stitches must not show through.
Circular Pocket
The method of making the circular pocket can be learned (as in the case of the flap pocket) on a piece of cloth. To make the pocket take a piece of tailor's chalk, and on the right side of the cloth draw a slightly curved line about 4 1/2 or 5 inches across, as illustrated in diagram No. 3. Cut a piece of linen about 5 1/2 or 6 inches long, selvedge - wise, and about 2 1/2 inches wide; place this on the wrong side of the piece of cloth, exactly under the curved line (which is drawn on the right side), leaving an equal length of the linen beyond the end of the line on each side; pin it in this position, and tack the cloth to the linen; the tacking must be done on the right side exactly on and along the chalk line, so that the line of tacking stitches on the wrong side exactly reproduces the chalk line on the right side.
N.B. - This straight piece of linen is to strengthen the opening of the pocket, and to prevent it stretching.
Cut a piece of the same cloth slightly longer than the chalk line, about 3 inches wide, and exactly on the cross; place it right side downwards "facing" the piece of cloth in which the pocket is being made, over the chalk line, leaving (as near as possible) an equal amount of the crossway piece beyond it all round, and pin it in this position.
N.B. - If the material is diagonal, the cross-way piece must be cut across the diagonal lines, and not with them. Turn the work over and, from the wrong side, tack on the piece of cloth, following the curved line of tacking stitches already made.
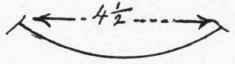
Diagram 3. Draw a slightly curved line in tailor's chalk on the right side of material
This should reproduce the curved line on the cross way piece.
Take a piece of tailor's chalk and correct this line, so that the curve may be quite perfect before the stitching is done. Machine-stitch on each side of the line, but not round the corners. Commence and cut off the thread at the end Of each line. The space between the two lines of stitching must depend upon the cloth - if it is not likely to fray, the lines of stitching can be worked very near together, just allowing for the opening for the pocket to be cut between them; but if it is not a closely woven material they must be further apart. However, the closer the lines can be stitched, the better the pocket will appear when the work is finished.
N.B. - The space between the two lines of stitching must be the same all along the curve, and both lines must be exactly the same length.
The upper thread at each of the four ends must be drawn through and tied firmly to its own under-thread, but they must never be tied across the ends.
The opening must now be made for the pocket. Take a small, short, sharp pair of scissors, and cut carefully between the two rows of stitching; cut from the centre to each end as far as the stitching, but not beyond. If the space between the stitching will allow of it, the cut at each end can be made slightly slanting, almost to meet each row of stitching, thus leaving a tiny tongue of the cloth at each end; this little tongue is made in order that the corners may set perfectly flat when turned in. But if the rows of stitching are too close together for the opening to be cut in this way, it is not only unnecessary, but cannot be done. Turn the crossway piece of cloth through the opening to the wrong side, and tack it closely all round, and quite near to the edge of it - this should give the opening the appearance of being corded, and not bound round; the corners must set quite smoothly, and not appear puckered. Tack the two edges together, passing the needle through the corded edge only, tacking over and over, from left to right, and back again from right to left, drawing the two edges together just to meet, but not to overlap, and forming a cross-stitch, as shown in diagram No. 4.
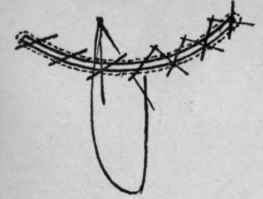
Diagram 4. Tack the two edges together from left to right, and back again from right to left
Place the work wrong side uppermost on a bare sleeve or ironing board, cover it with a cloth, well wrung out of water, and press it well with a tailor's goose. Place one or more rows of machine stitching round the opening near the edge.
N.B. - In making a coat, the pocket is the first part which is to be stitched (for ornament), and as the number of rows placed on it must correspond with those to be placed round the collar, revers, etc., the number must be decided upon before the pocket is stitched.
Continue to:
My Books

