Practical Lessons In Dressmaking. Third Lesson
Description
This section is from "Every Woman's Encyclopaedia". Also available from Amazon: Every Woman's Encyclopaedia.
Practical Lessons In Dressmaking. Third Lesson
Examiner in Dressmaking, Tailoring, French Pattern Modelling, Plain Needlezuork, and Millinery, of the Teachers in Training at the University College of South Wales and Monmouthshire, Cardiff; the London Higher Technical Examination Centres, etc.; First Class Diploma for Tailoring; Diploma of Honour for Dressmaking; Diploma of Merit of the Highest Order for Teaching; Silver Medallist, London Exhibition, 1900; Silver Medal, Franco-british Exhibition, 1908; Author of " Up-to-date Dresscutting and Drafting," also " The Practical Work of Dressmaking and Tailoring."
Slip-stitching - Sewing - Overcasting - Herringboning - Button-holing and Button-holes "Fanning" - Feather-stitching
Slip=stitching
Slip-stitching is used to invisibly fasten down hems, facings, etc., and to fix false tucks (cut on the cross) on to skirts, etc.
If a hem is to be slip-stitched, turn down a double fold, as for an ordinary hem, and tack it. Thread a needle with fine silk to match the material, take up a mere thread of it under the fold with the needle, and draw it gently through.
Slip the needle into and along the inside of the fold, and make a short running stitch; draw the needle through and again take up a thread of the material under the fold, and so continue to the end.
Slip-stitching is worked from right to left.

Diagram 8
Sewing
Sewing is a stitch used more frequently in plain needlework than in dressmaking; it is, however, useful for joining two pieces of material together, after the raw edges have been turned in, such as the ends of neck, waist, and wrist-bands. Also for sewing cord to the edge of a garment. This stitch is worked from right to left, as shown in diagram 8.

Diagram 9
Overcasting is a stitch used to protect the raw edges of seams to prevent their fraying; it somewhat resembles sewing, but is worked from left to right, instead of from right to left, and the stitches are made larger and further apart. They should form a row of slanting stitches all of equal size and depth, as shown in diagram 9.
Herringboning
Herringbone-stitch is used in dressmaking to fasten down the raw edges, when a false hem or a facing is to be put on, to keep the turnings in position and make them lie flat. It can also be used on thick materials instead of hemming, to avoid the double fold of material. The stitch is worked from left to right, and forms two rows of stitches, the threads crossing each other diagonally.
To make the stitch, insert the needle from right to left, first above and then below the raw edge; the lower side of each stitch should come just under the raw edge of the fold, the upper side of the stitch on the fold, but not through to the right side of the dress. When the stitch is finished it should appear as in diagram 10.
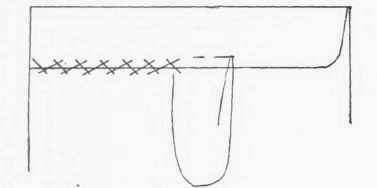
Diagram 10
Button-Holing And Butto=Holes
In dressmaking, button-holes are worked from left to right. Pass the needle through the slit, and take up the amount of material required for the depth of the stitch. While the needle is in this position, carry the twist from the eye over to the left of the needle and under the point to the right, draw the needle out rather sharply towards the slit, so as to form a little knot or purl edge, round the opening. When the garment is ready for the button-holes, take a piece of card and measure the diameter of the button to be used, and notch the card to that width. Mark the position and length for the button-holes before cutting them (a long stitch in cotton of a contrasting colour can be placed where each button-hole is to be cut). Punch a small hole on the outside ends of each mark, then, with a small sharp pair of scissors, cut a slit for the button-hole to the length marked by the notch on the card.
N.B. - It is very important that the slit be cut perfectly straight, as a good button-hole can never be made if the edges are crooked and uneven. The punched hole and the slit should now appear' as in diagram 11, but, as the button-hole should be pear-shaped, a small piece must be cut off on each side, from the slit into the round hole, to give it the shape shown in diagram 12. Great care must be taken to cut the two sides exactly alike, or the button-hole will have a crooked appearance. If the material in which the button-holes are to be worked is likely to fray, it is better to oversew round each one first with fine silk of the same colour It is unnecessary to oversew the cut edge of any firmly woven material muslin, or print.
twist to match the material, and the work commenced from the side of the straight slit (not the pear-shaped end). In working the button-hole care must be taken to catch the under layer, or layers, of material in with the button-hole stitches, or they will slip away and remain unworked. When the button-hole has been worked all round it must be " barred "; this is done by working two or three straight stitches across the end of the button-hole and two or three threads beyond the beginning of the slit, drawing the two edges of the work close together, but not allowing them to overlap. Button-hole over these straight stitches, bring the purl of each stitch towards the slit, and take the first and last stitch through the material, so as to give firmness to the bar, and keep it in position.
Diagrams 11, 12. and 13
The button-holes are sometimes worked (before the slit is cut) along each side of the mark for the button-hole with a row of running stitches, fastened off firmly; this prevents the button-hole stretching when it is worked.
If a punch is not available, the hole can be cut with a small, sharp pair of scissors by snipping the ends of the slit in a slanting direction, as shown in diagram 13, and then cutting out a small curved piece, as denoted by the dotted line in the same diagram, but as it is impossible to cut these ends with the scissors exactly to match in a row of button-holes, it is well worth the small outlay for the punch.
N.B. - The ' punch " is described and illustrated in the First Lesson on Tailoring.
Fancy Stitches "Fanning"
Fanning is an ornamental stitch used for fixing the top of bones. After a bodice has been boned, a " fan " of stitches is worked near the top of each one; it consists of a long centre stitch, on each side of which two or three stitches of graduated length are worked, each of the five (or seven, as the case may be) stitches must diverge from the same hole at the bottom.
Thread a long, strong needle with twist, and pass it from the under side of the bone (about one inch below the top end) and right through the centre of it; pass the needle back to the underside, about a quarter of an inch from the top, and exactly through the centre of the bone.
This will form the long centre stitch. Bring the needle up again through the same hole as at first, and make a shorter stitch on one side, and slightly apart from it; make one or more stitches on the same side, each one rather shorter than the last, and the same distance apart; work stitches to correspond on the other side of the centre stitch. Pass the needle (eye foremost) twice or three times under and over these five (or seven, as the case may be) stitches. This will form a stem, and hold them in position (diagram 14). Pass the needle through to the under side of the bone, fasten off the twist securely, and cut it off.

Diagram 14
N.B. - The colour of the twist is a matter of taste, but it should always be of the same shade as that used for the cross-stitch fixing the "tight band" to the bodice and marking the centre of the skirt.
Feather-stitching
Feather-stitching is occasionally used to ornament garments in place of ordinary stitching; it is effective and can be easily learned. In dressmaking it is most suitable for blouses, cotton or linen dresses, and children's garments. It can be worked in embroidery or crochet cotton, silk, or wool, according to the material on which it is to be done.
As a guide to ensure the straightness of the work, a line of tacking may be made along the band, or otherwise, where the feather-stitching is to be, and the stitches are then worked alternately right and left of the line of tacking, and the cotton, silk, or wool must always be carried under the point of the needle (at each stitch) so as to form a loop. The needle should be slightly slanted towards the line of tacking in working each stitch, as this gives the work a less stiff appearance than if the needle is inserted perfectly straight.
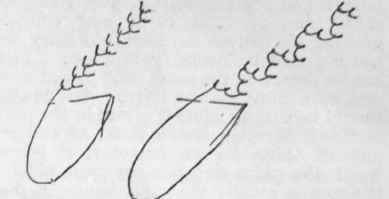
Diagram 15
The size of the stitches depends on the material, but they must be of uniform length, and the tendency to increase the size of the stitch as the work proceeds must be guarded against. The finer the material the smaller the stitch should be.
Feather-stitching may be single, double, or treble - either one stitch alternately right and left of the line of tacking, or two stitches alternately right and left, or three to the right and three to the left. Diagram 15 illustrates the work.
N.B. - The cotton, wool, or silk, must never be drawn too tightly or the appearance of the feather-stitching will be spoilt.
Continue to:
My Books

