Chapter III. Better Home Workshop Methods
Description
This section is from the book "Things To Make In Your Home Workshop", by Arthur Wakeling. Also available from Amazon: Things to Make in Your Home Workshop.
Chapter III. Better Home Workshop Methods
A MOMENT of great anticipation! The home mechanic removes the clamps from his assembled radio cabinet and prepares to give it a last cleaning before applying the paint, varnish, or lacquer. What does his inspection show?
Does he mutter under his breath and reach for the plastic wood, putty, glue and sawdust, or powdered-brick crack filler, or does he smile with pleasure as he finds every joint tight and the broad surface free from mars? Much depends on whether or not he has done his work "decently and in order."
By taking thought, any amateur woodworker can do craftsmanlike work. Probably as many mistakes come through improper laying out as through unskillful handling of tools.
Lumber, as it comes to the mechanic these days, is generally of uniform thickness and often flat enough for cabinet building. Nevertheless, in the order of the work, it should be treated as if the sides were not parallel.
One side, usually the better, should be lightly marked with an "X" to identify it as a face side. It is against this side and only this side that the try-square is held for testing the edges. An edge, jointed (planed) straight and square, is likewise taken for a working edge; against this the square is held for marking the ends to be sawed off.
The wise amateur avoids a pencil in laying out. He uses a sharp knife or an awl point. A soft pencil makes a line that is easy to see, but there its virtues end, for a saw wobbling from side to side on it may vary as much as 1/16 in. A hard pencil is better, but a knife point locates a measurement exactly.

Fig. 1. - Scribing a line along the inner edge of a steel framing square.
When the framing square is used, the marking tool should trace along the inner edge that rests against the wood (Fig. 1) rather than against the outer edge, which does not touch the surface of the wood and therefore allows the point to vary. If carefully sawed along a well-scribed line, the end of the board will be square with the face edge. The other edge may be located either by accurate measurement at the ends - useful especially if it is not to be parallel with the working edge - or by gaging.
Two difficulties beset the man who joints the edge of a board. The plane may scoop out the center, leaving the ends high; or more commonly, it may reduce the ends while leaving the center.

Fig. 2. - How to lift a jointer plane at the end of a stroke to prevent "dubbing" or slightly rounding the corner.
In the first case, the jointer plane is probably so dull that it chatters at the start, and the user unconsciously confines his efforts to the center, where the plane rides easily. The remedy is to hone the plane iron and take shavings at the ends of the board until the edge is fairly straight, and then to finish with full-length cuts. In the second, the heel of the plane is dropped at the start, and the toe at the end of the stroke, with the result that gradually the ends become "dubbed" off. If the plane is lifted bodily at the end and carried back, a straight edge is more likely to result (Fig. 2). Incidentally, the wear on the plane iron is cut nearly in half.
Accurate measurements depend upon accurate measuring sticks. If the various parts of a cabinet are measured with a square, inaccuracies in reading may cause slight variations in the relative length or width of the mating parts, making their assembly difficult or even impossible.
In simple cabinets, it is better to lay out one part and take from it the corresponding measurements on other parts. For pieces that are complicated it is best to lay out a rod (Fig. 3); then measurements are made once for all, and the layout is easily transferred from piece to piece.
In making measurements on the rod, stand the square on edge, so that the division lines will meet the surface of the wood. Locate the points with a knife. Score these lines square across the width and label them with a pencil.
An intricate piece, upon which you expect to work for weeks, requires more than a mere stick. For it you should prepare what a cabinetmaker would call a "rod" but what is really a thin board, often as wide as 11 in., upon which a full size sectional plan and an elevation arc drawn accurately with a pencil. The edges of the board must be straight and parallel so that a square can be used in drawing the various members.
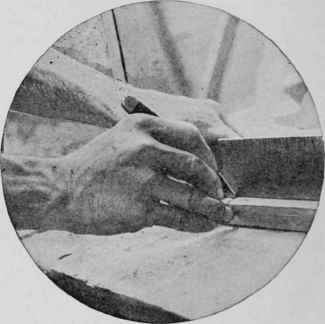
Fig. 3. - Laying out a measuring rod for a piece of furniture with the square held vertically.
In sawing, never forget that the blade takes up space. The kerf is usually a little less than 1/16 in. wide, but is sometimes wider. If the mechanic cuts on the line, he is not sure of the placing, and if the measurement is accurate the pieces will be at least 1/32 in. undersize.

Fig. 4. - The shoulder of a tenon can be cut more easily if a notch is first made for starting the saw.
For all joints, the proper method is to allow the teeth of one side of the saw to cut the center of the scratch, removing half the line and leaving half on the piece. This keeps the blade in the waste wood, retains a positive working line at all points, and insures a straight cut. If the edge is to be dressed after being sawed, the cut may be made a trifle to the side - enough to allow two or three shavings to be removed before the center of the line is reached.

Fig. 5. - Squaring the edges of two boards to locate the position for boring dowel holes.
In starting a side cut for a dado or for the shoulder of a tenon, it is often helpful to cut the starting corner with a knife, notching it in the waste wood (Fig. 4). This gives a starting point for the saw and prevents it from dancing around on the surface before biting in.

Fig. 6. - Boring a dowel hole with a block of wood on the bit to serve as an improvised depth gage.
If two boards are doweled together, it is most important that the face edges come smoothly flush. This requires great accuracy in the location of the dowel holes. Clamp the two pieces together, joining edges up, with both face sides out, and square across the edges to locate the holes with reference to the length (Fig. 5). With a gage set to center on the thickness of the wood, scratch across these lines from the face side of each board. As the head of the gage bears against the face sides, any variation from the center on one piece is duplicated on the other. If the boring is true, the faces must be in line when glued up.
Since the grain of the wood will "lead" the bit point, it is well to center-punch the intersection of the marks with a nail or a nail set so that the bit will start accurately. A bit gage or a wooden block bored to slip over the bit, is a help in boring the holes to a uniform depth and eliminates the danger that some of the dowels will strike and prevent the joint from closing (Fig. 6).
Another precaution: a small amount of space at the bottom of the hole must be allowed for imprisoned excess glue. Glue is no more compressible than water and is too thick to ooze past the dowel pin; if, then, the clamps are screwed tightly enough, the glue will expand the hole by splitting the wood.

Fig. 7. - Whenever wood must be hammered, use a soft block of waste wood as a protective cushion.
The assembling of cabinet parts often requires them to be tapped with a hammer to force the joints together. Every hammer blow, however light, means a bruise on the wood, unless a block of soft wood is used as a buffer between the hammer and the work (Fig. 7). Blocks should also be used under clamp jaws.
Scratches and mars on the piece seem inevitable, but much ordinary scuffing is avoidable. Only necessary tools should be rested on finished surfaces of the wood. Touch the square gently to the surface; and do not lay a saw on the board at all, for when the tool is picked up again the teeth will surely scratch. Before laying a smoothed side against the bench top or sawhorse, be sure that all shavings, sawdust, and splinters have been swept away.
Most cabinets should be sponged with warm water before the final sanding; this process not only swells flush any small bruises, but raises the grain. When the grain has been sandpapered down again, it will not be affected to any great extent by the application of the stain, which otherwise might raise it badly. Deep bruises often can be steamed out with the aid of wet blotting paper and a hot flatiron.
Continue to:
My Books

