


The Metal Working Lathe And Its Uses. IV. Tools and Turning
Description
This section is from the book "Amateur Work Magazine Vol4". Also available from Amazon: Amateur Work.
The Metal Working Lathe And Its Uses. IV. Tools and Turning
ROBERT GIBSON GRISWOLD
If a canvas was made throughout the various shops in this country, a great diversity of opinions would be found to exist as to just how a tool should be ground for certain work, what its shape should be and just how much feed should be given. Each lathe hand has experimented for himself and has found some particular shape and form of cutting edge that suits him best.
But the general principle upon which all lathe tools are formed is that of a wedge, and the keener the wedge the easier will be the cutting. For example, in woodworking we use tools possessing a very keen edge, obtained by grinding the tool edge on a long ta. per. Most every one is familiar with the smooth cutting properties of a well ground paring chisel and how very easily it will cut through the softer grained woods. But suppose we take a block of well seasoned oak and attempt to cut with the same chisel, especially by driving it with a mallet and hammer; if we are not very careful the edge will be broken off completely. Why? Simply because the edge has not sufficient strength to support the strain imposed by the heavier, harder wood.
And this principle modifies or determines just how far we can go in grinding a tool for lathe use. We know from the action of a wedge that the sharper the edge the easier it may be driven into any substance. The cutting of a chip from any piece of metal depends upon the wedge-action of the tool-edge cutting or prying off the thin layer of metal lying on one side of the wedge.
But the severing of this thin chip or layer requires considerable force, and if the edge of the tool ts too keen it will be broken off. This cutting action was fully described in a former chapter under "Tool-making for Amateurs."
So it is merely a question of giving a tool as keen an edge as it will hold and still do the work. A light cut will allow of a keener edge than a heavy cut, while the softer metals will pull a tool with a keen edge into them, and, although it would seem that a keen edge would be the best for such work, practice shows that the best results are obtained with tools having very little rake - almost a scraper in their action. With cast iron and steel a greater rake is permissable.
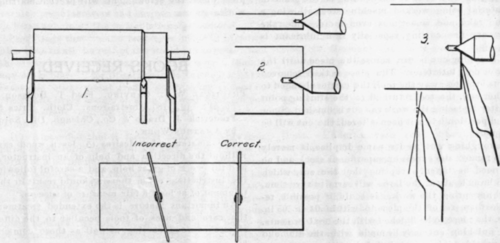
Now let us take one or more examples that will show exactly how the several shapes of tools are used in turning a piece to size. Starting with a small cylinder, as shown in Fig. 1, we will suppose that the piece is in the rough and requires considerable turned off. The piece is first centered, drilled and countersunk for the lathe centers. A word of caution here may be of value. Never make your centers unnecessarily large. Suit the center to the work - a heavy piece requiring a large countersink, while a light piece requires a very small one. Heavy cuts cause a considerable strain on the centers. and if they do not enter into the piece by a sufficient depth may easily be broken off. Fig.2 illustrates this, showing the greater support afforded as the center enters into the work deeper and deeper. The center should always be lubricated and a mixture of white lead and oil is probably the best as the lead affords a certain body which prevents the oil being squeezed out when the pressure of the cut is applied. A light oil will not wear well.
Another point-do not set the center up too tightly. It should have merely sufficient pressure to prevent the overhanging carrier-tail making it revolve as it passes center when the spindle is slowly revolved by hand. As the cuts continue the heat will gradually expand the piece, causing it to press more and more on the tall center, and if not relieved by slightly backing out, the tail-screw may generate sufficient heat to draw the temper of the center, when it will cut and wear very rapidly.
In taking the roughing cut, use a diamond-point tool, setting it almost at right angles to the work, as shown in Fig. 1. The clearance need not be great, probably eight or ten degrees will be enough and the top of the tool should have a rake of 8 to 15° and a side rake ranging from 15 to 20°, depending on the grade of the material being worked, machine steel allowing a 40° side rake, and sometimes even more. Side rake makes very fine cutting, especially if a lubricant is used.
The roughing cut is run across the piece until the ■carrier or dog interferes. The piece is then removed without backing away the tool, the carrier changed to the other end, the tool returned to the starting point and, after replacing the work the cut is finished. Since the tool position has not been altered, the cut will be continuous.
The roughing out, as its name implies, is merely used to remove the excess or superfluous stock and no pains need be taken, excepting that the cut, which should be as heavy as the lathe will carry to save time, should not spring the work. It sould, if possible, reduce the diameter of the piece to within .04 or .05 in. of size, the piece to be finished with the next two cuts.
The finishing cut may be made with the diamond point, provided it is rounded slightly with an oil stone. If the work is not very particular it may be brought to a smooth finish with a mill file and emery cloth, but grinding is the quickest and surest method of finishing a piece to size. The broad-nose finishing tool may also be used to good advantage, but a very light cut must be taken as the broad cutting surface readily induces chattering and this causes ripples over the entire surface.
In the matter of squaring the ends some prefer squaring first before the piece is turned, while others do it last. If done at first there is more metal to be removed by the side tool than if left until the last operation.
The stock should be cut almost to length, as the side tools are not able to remove much metal at a cut. If the diameter of the piece is very large, say four or five inches, the extreme point of the tool should be backed off slightly, as shown in Fig. 3 and then fed out across the end. This presents a small cutting surface and insures the end being square (provided the cross-slide ways are square with the center-line of the lathe). For small work it is quite sufficient to square the ends with the side of the tool. As work must always be turned end for end in squaring, the right side tool is the one most frequently used.
The sizes are measured with calipers. The sense of truth in calipering a piece may be developed to such a degree of sensitiveness that a difference of .001 or .002 may be easily detected. Never attempt to caliper a piece for finished size while in motion. Stop the work and carefully measure it throughout its length. The points of the calipers should just touch - no more, no less. Don't force them over and "guess " that you have it " within a hair." Get it just right. Hold the calipers truly perpendicular with the axis of the work, not canted as shown in Fig. 4.
When holding finished work in the carrier always place a strip of copper around the piece and a thick piece under the screw. This will prevent marring the work.
Continue to:


My Books

