Photography. Printing Frame
Description
This section is from the book "Amateur Work Magazine Vol3". Also available from Amazon: Amateur Work.
Photography. Printing Frame
Francis L. Bain
The frame described below will undoubtedly fill a long-felt want in the workroom of many amateurs, particularly those interested in photography, as it can be made quite cheaply. For those who prefer lightness rather than strength and long service in a printing frame, it is suggested that whitewood be used, while those who do not object to a little extra weight will find that cherry will far out-wear whitewood and give much better satisfaction generally.
The following materials will be needed, and in each case the measurements as given represent the finished size of the particular article referred to:
Sides - 2 pieces kiln dried cherry 17 8/4" long, 2" wide, 1 1/4" thick. Ends - 2 pieces kiln dried cherry, 14f " long, 2" wide, 1 1/4" thick. Backs - 2 pieces kiln dried white pine, 11|" loug, 7 7-16' wide, 1/2" thick; 2 pieces felt, 11 7/8" long, 7 7-16" wide, 1-16" thick; 1 piece glass 15 1/4" long, 12$'" wide, 3-16" thick. Springs - 2 pieces spring brass 12 1/2" long, 1 1/2" wide, 1-16" thick; 4 pieces sheet steel 3" long, 1 1/2" wide, 1-32" thick; 2 brass wood screws, round head, 1/2", No. 9; 8 bright iron wood screws, flat head, 1", No. 7; 2 brass hinges 1 1/2" long, 1 1/4" wide, when open; 8 brass wood screws, flat head (to fit hinges) \" long.
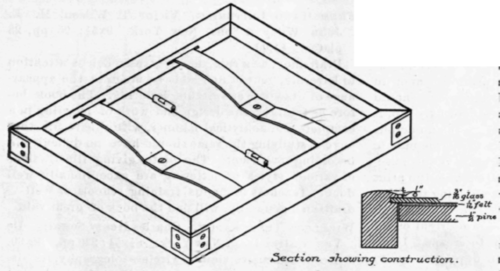
After the four pieces of cherry have been planed to the required size, one broad surface, or side of each piece, should be numbered 1, and one of the narrow sides adjacent to this (known as the "joint side") should be numbered 2, then gauge a line on each No. 1 side which shall be 1/4" from and parallel with, side No. 2; following this with another gauged line 3-16" beyond the first one (or 7-16" "from the joint side',). The space between these two lines should next be rabbetted out to a depth of J", either on a circular saw or wih a small chisel or router-plane, thus forming a groove into which the glass is to be fitted. The No. 2 edge of each piece is now to be rounded off with plane and sandpapered, the rounding extending down on either side to a distance of 1/8" as shown in the sectional view. The frame is now ready to be mitred together, and if it is possible to get access to a mitre box the resulting cuts will be far more accurate than they otherwise would be. The four pieces of sheet steel, 3x 1 1/2xl-32", should now be bent to form perfect right angle braces, and two countersunk holes bored in each leg about 1" from and parallel with the corner of the angle. These holes should be bored for the 1" No. 7 wood screws, and the counters should be on the outside. The two long sides of the frame should now have two grooves in each, on the No. 1 side, to receive the ends of the brass springs. The measurements are as follows: Gauge a line on sides No. 1 just 1 7-16" from the No. 2 edge, and another parallel line|r"from the firstone, then meas-siire in 3" from each extreme end and again measure 4" further in from each of the marks just made, hus forming two spaces 4" long by "wide. Rabbet these out with a small chisel to a depth of 1/2", then thoroughly sandpaper each piece, using Nor \\ and 0 sandpaper, not, however, touching the mitred ends with sandpaper, as jointed surfaces intended to be brought together should never be sandpapered. The plate of glass should now be inserted into the rabbet of all four sides, the frame clamped closely together without the necessity of using nails, dowels or glue.
The 1/2 pine "backs" should next be finished as per schedule, and to these should be glued the pieces of felt, then the two pieces should be hinged together •with just the joints of the hinges showing, as per illustration. The distance of hinges from sides of frame is entirely a matter of judgement, depending upon the size of the frame.
The brass springs are next in order, to be made as follows: Measure in 5 1/2" from each end and square a line across the width of the piece. From these lines bend the ends of the piece upward uutil, when the central flat space (which will be 1 1/2" square) is held firmly on the bench, each end will be 1 1/4" above the surface of the bench. Then bore a hole through the exact centre of the \\" square resting surface for a 1/2" No. 9 screw, and screw in place, allowing just enough "play" for the springs to be swung in and out of the slots freely. If the tension on these springs is too great or too little, it can be remedied by increasing the height of the bend. This bending, by the way, should be done straight, not curved in any way.
With this, as with other articles of this nature, the matter of size is governed entirely by the character of the work for which the frame is to be used, but for general use the size mentioned here, 12x15" inside, is very desirable. If desired, one or two coats of white shellac may be applied to the frame, though with cherry one coat of oil is just as useful.
Continue to:
My Books

