


Chapter 13. Projects For Home Improvement
Description
This section is from the book "Do It Yourself With Aluminum. 125 Projects For The Home Craftsman", by G. W. Birdsall. Also available from Amazon: Do It Yourself With Aluminum.
Chapter 13. Projects For Home Improvement
Screen-storage Rack (Fig. 13-1) stores screens or storm windows overhead in garage or basement. Vertical supports are 2 x 4's nailed to ceiling joists in garage or underside of floor joists in basement. Measure screens or windows, and make the distance between supports equal to their width plus for side clearance. Nail 1 x 2's across bottom ends of vertical supports to keep them from spreading.
The slides are 1/16" x 1" x 1" aluminum angle, attached to the supports by drilling 5/32" holes and countersinking so #8 x 3/4" aluminum screws will seat flush. Space the slides 1/4" apart (11/4W between horizontal faces).
To hold narrow screens or windows, add more vertical supports inside original verticals as shown in Fig. 13-1.
Partition (Fig. 13-2) makes an attractive unit to divide off various areas in the basement, rumpus room, office, or workshop. The panels are ordinary corrugated aluminum such as is used for roofing or siding. Or they may be panels with small holes perforated in them .... known as acoustical panels.
In either case, paint them with a flat paint in a soft color to match your decorative scheme, or retain the original bright aluminum finish and avoid finger marking by applying a coat of wax.
Vertical supports are 1" or 11/4" tube which can be mounted directly into the floor and ceiling or fitted into 2" x 4" pieces which in turn mount to floor and ceiling. Join tubes end to end where necessary per Fig. 4-63.
Sheet-metal self-tapping screws are excellent for securing the panels to the tube.
To obtain sound deadening, use two of the perforated panels with a layer of glass wool or other acoustical material sandwiched in between them. Do not apply paint to such an assembly .... paint the panels before assembling.
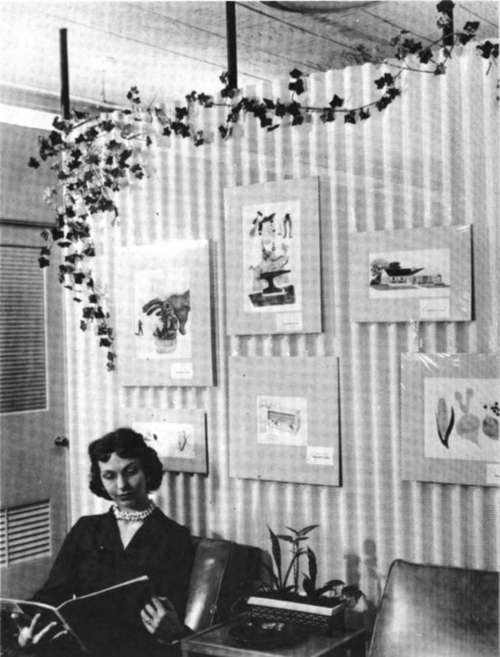
Fig. 13-2.
Card Table Renovated
To hide the battered top of your old card table, cover it with leather-grained embossed aluminum sheet. Then hot dishes or wet glasses can be set directly on the top without damaging it. Stains and spilled food wipe up in a jiffy.
Place embossed aluminum sheet face down on floor, and lay table, top down, over it as shown in Fig. 13-3. Allow sufficient material around each side to fold over the frame as shown in the cross section at the top. Notch corners and around legs and brackets. Bend up first flange along sides, using a hammer and wood block as shown. Tap corners gently to smooth edges. Secure to frame with screws. Bend aluminum over and down inside frame to avoid catching on clothes.

Fig. 13-3.
Finish by coating top and sides with clear lacquer or paste wax, polished well.
Hi-Fi Radio-Phonocraph (Fig. 13-4) is simple to construct with 3/4" plywood lacquered in black and with satin-finished frame of 1/16" x 1" x 1" angle. See Fig. 4—37 for corner bends. Front instrument panel is Masonite, painted white. Ornamental aluminum strips above radio dial and below amplifier controls at left are plain aluminum sheets, cemented to Masonite, scratch-marked into squares, and swirled by rubbing with circular strokes in each square, per Fig. 5-3.
Fig. 13-4.
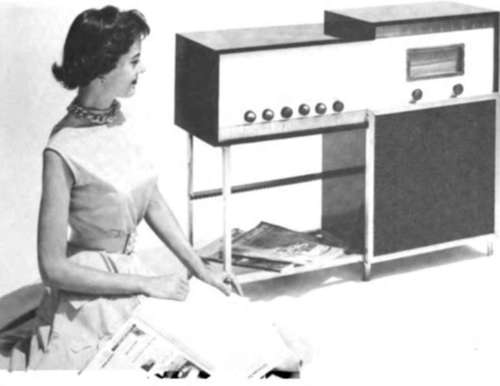
Cabinet is dimensioned according to your equipment. Leave the bottom of speaker cabinet open to avoid cabinet resonance. It is important to line the speaker cabinet with 1" or 2" layer of glass wool or other acoustic material.
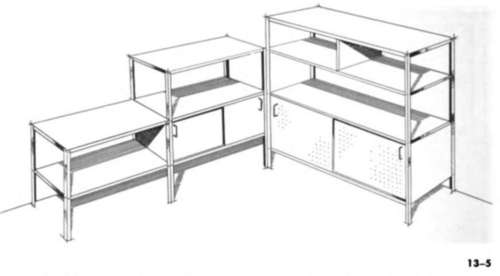
Modular Cabinets (Fig. 13-5) offer endless design combinations. Height and length can be varied. Sections can be fitted with or without doors .... either sliding (see Fig. 4-82) or hinge type. But to get the benefit of modular design and use material efficiently, make them all 12" deep, front to back, and make them either 3' or 4' long. If made as individual units, they can easily be rearranged for various room groupings. Left unit is 3' high; right, 4' high.
Make legs of either 1/8" x 3/4" x 3/4" or 1/16" x 1" x 1" angle, using the same size for all your units. Frame top shelf with the same angle if you wish. All shelves and panels are 3/4" plywood. Include in each cabinet at least one full box section. Back panel will then provide lateral rigidity; end panels, the front-to-back rigidity needed for a steady structure. This eliminates the need for braces.
Shelf heights should match for all your units, although box sections may differ. Here the right unit has an 18" high box (outside) 4" from floor, 14" to top of next shelf, 12" more to top of cabinet. The left cabinet has a 16" high box 6" from floor. Turn leg ends under to avoid digging into floor, per Fig. 4-49.
Kick Plates help protect lower parts of outside doors, and especially the inside of screen doors where the youngsters kick them open. Cover these areas with an attractive sheet of embossed aluminum, nailed or screwed in place.
Stair Rails are an important safety item. Equip every stairway in your house with rails of 11/4" aluminum tube, attached to the wall per Fig. 4-79. Close open ends with snap-in plugs available at all Do-It-Yourself Aluminum outlets, or fit wood dowels.
Handles for everything from garbage cans to toolboxes, as well as door handles, shelf braces, etc., are easy to make to order. Select a piece of aluminum tube; 3/4" size is usually most convenient. Flatten both ends, and bend to form handle. Screw or rivet to object desired. Or another type handle is made by flattening 3/4" tube enough so that 1/8" x 3/4" bar can be inserted. Bend ends of bar down to form attachment, and screw or rivet to object.
Screens for all windows in your house are easy to make with special screen sections found in all Do-It-Yourself Aluminum racks. Corners are made simply by pushing clips into hollow frame members. Complete instructions are available there free and are not duplicated here because of space limitations. Investigate this easy-to-make framing system. There is no tacking of screen wire, as wedges lock screen into frames (see Fig. 13-6).
Continue to:


My Books

