How To Make A Safety Guard For A Circular Saw
Description
This section is from the book "Cassell's Cyclopaedia Of Mechanics", by Paul N. Hasluck. Also available from Amazon: Cassell's Cyclopaedia Of Mechanics.
How To Make A Safety Guard For A Circular Saw
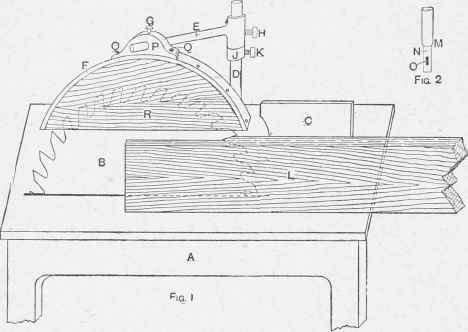
The liability to accident by timber being thrown from the circular saw has necessitated the provision of safety guards. The guard about to be described is simple in construction, efficient, and comparatively inexpensive. Fig. 1 of the acompanying illustrations shows a saw bench with a suitable guard fixed in position; A is the bench, B the saw, C the fence, D a pillar, E radial arm, F the guard hung to the arm and secured by means of a small pin G. The radial arm is held in position by means of a set-screw H. By easing this screw the guard may be turned back out of the way while screws are being changed, or while a saw is being topped in the bench. Immediately underneath the socket of the radial arm there is a collar washer J, which is also held in place by means of a set-screw K. The advantage of this washer is that when the set-screw that secures the radial arm is eased, the washer prevents the socket of the arm from sliding down the pillar. If there were no washer, the left hand would have to be used for holding the arm so as to prevent it sliding down the pillar, when the guard would drop on to the saw. L indicates a piece of timber partly cut by the saw. It will be seen that the guard does not come down on to the piece that is being sawn. The sawyer is therefore able to see the tooth in the cut. This is an important point; for if nothing can be seen of the teeth or cut (as is the case with some guards), it is impossible for the sawyer to see whether the saw is making a true course or not.
It will also be seen that this guard may be raised or lowered to suit timber of different depths. There should be two or three guards of different sizes for saws of various diameters. The same radial arm will answer for all the guards. The iron pillar D (Fig. 1, and illustrated by Fig. 2) should be of suitable length, and about l 1/2 in. in diameter. At M there is a shoulder that rests square on the top of the table. The part N is square, and there is a cotter-way 0 to receive a small cotter. Near the outer edge of the table a square hole is made by first boring a hole and then filing it square. The square part N of the pillar should fit nicely in this hole. A cotter is then driven in the cotter-way, which holds the pillar firmly in position. The square prevents the pillar from turning in any direction. The guard F (Fig. 1) is a piece of wrought iron about 1 3/4 in. wide by 3/16 in. thick, and of suitable length, and drilled to receive the necessary screws and rivets, or small bolts with nuts (sea Fig. 1). This piece of iron is bent to the required curve. A piece of iron is now made to the shape shown at P (Fig. 1), or any convenient shape. A hole is made at the centre to receive the radial arm E, and another hole drilled at the top down through the centre to receive a pin that passes down through it and the radial arm, thus securing the guard to the arm. Holes should also be drilled at the ends to secure the piece to the guard by means of small rivets or bolts, shown at Q (Fig. 1), passed through holes in the guard and riveted, or the nuts screwed up tightly, as the case may be. A piece of wood tin. or 1/2 in. thick is now shaped as shown at R (Fig. 1); the bent piece of iron or guard is screwed to this. This piece of wood not only protects the saw but also makes the guard more rigid. The guard is now completed, and when shifting guards, all that has to be done is to withdraw the pin (:, place the other guard on the arm, and insert the pin lower, or raise the guard, as the case may be, to suit the diameter of saw or depth of piece that is being sawn.
Making a Safety Guard for a Circular Saw.
Continue to:
My Books

