How To Make A Removable Tile Hearth
Description
This section is from the book "Cassell's Cyclopaedia Of Mechanics", by Paul N. Hasluck. Also available from Amazon: Cassell's Cyclopaedia Of Mechanics.
How To Make A Removable Tile Hearth
In the under consideration it is not necessary to take out the stove before the tile hearth can be laid, and another advantage is that the hearth is easily removed when occasion requires. The tiles should each not be less than 3in. square, but ordinary designs can now be got in 6 in. tiles; plain 6-in. tiles coloured teapot brown, butt', peacock blue, etc., to harmonise with the general colour of the room. are. however, recommended in place of the design. Fig. 1 shows an iron curb or tender that can be bought of almost any size for any ordinary fireplace. Fig. 2 is a plan of the hearth it is wished to convert, and Fig. 3 shows the curb or fender in position resting on the floor hoards just, up to the hearth. Two countersunk holes are first drilled through the top of the curb, as shown at A A (Fig. 3i, and the curb is screwed down to the floor with two long wood screws, with the heads flush with the top of the curb. The fender or curb is thus easily removable, being secured to the woolwork of flooring by only two screws. These curbs, shown in section by Fig. 4, are about 3 in. high, so that there is plenty of room inside the curb to bed the tiles directly on to the existing hearth and leave a 2-in. projection or curb round. The curbs can be bought from about 4s. each unjapauned: they are made in a variety of desigus. but a plain curb with bevelled edges looks very well. It is desirable to buy it unblacked and black it wheu it is in position and the hearth is laid. The tiles may now be put in their places, as showu iu Fig. 5, cutting and fitting those that require it. To cut the tiles, cut through the glaze on the top with a small steel chisel about 4in. long and 1/4in. wide on the cutting edge, and then tap smartly along this cut on the back of the tile with a small hammer. After a little practice they will be found to break quite easily. The tiles should not fit too tightly, and a space of about 1.16in. should be at each joint. If any of the tiles require a piece taken right out of them, it is simpler to cut them straight across and then cut the small pieces off afterwards; the joint will hardly be noticed if no cement gets into it whilst laying. When the tiles have been cut and fitted, take them up and put them into apail of water, pencilling a number on the back of each so that they may be returned to their correct positions. Before preparing the cement bed to receive the tiles, try the hearth to see if it is level. Make a "screed," as it is called, out of any piece of wood about '.in. thick; cutout at each end so that the ends rest on the top of the iron curb, and the body just clears the hearth by about fin. (see Fig. 4). It will be seen that by working this backwards and forwards, keeping the ends hard down on the fender, it will screed or scrape the cement bed to a level surface, and the back part can easily be worked to the same level. Next mix up in a pail some neat Portland cement rather soft, and float over the whole of the hearth, screediug it down to a level surface. Lay all the tiles quickly and lightly on the surface of the cement, and pat them down evenly to a level surface with a piece of wood. If any of them are too low, or do not lied, they can be easily picked up with the point of a trowel inserted in the joint, and a little cement can be added or taken away as required; the tile can then be re-bedded. After the tiles are all bedded, with a rag rub some stiff cement well into the joints and then polish the tiles with a dry cloth.
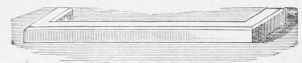
Fig. 1.
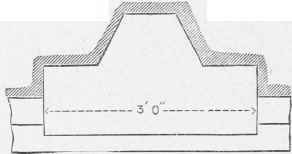
Fig. 2.
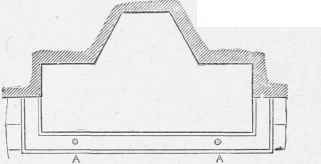
Fig. 3.
Fig. 4.
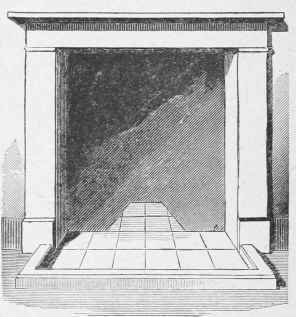
Fig. 5. A Removable Tile Hearth.
Continue to:
My Books

