How To Cut Shoe Finishers' Irons
Description
This section is from the book "Cassell's Cyclopaedia Of Mechanics", by Paul N. Hasluck. Also available from Amazon: Cassell's Cyclopaedia Of Mechanics.
How To Cut Shoe Finishers' Irons
Irons for ironing up the edges of boots and shoes are of various forms, a few of which are shown in the illustrations. They will serve a- examples of how irons should be made and recut. The iron is of such importance to the finishing of all classes of work that it is worth while to learn how to cut kit, as it is called, especially by those who are at a distance from any large town. If new irons are to be made, stocks for them must be procured; these stocks are oblong pieces of squared iron, which are ultimately shaped as shown in Figs. 1. 2, 3, and 4, each iron having a stem at the bottom that can be driven into a handle. The better way, however, is to buy the irons already shaped, as they are very cheap, and then a careful recutting produces a good iron. Stocks for some of the smaller irons can be made from the butt or shank ends of files or rasps. A small vice and the necessary tiles are the toots required. Fig. 1, in which the crease or indentation B produces a bead on the edge of the sole, can be made like all irons of that kind, single and double, in sets in various sizes. The same remark applies to Fig. 2, but in the latter an indentation or crease is thrown upon the welt side. If these two irons are combined in one, the crease at Fig. 1 being placed at C in Fig. 2, a double iron is produced, and a set of such irons would be very useful They can run up to almost any size, by widening the space between C and D (Fig. 2) from 1/8 in. upwards, increasing the space by 1/32 in. for each size. Fig. 3 is somewhat like Fig. 1, but with a slightly flatter top. It shows a double pump iron, which is made to fit. two thicknesses of edges; it is, in fact, two irons in one, and being larger than one iron only, it retains heat for a longer time. In Fig. 4 the curve marked F can be modified as required; being a waist iron, it is used to set up edges of all kinds, some of which are thin and square, others round, and others of various angles. The files can be bought in sets; they are called kit files, and can be obtained probably at almost any leather grindery stores. These files consist of a four-cornered file, a flat four-sided bastard file, a tapered file, a knife-shaped file, a small rat-tail file, and a triangular file. Jewellers' files of various shapes may also be used, and they come in very handy for cutting different fancy shapes. The rough cutting can be done with coarse tiles, and the finishing of the shaping process with finer files, a last touch being given with tine kit files. When the proper shape has been obtained the creases can be cut, or the beads squared up with the tapered file, the knife-shaped file, and the small rat-tail file, and the square beads finished with the triangular file. So far, the iron has only been shaped up and roughly finished as far as files can do it; the final finishing and polishing are done with emery powder.
Coarse, medium, and flour emery are mixed with oil, the paste being smeared on pieces of leather and the iron rubbed upon it; the coarse emery is followed by the medium and then by the flour emery, the finishing being done with dry flour emery. If the iron is for setting up a stout edge, several pieces of leather are nailed together, and the emery smeared oh the topmost one. During the filing operations the greatest Bare must be taken not to wear away the creases and beads.
Fig. I.
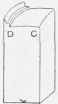
Fig. 2.

Fig. 3.
Fig. 4. Shoe Finishers' Irons.
Continue to:
My Books

