An Easily-Made Snow Plough
Description
This section is from the book "Cassell's Cyclopaedia Of Mechanics", by Paul N. Hasluck. Also available from Amazon: Cassell's Cyclopaedia Of Mechanics.
An Easily-Made Snow Plough
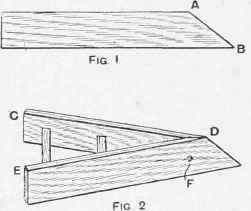
For the construction of the snow plough here illustrated, two elm slabs about 5ft. by 10 in. by l 1/2in. are required; the planks might be longer and wider with advantage. Cut one end of each plank as at AB (Fig. 1); then place it on the second, and draw a line along A B as a guide by which to cut the second. Place the planks edgeways, as in Fig. 2, and decide the angle at which to fix them. A suitable angle will make the ends C and E 2 ft. 6 in. or 3 ft. apart. Lay E F edgeways on the edge of C B at D at the proper angle, and mark the bevel at B. Then, having fixed CB edgeways, cut down this bevel line with a saw. EF, when placed against this bevel, will now form the angle required, the outer edge being bevelled to a sharp edge. Two strong pieces of wood should then be cut to the length of the cross rails. Place all in position before nailing together, and mark with a pencil the ends of the rails on both planks. Then bore holes from the inside to the marks, and, when all is ready, nail the side pieces together with 3-in. or 4-in. wire nails. Place the rails in position, and nail from the outside through the holes already made. A piece of tin, such as a tin canister flattened out, will, if nailed on the front edge at B, ease the passage through the snow. A strong staple should be placed at each side, as at F, for harnessing a pony or horse to draw the plough. "When in use, some heavy logs or a box of stones should be tied on the plough to prevent it rising over the snow.
An Easily-made Snow Plough.
Continue to:
My Books

