Me. 109g. Famed Nazi Fighter
Description
This section is from the book "Boy's Fun Book Of Things To Make And Do", by Grosset & Dunlap Publishers. Also see: The Pocket Dangerous Book for Boys: Things to Do.
Me. 109g. Famed Nazi Fighter
THE Messerschmitt Me. 109-renowned Luftwaffe fighter-is the German counterpart of the English Spitfire. It is powered with a liquid-cooled in-line engine of about 1,200 horsepower, which gives a maximum speed of nearly 375 m.p.h. and a rate of climb in excess of 3,000 feet per minute. Extremely maneuverable, it is at its best at high altitudes, where it is employed for interceptor purposes. The first 109 was used years ago in the Spanish Civil War. Since then it has gone through many changes, culminating in the 109G.
This model makes an attractive modern addition to your home or office. Together with planes already described, it is ideal for use in aircraft-identification classes because students learn the important identification points in three-dimensional form, rather than from a comparatively unreal flat orthographic drawing.
Construction closely follows that of the other models in this series (see, for example, the model Mustang, page 178) so only those points that are especially unique and applicable to the Messerschmitt are given here.
The two wing panels are made in one piece, then cut apart and glued or cemented to the fuselage. They are held firmly in place by boring a hole through the fuselage and running a dowel through the hole so the ends stick out about 1/2" on each side, then sharpening these ends and forcing the wing panels onto the points. Make the fillets around the wing-panel roots from wood putty or a mix of talcum and dope.
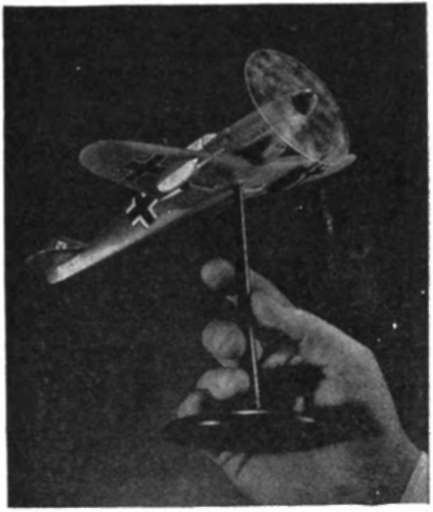
Readily apparent in this picture is the graceful fuselage line of the Messerschmitt. Plane spotters use such characteristics for recognition purposes.
Paint the top surfaces of the completed model a dull greenish brown and the undersides a light blue. Finish the cockpit in white and add the details with black India ink and a ruling pen. The propeller is a celluloid disk. The stand may be bought from a model-supply house or made up from a simple turning and a piece of dowel.
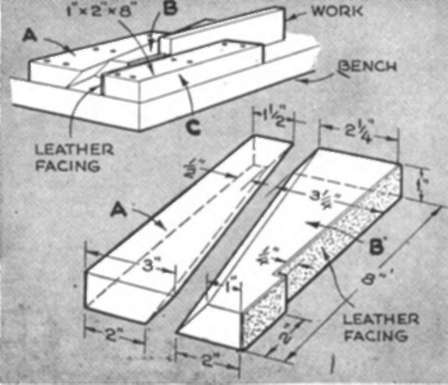
Useful Bench Clamp Is Made From Hardwood And Scrap Material
THIS bench clamp is simple to make and easy to use. Since it is mounted on the bench top, work can be uniformly supported throughout its length. Thus in some cases it is better to use the clamp than a conventional vise, which allows the ends of long work to sag. A notch in the wedge is for clamping material more than 1" thick. The wedge and one of the stationary pieces are faced with leather, as indicated, to prevent marring delicate work. Make the three pieces from hardwood, taking particular care when cutting the bevel. Fasten the wedge to the bench with a leather thong so it won't be misplaced and firmly secure the other two pieces in place with flathead, countersunk wood screws. Try several locations before mounting the clamp.
Continue to:
My Books

